The real challenges aren't the angle itself. They're fall hazard management, precision structural attachment, and California's permitting requirements. Errors on steep roofs — missed rafters, improper flashing, under-torqued fasteners — result in leaks, failed inspections, voided warranties, and serious safety incidents.
This guide walks through the complete installation process so you know exactly what correct work looks like. That said, be clear from the start: steep roof solar installation is not a DIY project. It requires licensed professionals with both roofing and solar expertise working together.
Key Takeaways
- Roofs up to approximately 40° (9:12–10:12 pitch) can support solar; steeper than that becomes impractical and unsafe
- Flush-mount rail systems are the right approach — no tilt hardware needed since the pitch provides the angle
- Every attachment must anchor into a rafter, not sheathing alone, and be properly flashed
- California requires a building permit for all solar installations; utility Permission to Operate (PTO) must be obtained separately before grid activation
- Use a contractor with both roofing and solar expertise — tile roofs across LA and the San Gabriel Valley require that dual knowledge
Prerequisites and Safety Considerations
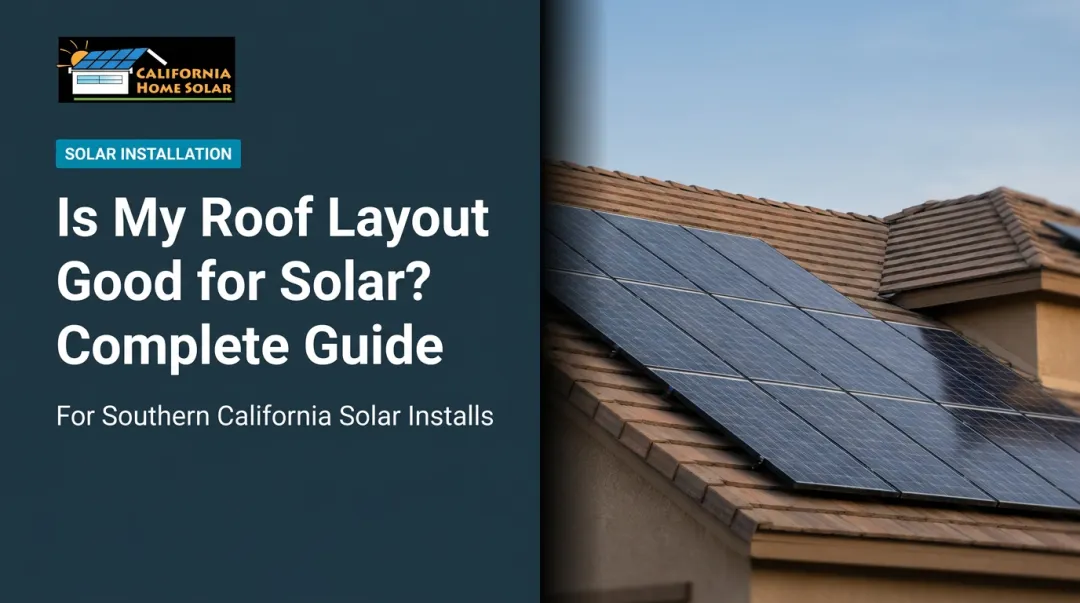
The Viable Pitch Range
The NRCA classifies any roof above 3:12 (14°) as steep-slope. For solar installation, pitches from 4:12 to 9:12 (roughly 18°–37°) work well with flush-mount systems. Beyond 10:12 (~40°), it becomes extremely difficult to maintain an efficient panel orientation, and installer fall risk increases dramatically. Treat 40° as the practical upper limit.
Roof Condition and Structural Readiness
Before installation begins, assess:
- Remaining lifespan — DOE estimates PV systems now operate for 25–35 years; your roof covering needs to match that lifespan, or re-roofing should happen first
- Rafter condition — inspect from the attic for any deterioration, pest damage, or compromised members before scheduling installation
- Sun exposure — the south-facing roof surface needs at least 5–6 hours of direct daily sunlight; LA neighborhood trees and adjacent structures can create more shading than homeowners expect
- Structural criteria — LA County's small residential PV screening criteria require flush-mounted arrays on wood-framed homes to weigh no more than 4 psf, maintain a 2–10 inch roof gap, and cover no more than half the total roof area
Fall Protection Requirements
According to BLS data, construction accounted for 47.8% of all fatal falls in 2023, with roofing contractors accounting for 110 deaths. Fall protection on steep roofs isn't a suggestion — it's a legal requirement.
Cal/OSHA requirements for residential roofing work vary by pitch and height:
- 3:12 to 7:12 pitch: Fall protection required when eave height exceeds 15 feet
- Above 7:12 pitch: Employees must be protected regardless of height — catch platforms or personal fall arrest systems
- Federal OSHA 29 CFR 1926.501(b)(13): Fall protection required at 6 feet or more for residential construction
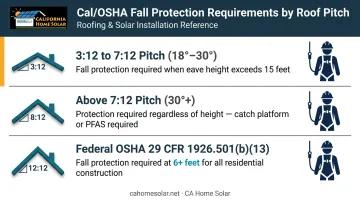
Pitches above 7:12 typically require scaffolding or a staging system in addition to personal fall arrest equipment.
Permit and Utility Coordination
California requires a building permit for residential solar in virtually all jurisdictions under Government Code 65850.5. The submittal includes structural load calculations, electrical plans, and equipment specs — especially critical on steep roofs where wind and seismic forces are higher.
Utility interconnection is handled separately from the building permit. SCE requires Permission to Operate (PTO) before activation — most customers receive it within 10 business days, while complete applications can be processed in 2–3 business days. LADWP follows its own NEM guidelines and inspection requirements.
HOA approval may also apply in many LA-area communities. Under California Civil Code 714, HOAs cannot effectively prohibit solar, and any enforceable restriction cannot increase your cost by more than $1,000 or reduce system efficiency by more than 10%.
Do not proceed if: the roof has active leaks or significant damage, pitch exceeds 40°, rafter structure is compromised, the south-facing surface is substantially shaded during peak hours, or permits have not been obtained.
Tools and Materials Required
Essential Tools
- Safety harness, certified roof anchors, and rated safety line
- Cordless drill with Torx/hex driver bits
- Torque wrench (for verifying fastener installation to manufacturer spec)
- Chalk line and laser level
- Rafter-finding tools: strong magnets, stud finder, or small probe drill
- Caulking gun and flashing template
Core Materials
- Rail mounting system: L-feet or standoffs, aluminum rails, mid-clamps and end-clamps
- Fasteners: Lag bolts or structural screws sized for appropriate rafter penetration — depths are product-specific; follow the manufacturer's installation manual
- Flashing: EPDM rubber flashing for shingle roofs; tile hook flashing mounts for the concrete and clay tile roofs common across Southern California — use purpose-built mounts only
- Sealant: UV-rated exterior sealant as a secondary barrier
- Electrical: Microinverters or string inverter, conduit, junction box, grounding hardware per the 2025 California Electrical Code (based on the 2023 NEC)
What You Don't Need on Steep Roofs
Ballast systems, tilt frames, and standing racking structures are for flat and low-slope applications. On a steep roof, the pitch itself provides the tilt. That means a shorter material list and less structural load on the roof deck.
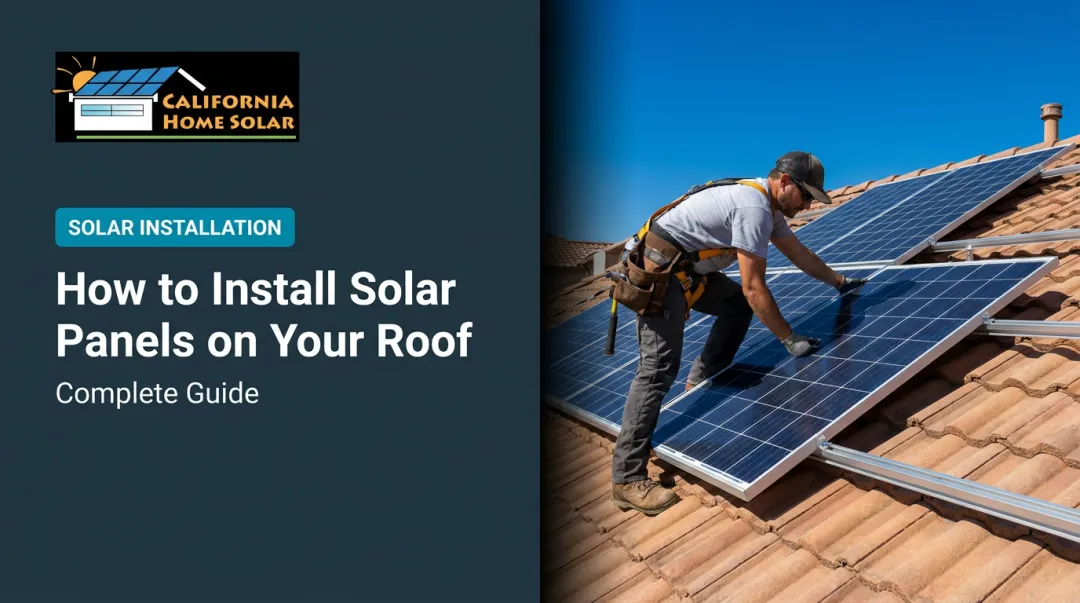
How to Install Solar Panels on a Steep Roof: Step-by-Step
The sequence below is non-negotiable. Skipping steps — particularly rafter confirmation and flashing — is the primary cause of costly rework on steep roof solar jobs.
Step 1 – Locate rafters and plan the array layout
Start from the attic. Identify rafter centerlines and measure spacing, then confirm their location from the roof surface using magnetic, percussion, or probing methods. For the array layout:
- Center the array on the roof face
- Maintain at least 18 inches of clearance at all edges and the bottom
- Map every L-foot attachment point directly over a confirmed rafter centerline — not sheathing alone
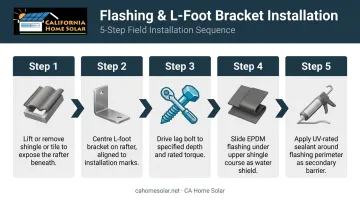
Step 2 – Install flashing and L-feet brackets
At each attachment point:
- Lift or remove the overlying shingle or tile
- Position the L-foot bracket centered on the rafter
- Drive the lag bolt into the center-third of the rafter to manufacturer-specified depth and torque
- Slide EPDM or step flashing under the upper course of shingles, covering the penetration
- Apply UV-rated sealant around the penetration as a secondary barrier
For concrete or clay tile roofs, use purpose-built tile hook mounts designed to lift tiles without cracking them. Cracked tiles are a primary source of leak callbacks, and improvised attachment methods cause nearly all of them.
Step 3 – Mount rails and verify level
Attach aluminum rails to the installed L-feet. Use a chalk line or laser level to confirm rails are level horizontally across the full array width. Unlevel rails cause panel misalignment and water pooling at panel frames — both are costly to fix after the array is complete. Shim where rafter positioning creates height variation, then torque all rail-to-L-foot connections to spec before moving to panels.
Step 4 – Install panels and electrical wiring
Slide panels into the rail system starting from the bottom row upward. Secure with mid-clamps between adjacent panels and end-clamps at array edges.
Connect DC wiring per the system design:
- Microinverter systems: connect panel by panel
- String inverter systems: connect panels in series
Run conduit along rails or down the roof edge to the inverter using conduit mounts to keep wiring secure and code-compliant.
Step 5 – Complete electrical integration
Connect DC wiring from panels to the inverter, then connect inverter output to the main service panel through a dedicated breaker and disconnect. All work must comply with the California Electrical Code. In most California jurisdictions, this step must be performed by or directly supervised by a licensed electrician. Confirm proper grounding throughout the array per code before closing up. If you're uncertain about any part of the electrical scope, a licensed solar contractor can handle permitting, inspection coordination, and final sign-off as part of a full installation — which is how most Southern California homeowners approach steep-roof jobs.
Post-Installation Checks and Validation
Visual Inspection Before Coming Down
With safety gear still in place, inspect every mount point for:
- Correct flashing position with no lifted shingles or cracked tiles
- Rails seated flush with no visible gaps
- From the attic interior: any pinpoints of daylight at penetration locations require correction before you come down
Permit Inspection and Grid Connection
The local building department and utility must inspect the system before it can be activated. In California, this is a legal requirement. Do not energize a grid-tied system before receiving both the building department final inspection sign-off and utility PTO.
Unpermitted systems carry serious consequences:
- Mandatory removal orders from the building department
- Complications with homeowner's insurance claims
- Disclosure obligations that can derail a property sale
System Activation and Output Verification
With both approvals confirmed, power up the system and verify production through the monitoring platform. Confirm each panel or microinverter reports output within the expected range for time of day, season, and roof orientation. Zero-output panels or string-level dropouts indicate a wiring or connection issue that must be resolved before sign-off.
Common Installation Problems on Steep Roofs and How to Fix Them
These three problems account for the majority of callbacks on steep-roof solar jobs. Each has a clear cause and a correct fix — no guesswork required.
Roof Leaks at Flashing Points
Problem: Water infiltration at lag bolt penetrations, typically noticed during heavy rain.
Cause: Flashing placed over the shingle rather than under the upper course, or sealant applied as the only waterproofing without proper mechanical flashing — common when a solar-only installer unfamiliar with roofing handles penetrations.
Fix: Remove the affected L-foot, correctly reposition step flashing under the upper shingle course, re-drive the fastener into the confirmed rafter, and reapply sealant. Applying more caulk over an improperly flashed mount is not a fix. The leak will return.
Rail Misalignment Across the Array
Problem: Panels don't sit flat, rails bow or sag, or a visible step appears between panel rows.
Cause: L-feet installed at different heights without checking level, or attachment points drifting off rafter centerlines at different elevations on a steep roof.
Fix: Loosen rail-to-L-foot connections and re-establish a horizontal reference line with a chalk line or laser level. Shim L-feet where needed to achieve a uniform plane, then retighten all connections to torque spec before remounting panels.
Fastener Pull-Out Under Wind Load
Problem: A mounting bracket pulls away from the roof — particularly relevant in Southern California's Santa Ana wind zones.
Cause: Lag bolt driven into the rafter edge, a knot, or sheathing only without engaging the rafter. Under-torqued structural screws can also back out under repeated wind loading.
Fix: Start by relocating the attachment to a confirmed rafter centerline. Use the correct fastener diameter and embedment depth for the rafter species, and drive to the torque the mounting system manufacturer specifies. In designated high-wind zones — including much of Los Angeles and Orange County — consult a structural engineer to verify the attachment pattern before installation begins.
Pro Tips for Installing Solar on a Steep Roof
Finalize the entire design from the ground before anyone ascends. Confirm panel count, row configuration, rafter positions, conduit path, and equipment locations using attic access, satellite imagery, and structural drawings. On steep roofs, every unnecessary trip up and down adds fall risk and time. A fully resolved design means the crew goes up with a clear plan.
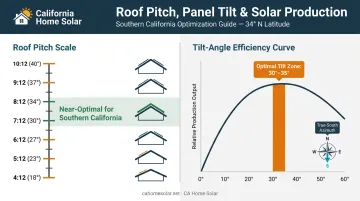
Use the pitch as a production advantage. South-facing roofs in the 7:12–8:12 range sit at approximately 30°–34° tilt — near optimal angle for Southern California's latitude of roughly 34° North. A flush-mounted steep roof array at this pitch can match or outperform a flat roof installation that requires tilt frames. Confirm azimuth before finalizing the layout; true south-facing surfaces deliver the highest annual output.
Verify your contractor handles both roofing and solar. Tile roofs — among the most common roof types across Los Angeles, Pasadena, and the San Gabriel Valley — require roofing knowledge alongside solar installation skill. A contractor who handles structural assessment, roofing integrity, solar mounting, and California permit navigation in one coordinated process avoids the gaps that cause the most common steep roof installation failures.
CA Home Solar, recognized as a Solar Power World Top 500 Solar Contractor with 36 years serving Southern California, covers that full scope: from the initial assessment through Permission to Operate.
Conclusion
A steep roof is not a barrier to solar in Southern California. But the combination of fall risk, precision structural attachment, California permit requirements, and tile roof complexity makes professional installation the right call for every homeowner.
Start with a qualified roof and solar assessment to confirm pitch, structural condition, and sun exposure. From there, ensure every phase — rafter confirmation, flashing, electrical integration, and utility interconnection — is documented and inspected before the system is considered complete. A contractor familiar with Southern California's Title 24 requirements and local tile roof conditions — like the team at California Home Solar — can walk you through that process from the first site visit to final utility sign-off.
Frequently Asked Questions
How steep is too steep for solar panels?
The practical limit is approximately 40° (10:12 pitch). Above that, flush-mounting panels becomes inefficient and installer fall risk reaches levels that disqualify standard residential work.
What is the best roof pitch for solar panels?
For Southern California's latitude of approximately 34° North, an optimal panel tilt of 30°–35° is ideal. This corresponds to roughly a 7:12–8:12 roof pitch, meaning many steep roofs in the LA area naturally deliver near-optimal annual production with a flush-mount system.
Do I need a permit to install solar panels in California?
Yes. California solar installations require three separate approvals:
- Building permit under Government Code 65850.5 (required in virtually all jurisdictions)
- Utility Permission to Operate from SCE or LADWP before grid activation
- HOA approval, if applicable in your LA-area community
Can solar panels be installed on a tile roof?
Yes. Concrete and clay tile roofs common across Southern California can support solar panels, but they require specialized tile hook flashing mounts. Tiles must be carefully lifted without cracking during installation, which makes installer experience with tile roofs a critical selection factor.
Does roof pitch affect solar energy output?
Yes. Pitch determines tilt angle, which influences how directly sunlight strikes the panels throughout the year. In Southern California, steeper south-facing roofs can improve winter production. Roof orientation (azimuth) has an equal or greater impact. True south-facing surfaces consistently deliver the highest annual output.
Is it safe to install solar panels on a steep roof yourself?
No. Falls are the leading cause of fatal construction injuries, and steep roofs demand OSHA-compliant fall protection. California also requires permitted solar work to be performed by or supervised by a licensed contractor — the structural, roofing, and electrical complexity makes this among the riskiest residential installations to attempt without professional help.