The stakes for cutting corners are real. Poor installation produces roof leaks at penetration points, failed local inspections, voided panel or workmanship warranties, fire risks from incorrect wiring, and reduced output from shading that a proper site assessment would have caught. California Home Solar has handled these projects across Los Angeles and Orange County for 36 years — and the problems they fix most often trace back to skipped steps at the beginning.
This guide walks through every phase of a proper roof solar installation: what to assess before ordering hardware, what permits California requires, and how to execute each step without creating problems that surface years later.
Key Takeaways
- Roof solar installation requires structural assessment, watertight mounting, and licensed electrical work — in a strict sequence
- Your roof must be evaluated for age, load capacity, material type, and sun exposure before any hardware is ordered
- Installation follows four phases: site assessment, permitting, racking and panel mounting, then electrical integration
- California requires a building permit, utility interconnection agreement, and Permission to Operate (PTO) before your system can legally run
- Professional installation is strongly recommended for tile roofs, steep pitches, multi-story homes, or any project needing a panel upgrade
Before You Begin: Roof Suitability and Site Assessment
Skipping a pre-installation assessment is the single most common mistake homeowners make. It leads to costly rework, structural failures, or systems that underperform across their entire 25-year lifespan. Get this phase right before ordering a single piece of hardware.
Roof Structure and Condition
California's Solar Permitting Guidebook uses 4 psf as the maximum distributed dead load for flush-mounted rooftop PV under its expedited structural criteria. That means rafters, trusses, and roof decking all need to be evaluated against that benchmark before the layout is finalized — not after.
Roofs that are aging or showing signs of rot should be replaced before installation. Removing and reinstalling panels after a later roof replacement can cost $1,500–$6,000, depending on array size, roof height, and racking type. That's a cost worth avoiding upfront. California Home Solar handles roofing remodeling alongside solar installation, so homeowners can address an aging roof and solar prep in one coordinated project rather than managing two separate contractors.
Roof Type and Mounting Compatibility
Roof material determines mounting method, labor complexity, and leak risk. Here's how the main types compare:
| Roof Type | Mounting Method | Compatibility |
|---|---|---|
| Asphalt shingle | Lag bolt through flashing into rafters | Compatible, but penetration quality matters |
| Standing seam metal | S-5 clamps — no drilling required | Least invasive, lowest leak risk |
| Clay/concrete tile | Tile hooks with pilot holes and sealant | More labor-intensive; tiles may need removal |
| Flat/low-slope | Ballasted system, minimal penetrations | Works well; structural load and wind design are key |
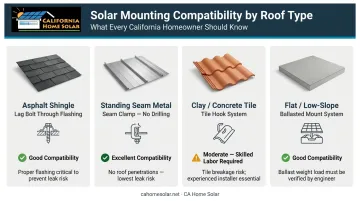
Clay, slate, and shake roofs are the most complex and expensive to work with. Fragile materials require extra labor, qualified installers can be harder to source, and any mistakes during mounting are costly to fix. Factor in added cost and schedule time if your home has these materials.
Optimal Placement and Sun Exposure
In the Northern Hemisphere, south-facing roof planes with a pitch between 15 and 40 degrees deliver the best annual production. In Southern California, west-facing orientations can also be strategically useful. SCE's TOU-D-4-9PM rate plan charges its highest summer weekday rates from 4 p.m. to 9 p.m., so panels that shift production into the late afternoon can improve bill offset even if they generate fewer total kilowatt-hours annually.
Shade is a system-killer regardless of orientation. Partial shading from a chimney, nearby tree, or rooftop equipment can cut output by 10–25% across the entire array.
Before finalizing panel placement, run a shade analysis at different times of day and across seasons. Tools like NREL's PVWatts model shade as site-specific inputs rather than a generic percentage, which makes them far more useful than rules of thumb.
Key placement factors to assess:
- Orientation: South-facing is optimal; west-facing can be strategic under TOU rate plans
- Pitch: 15–40 degrees maximizes annual yield for most California roofs
- Shading sources: Chimneys, trees, HVAC equipment, and neighboring structures
- Seasonal variation: Shading patterns shift significantly from summer to winter
Tools, Materials, and Permits Required
Hardware and Materials
Most solar kit packages include panels, inverter, and racking rails. What they typically don't include — and what you'll source separately at electrical suppliers:
- Conduit and wire
- AC/DC disconnects
- Junction boxes and breakers
- PV disconnect switch
Mounting hardware you'll need:
- Stainless steel lag bolts and aluminum mounting rails
- Stanchions, end clamps, and mid clamps
- Butyl tape, metal flashing, and self-leveling sealant
Essential tools:
- Deep-scan stud finder and chalk line
- Impact driver with correctly sized drill bits
- Level and tape measure
Fall protection is required for all roof work. Use a harness with secured anchor points and non-slip footwear before stepping onto any roof surface.
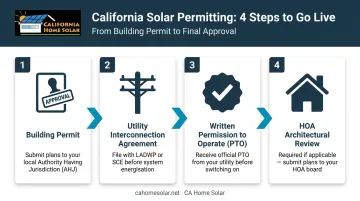
California Permit and Utility Requirements
This is where many DIY projects stall. California's permitting process is layered:
- Building permit from the local Authority Having Jurisdiction (city or county) — required for structural support of solar systems
- Utility interconnection agreement with LADWP or SCE depending on your service area
- Written Permission to Operate (PTO) before the system can legally run in parallel with the grid — SCE requires this in writing before your system goes live
- HOA architectural review if applicable
Note on HOA rules: California Civil Code 714 limits HOA restrictions to changes costing under $1,000 extra or reducing system efficiency by more than 10%.
For LA County, qualifying residential rooftop systems up to 10 kW AC target a 1–3 business day plan check turnaround — but only with a complete application. A full submission includes a site plan, roof plan, single-line electrical diagram, equipment spec sheets, and structural criteria documentation. Incomplete packages trigger revision cycles and delays.
California Home Solar handles permits, utility interconnection, and PTO coordination as part of every standard installation.
How to Install Solar Panels on Your Roof, Step by Step
Installation follows a defined sequence. Skip a step — especially waterproofing layers or torque specs — and the problems won't show up until months or years later, when they're far more expensive to fix.
Locating Rafters and Marking the Layout
Use a deep-scan stud finder or measure from inside the attic to locate rafters — typically 16" or 24" on-center in residential construction. Mark positions with chalk lines on the roof surface, then verify with small pilot holes before committing to final mount locations.
Drilling into solid rafter wood versus missing it entirely is a critical distinction. A lag bolt that misses the rafter has no holding strength and will fail under wind or snow load. Verify every location before drilling the final bolt hole.
Installing Roof Attachments and Racking Rails
The IronRidge FlashFoot2 sequence for asphalt shingles illustrates the correct approach: drill a ¼-inch pilot hole, fill with roofing-manufacturer-approved sealant, slide flashing under surrounding shingles, and fasten with a lag bolt and bonded washer. The waterproofing stack matters — butyl tape under the mount base, metal flashing over the penetration, self-leveling sealant as the final layer. Skipping any layer compromises the seal.
Once mounts are set, attach aluminum rails to stanchions using stainless steel hardware. Key details:
- Maintain consistent height across all attachment points
- Leave small gaps between rail sections for thermal expansion — Unirac notes this prevents rail buckling
- Verify the array is square by measuring corner diagonals before moving to panels
Mounting the Solar Panels
Common residential modules weigh 40–50 lbs each (Canadian Solar's KuPower at 40.8 lbs; Qcells Q.PEAK DUO at 48.5 lbs). Always work with a second person for lifting.
Install end clamps at outer rail edges and mid clamps between adjacent panels. Maintain consistent spacing between panels for airflow and heat dissipation. Torque all clamps to manufacturer specifications — over-tightening can crack mounting feet; under-tightening allows movement over time.
If using microinverters, wire them to the panel before securing the panel to the racking. Those connections become inaccessible once the panel is down.
Electrical Integration
The DC wiring path from panels to breaker panel follows this sequence:
- Panel output runs through conduit to the inverter (string inverters mount on a wall; microinverters attach under each panel)
- Wiring passes through a PV disconnect switch
- AC/DC disconnects connect to the home's main breaker panel
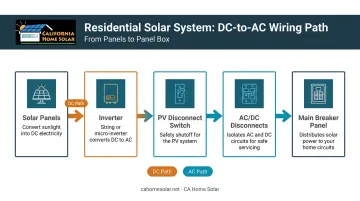
In California, this electrical work must be performed or supervised by a licensed electrician. Confirm local requirements before proceeding — requirements vary by city and utility, and the inspection will catch any non-compliant work.
Post-Installation Visual and Functional Checks
Before requesting inspection, run through this checklist:
- Visually inspect every mount, clamp, and penetration seal
- Check for cracked or displaced shingles around bolt locations
- Confirm panel alignment is even and gaps are consistent
- Power on the system and verify monitoring shows production from all panels
- Any panel showing zero output indicates a wiring or connection issue — resolve it before the inspector arrives
Common Solar Panel Installation Problems and Fixes
These three issues show up most often after residential installs — and each one has a clear fix.
Roof Leaks at Mounting Penetrations
Problem: Water infiltration at lag bolt or stanchion locations, often appearing weeks or months after installation.
Likely cause: Missing or improperly layered waterproofing — most commonly butyl tape omitted under the mount base, or flashing not correctly seated under surrounding shingles.
Fix: Remove the affected mount, clean the surface, and reinstall with the correct three-layer sequence (butyl tape → flashing → sealant). Patching over an improperly sealed mount is a short-term fix at best; the penetration needs to be properly redone.
Panels Underperforming or Showing Zero Output
Problem: Monitoring shows production below expectations, or individual panels show no output.
Likely cause: Shading missed during site assessment, incorrect series/parallel wiring, or a faulty inverter connection. NREL's PVWatts uses default system losses of around 14% to account for soiling, mismatch, wiring, and other real-world factors — if your system is falling well below that baseline, something specific is wrong.
Fix: Use monitoring data to isolate affected panels, check for new shading sources, and verify all wiring connections are correctly configured per the electrical design.
Racking Loosening Over Time
Problem: Panels or rails developing movement, especially noticeable after seasonal temperature swings.
Likely cause: Fasteners weren't torqued to specification during installation, or thermal cycling has gradually loosened connections.
Fix: Conduct an annual torque check on all lag bolts, rail-to-stanchion connections, and panel clamps using a calibrated torque wrench. Re-tighten to manufacturer specs where needed. A professional maintenance visit — like the annual service California Home Solar provides — can handle these checks systematically alongside cleaning.
Pro Tips for Installing Solar Panels Effectively
Timing matters more than most homeowners expect. In Southern California, spring and fall are the best windows for roof work. Summer heat makes surfaces dangerously hot and affects sealant curing; winter rain increases fall risk and can compromise fresh sealant applied in wet conditions.
Photo documentation protects you at every stage. Capture rafter locations before covering them, each mount placement before sealing, all wiring runs, and the completed panel layout. Inspectors require it, warranty claims often depend on it, and it's your best resource for future troubleshooting.
Some situations call for a licensed professional. Tile roofs, steep pitches, multi-story homes, and projects requiring an electrical panel upgrade are all cases where professional installation pays for itself in avoided mistakes and liability.
For Southern California homeowners, California Home Solar brings 36 years of local experience and Top 500 Solar Contractor recognition to every job. Their team knows LA-area permitting, LADWP and SCE interconnection requirements, and can pair installation with HERO program financing — a PACE-based option with no money down that repays through property taxes over 5–25 years.
Conclusion
The quality of a solar roof installation determines whether the system performs safely and efficiently across its 25-year lifespan. Structural integrity, watertight penetrations, correct electrical connections, and a passed inspection aren't optional checkpoints. They're prerequisites for a system that works, holds its warranty, and stays safe.
Approach the process methodically: assess the roof first, obtain permits before touching hardware, follow the installation sequence without shortcuts, and validate everything before activation. If any phase feels beyond your skill set — or outside your comfort level with heights and electrical work — a certified local installer is the practical choice. For Southern California homeowners, California Home Solar has handled A-to-Z installations across Los Angeles and Orange County for 36 years, which means the permitting, inspections, and electrical work are covered without the DIY risk.
Frequently Asked Questions
Is it worth putting solar panels on your roof?
For most Southern California homeowners, yes. EnergySage estimates 25-year electricity savings of $175,661 for Los Angeles homeowners as of 2026, and a Lawrence Berkeley National Laboratory study found buyers paid a premium of roughly $15,000 for an average 3.6 kW system at resale — strong returns driven by high SCE and LADWP rates and year-round sun that outpace most U.S. markets.
What is the 20% rule for solar panels?
The commonly cited "20% rule" is often a simplified version of actual fire code requirements. NFPA guidance requires 36-inch access pathways and ridge setbacks, with reduced ridge clearance allowed only when the array covers no more than 33% of roof area. California permitting checklists reference the same 36-inch setback thresholds — confirm specifics with your local AHJ.
Can I install solar panels on my roof myself?
DIY is legally possible in some jurisdictions, but California grid-tied systems still require permits, inspections, interconnection approval, PTO, and a licensed electrician for the panel connection. Most homeowners find that professional installation protects warranties, avoids costly wiring errors, and moves through permitting faster than going it alone.
How long does it take to install solar panels on a roof?
Physical installation for a typical residential system runs 1–3 days on-site. The bigger time variable is permitting and utility approval: LA County targets 1–3 business days for plan check on qualifying systems, but interconnection review and PTO from SCE or LADWP add additional weeks before the system can legally operate.
Do I need a permit to install solar panels in California?
Yes. California requires a building permit from the local AHJ, a utility interconnection agreement with your utility, and written PTO before the system can legally connect to the grid. HOA approval may also be required, though California Civil Code 714 limits how much HOAs can restrict solar installations.
What type of roof is best for solar panels?
Standing seam metal and asphalt shingle roofs are the most straightforward — metal because clamps require no penetrations, and shingle because flashed lag-bolt systems are well-established and widely understood. Tile and slate roofs are installable but require more labor and specialized hardware. Flat roofs work well with ballasted mounting systems that minimize penetrations.