Not every roof is solar-ready. Even in sun-drenched Southern California, the wrong orientation, aging shingles, or a shaded panel zone can slash your system's output or create expensive complications down the road. Getting this assessment right before you commit saves time, money, and frustration.
This guide walks through the five key factors that determine whether your roof is a good candidate for solar, how to do a preliminary check yourself, and what your results actually mean for next steps.
Key Takeaways
- South- or west-facing roof sections with a pitch between 15–40 degrees are ideal for solar in Southern California
- Roof age and material type matter as much as direction — panels last 25+ years, so your roof must too
- Even partial shading significantly reduces output; NREL research shows microinverters recover 40–50% of shade-caused losses versus string inverters
- Most residential systems need 300–500 square feet of unobstructed roof space after fire code pathways are removed
- If your roof falls short, options exist : microinverters, ground mounts, or bundling a roof replacement with your solar installation
Key Roof Factors That Determine Solar Suitability
Assessing a roof for solar comes down to five measurable factors. Any one of them can determine whether panels perform well, need design adjustments, or require remediation before installation can begin.
Roof Orientation (Direction)
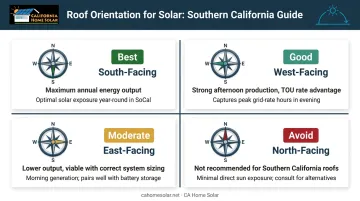
In the Northern Hemisphere, south-facing roof sections capture the most direct sunlight throughout the day. For Southern California homeowners — sitting at roughly 34°N latitude — a true south-facing roof gets the longest daily sun exposure and can approach maximum annual output.
West-facing roofs are the second-best option, and in California they carry a specific financial advantage. SCE's TOU-D plans carry peak pricing from 4:00–9:00 p.m. on summer weekdays, meaning west-facing panels generate power precisely when rates are highest. LADWP's high-peak window runs Monday–Friday, 1:00–4:59 p.m. — again, a timing advantage for afternoon-facing arrays.
- South-facing: Maximum annual output, best overall choice
- West-facing: Strong afternoon production, valuable under California TOU rates
- East-facing: Lower output but viable with proper system sizing
- North-facing: Generally not viable for residential solar in Southern California
Roof Pitch and Tilt Angle
The ideal tilt angle for fixed solar panels near 34°N latitude is generally close to the latitude itself — roughly 30–35 degrees. The optimal pitch for any specific address is best confirmed through site-specific modeling using tools like the NREL PVWatts Calculator.
What's worth knowing:
- Very flat or low-slope roofs can host panels using tilt-mount racking brackets, which add cost but restore production efficiency
- Steep roofs complicate installation and may require additional hardware
- Pitch alone is rarely a dealbreaker — the combination of pitch and orientation together determines actual output
Roof Material Compatibility
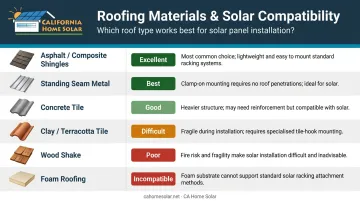
Material affects both installation approach and long-term leak risk. Here's how common Southern California roofing types stack up:
| Material | Solar Compatibility | Notes |
|---|---|---|
| Asphalt/composite shingles | Excellent | Easiest installation, most common |
| Standing seam metal | Best | No drilling required |
| Concrete tile | Good | Requires tile hooks and careful handling |
| Clay/terracotta tile | Difficult | Brittle; high cracking risk during installation |
| Wood shake | Poor | Fire code restrictions apply in LA; fragile |
| Foam roofing | Generally incompatible | Ballasted mounting sometimes feasible |
For clay tile roofs, a comp-out process — replacing tiles beneath the panel array with composition shingles — is sometimes used to reduce cracking risk and provide a more reliable mounting surface. Because California Home Solar handles both roofing remodeling and solar installation, this kind of material upgrade can be managed as one coordinated project rather than scheduling two separate contractors.
Roof Age and Structural Condition
Solar panels are designed to last 25+ years. The roof underneath needs to match that lifespan. The U.S. Department of Energy advises homeowners to factor in roof age and replacement timing before committing to solar.
Watch for these warning signs before proceeding:
- Missing, cracked, or curling shingles
- Granule loss visible in gutters
- Soft spots, sagging sections, or spongy decking
- Water stains inside the attic
- Damaged rafters or trusses
- Deteriorated or exposed underlayment
If the roof is 15–20+ years old, a professional inspection is strongly recommended before installation. A roof that fails five years after solar goes up means paying for panel removal, re-roofing, and reinstallation — a costly sequence that can eliminate years of energy savings.
Shading and Usable Space
Shading impact is easy to underestimate. Trees, chimneys, dormers, skylights, HVAC equipment, and neighboring structures can all reduce output — and in a standard string inverter system, one shaded panel drags down the performance of the entire array.
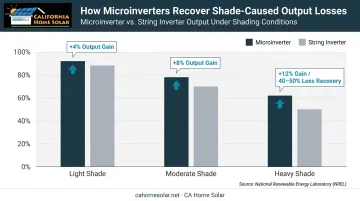
According to NREL's partial shade study, microinverters consistently outperformed string inverters under shaded conditions:
- Light shade: +4% output gain
- Moderate shade: +8% output gain
- Heavy shade: +12% output gain, recovering 40–50% of total shade-caused losses
Shading also shifts with the seasons — a tree that's bare in January looks very different in July. Accurate analysis requires a full-year assessment, not a single-day snapshot.
On usable space: The LAFD requires a 3-foot-wide clear access pathway from eave to ridge on each roof slope where panels are located. Add in chimneys, vents, skylights, and other obstructions, and what looks like a large roof can yield surprisingly limited usable panel area.
Most residential systems require 300–500 square feet of clear, contiguous space. According to LBNL's 2024 Tracking the Sun report, the median new residential solar install was 7.4 kW in 2023 — a useful benchmark for sizing expectations.
How to Assess Your Roof Layout for Solar
Homeowners can run a solid first-pass check before calling an installer. Just understand the limits of each approach.
DIY Visual Checks From the Ground
You can learn a lot without going up on the roof:
- Check orientation — Use your phone's compass app to confirm which direction the main roof face points
- Spot obvious obstructions — Look for large trees, chimneys, or neighboring structures that shadow the panel zone
- Estimate pitch visually — Compare the slope against a basic pitch reference chart; most phone apps can also measure roof pitch using the camera
- Inspect condition — Look for missing or curling shingles, visible sagging, or damaged sections from ground level; check the attic for water stains or soft spots
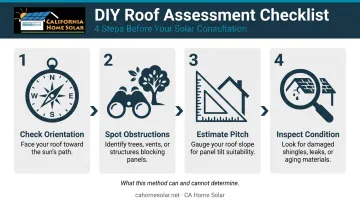
This tells you orientation, obvious shading problems, and rough condition. It won't tell you actual sun hours, structural load capacity, or whether the underlayment has failed beneath otherwise intact shingles.
Using Online Tools for Preliminary Assessment
Google's Project Sunroof uses satellite imagery and sun angle data to estimate solar potential for a specific address. It shows estimated annual sun hours, approximate panel fit, and projected savings — a useful starting point.
Keep these limitations in mind:
- Can't assess roof condition or material type
- Doesn't account for local fire code setback requirements
- Satellite imagery may be outdated
- No structural load analysis
Use these tools to get a rough baseline, not to make a final decision.
Getting a Professional Site Assessment
A professional assessment covers what no satellite tool or visual check can:
- Shading analysis across all seasons using modeling software
- Structural load verification for panel weight
- Roof condition inspection including underlayment and decking
- Material compatibility check and mounting approach recommendation
- System sizing based on your actual energy usage and roof geometry
California Home Solar — a Top 500 Solar Contractor and licensed contractor for both roofing and solar — offers free consultations that cover roof condition and solar layout readiness in a single visit. That means any roof issues and solar opportunities get flagged at the same time, without scheduling two separate assessments.
How to Interpret Your Roof Assessment Results
Once you've gathered your roof data, results fall into one of three categories — each with a clear next step.
Green Light — Your Roof Is Solar-Ready
Your roof qualifies if it has:
- South- or west-facing primary sections
- Pitch in the 15–40 degree range
- 10+ years of remaining useful life
- Compatible material in good condition
- Minimal shading on the panel zone
- 300+ square feet of clear, usable space
Next step: Move directly to system design and permitting.
Yellow Light — Workable With Adjustments
Borderline scenarios that are still viable:
- East-facing roof: lower output, offset by adding panels to the array
- Minor shading: Enphase IQ8 microinverters or SolarEdge optimizers mitigate string losses at the panel level
- Concrete tile: workable with specialized tile hooks and careful installation
- 7–10 years of remaining roof life: combining a replacement with solar installation often makes financial sense
Next step: Get a detailed quote that accounts for the specific adjustments needed.
Red Light — Roof Needs Remediation First
Conditions that disqualify a roof from solar until addressed:
- North-facing primary roof with no viable east/west sections
- Active leaks, structural damage, or deteriorated decking
- Clay tile or wood shake that can't safely support mounting hardware
- Less than 5 years of estimated remaining life
- Insufficient usable square footage after fire code setbacks
Next step: Address the roof issue first. California Home Solar handles solar-ready roofing and solar installation as an integrated service, which simplifies the project when both need to happen.
What to Do If Your Roof Isn't Quite Ready
A roof that needs replacement before solar isn't a reason to delay going solar indefinitely. The DOE points out that replacing a roof is actually the ideal time to add solar — and bundling both projects together makes strong financial sense.
Here's why bundling makes financial sense:
- Avoid double labor costs — reinstalling panels during a future re-roof adds significant cost that erodes early ROI
- Synchronized warranties — starting both systems at the same time keeps coverage timelines aligned
- Single project management — One contractor, one permit process, less disruption
California Home Solar handles both scopes in-house. As a registered HERO contractor, they can finance solar and roofing upgrades together — zero down payment, terms up to 25 years, billed through your property taxes.
Practical Workarounds for Specific Layout Challenges
- East-facing roof: Add more panels to compensate for lower per-panel output
- Shading problems: Install microinverters or DC power optimizers at the panel level
- Flat or low-slope roofs: Use tilt-mount racking to optimize angle
If you're not sure where your roof stands, California Home Solar's free site evaluation covers both roof condition and solar layout suitability — no guesswork, no pressure.
Frequently Asked Questions
What are the common percentage rules for solar panels on roofs?
These rules refer to fire code access requirements, not panel coverage limits. In Los Angeles, the LAFD requires a 3-foot-wide clear pathway from eave to ridge on each roof slope with panels. Local AHJ rules govern exact layout requirements, which a licensed installer confirms during the permit process.
What types of roofs are not suitable for solar panels?
Wood shake (fire risk, fragile structure), clay/terracotta tile (high cracking risk during installation), foam roofing, and tar-and-gravel roofs are the most problematic. In some cases, a comp-out process (replacing problem sections with composition shingles beneath the panel area) makes installation possible.
Which is better for solar panels, N-type or P-type solar cells?
N-type cells offer higher efficiency and lower annual degradation; P-type panels are more affordable and widely available. A solar installer can recommend the right type based on your roof space and energy goals.
What is the minimum roof space needed for a residential solar system?
Most residential systems need 300–500 square feet of usable, unobstructed roof space. Fire code pathways, vents, chimneys, and skylights all reduce effective area, so the usable number is often smaller than total roof square footage suggests.
Can solar panels be installed on a north-facing roof?
North-facing roofs receive significantly less direct sunlight year-round and are generally not recommended for solar in Southern California. East- or west-facing sections of the same home can often compensate, or a ground-mounted system can be explored where roof orientation isn't viable.
How do I know if my roof needs to be replaced before going solar?
If your roof is 15+ years old or shows curling shingles, soft spots, or a compromised underlayment, get a professional inspection before proceeding. Replacing the roof after panels are installed means paying for removal and reinstallation, which significantly delays your break-even point.