The core risk is a timing mismatch. Solar PV systems carry an expected operational life of 25–30 years, but many existing roofs won't last that long. Install panels on an aging roof and you'll eventually pay to remove and reinstall the entire array — a cost that runs $1,500–$6,000 just for that step alone.
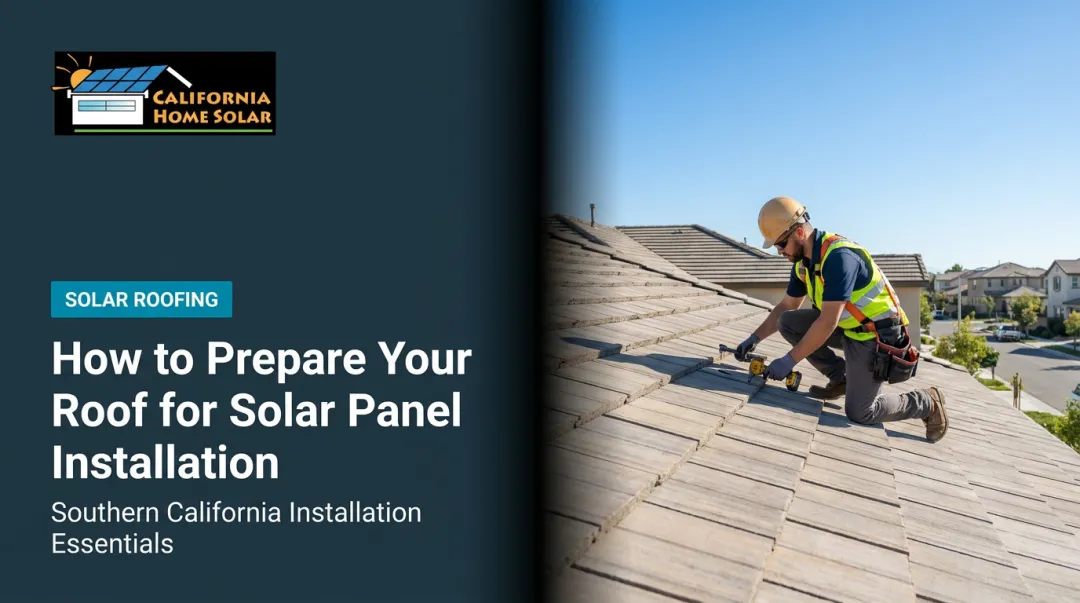
This guide walks Southern California homeowners through every decision in the process: assessing roof readiness, understanding what upgrades are actually required, choosing the right mounting system, and sequencing the work so roofing and solar finish as a single coordinated project — not two separate ones bolted together.
Key Takeaways
- Get a roof assessment — orientation, pitch, age, and structural condition — before signing any solar contract
- Most roofs need at least minor work — decking spot repairs, flashing prep, or ventilation improvements — even when full replacement isn't necessary
- Replace the roof first if fewer than 10 years of useful life remain — panel removal and reinstallation runs up to $6,000
- The mounting method (rack-mount, in-roof, or solar shingles) determines how extensive the roof upgrade needs to be
- The federal Residential Clean Energy Credit covers 30% of qualified solar installation costs, including labor; CA Home Solar is also a HERO Registered Contractor with additional California financing options
Assessing Your Roof for Solar Readiness
Don't skip this step. A thorough roof evaluation determines whether you need minor prep, targeted upgrades, or a full replacement — and getting it wrong in either direction costs you money.
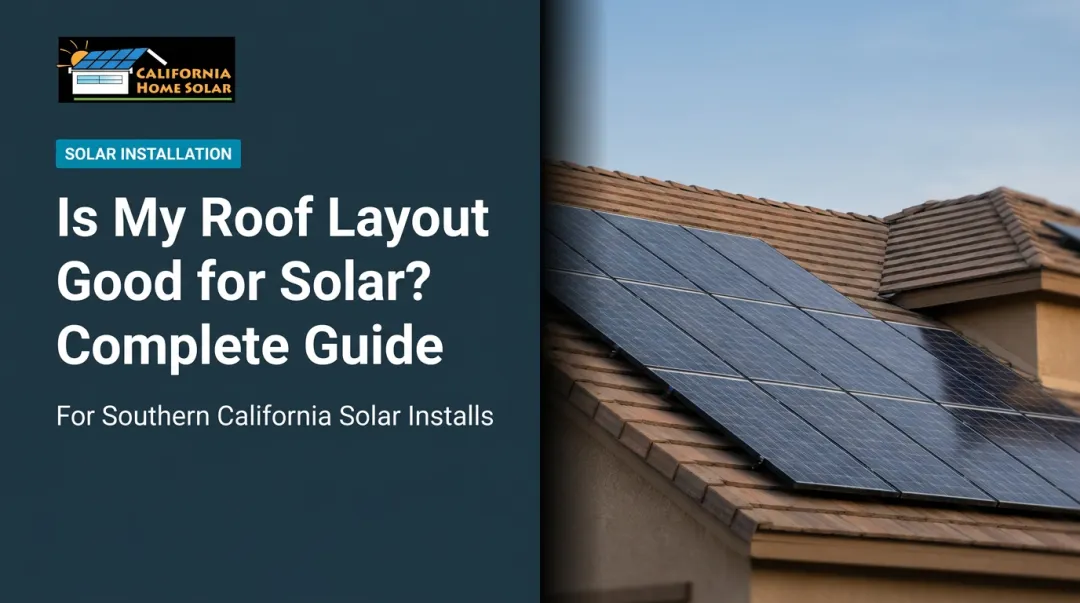
Orientation, Pitch, and Shading
Southern California's roughly 34° N latitude makes south-facing slopes the clear winner for consistent year-round output. The California Energy Commission's 2025 compliance standards allow azimuths from 90 to 300 degrees (measured clockwise from true north) for modules pitched greater than 10 degrees. East- and west-facing slopes are viable — EnergySage data shows east/west systems lose roughly 10–20% of annual production compared to south-facing arrays — but they're not ruled out, especially in LA where irradiance is strong.
Ideal pitch falls between roughly 15–40 degrees. Flat roofs can work but require tilted racking to angle panels toward the sun, which adds hardware cost.
Shading can quietly eliminate usable roof area. Under CEC rules, panels can't be placed on sections with less than 70% annual solar access. Obstructions the CEC specifically flags include:
- Chimneys, dormers, and vent stacks
- Mature and newly planted trees
- Neighboring buildings and utility poles within 30 feet
- Roof-mounted equipment
On string inverter systems, shade on a single panel can suppress output across the entire row — a detail that matters a lot when scoping which roof sections are actually usable.
Roof Age and Structural Condition
The practical rule most installers follow: if an asphalt shingle roof is over 10 years old, replace it before going solar. That guidance comes from both SEIA's homeowner resources and EnergySage — the logic being that panels will outlast the roof, and removing them later to re-roof costs thousands.
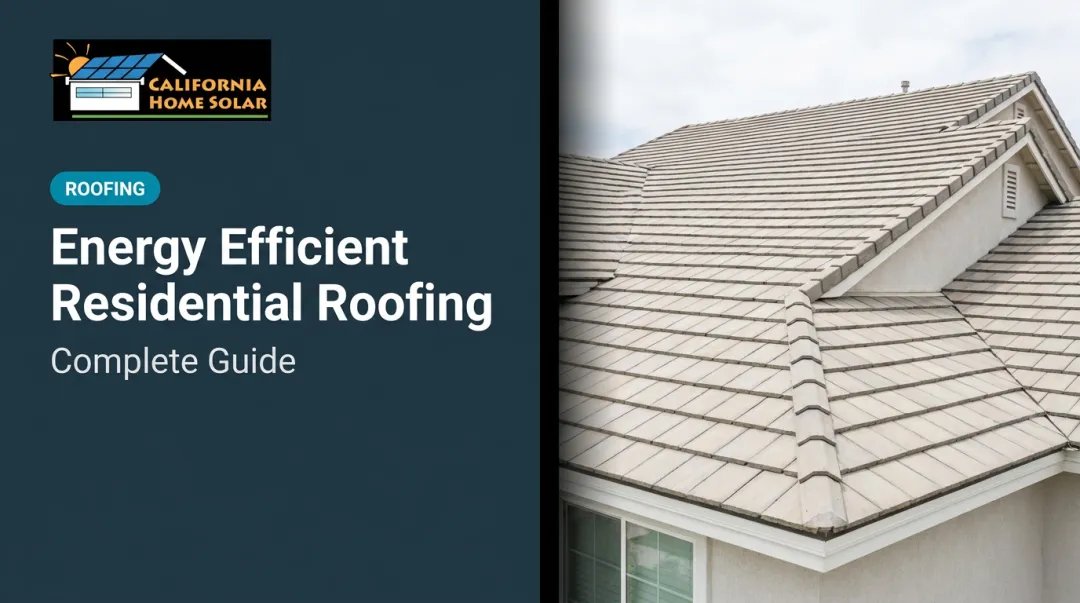
Tile and metal roofs tell a different story. Clay and concrete tile roofs commonly exceed 50 years, and metal roofs often last 40–70 years — both well aligned with a 25–30 year panel lifespan.
Structural inspection should cover four key areas:
- Soft spots, rot, or delamination in the decking
- Rafter sizing adequate for California's 4 psf dead-load benchmark — pre-1980 homes often have undersized framing that won't meet current load requirements at bracket points
- Signs of prior or active leaks that would be hidden under panels
- Confirmed rafter locations — every bracket must anchor into framing, not just decking

No remote estimate can substitute for an on-roof inspection. CA Home Solar handles both roofing remodeling and solar installation, so the same team assesses structural needs and maps the solar layout in a single visit — eliminating the coordination gaps that slow down multi-contractor jobs.
Essential Roof Upgrades for Solar Panel Integration
"Roof upgrades for solar" doesn't always mean tear-off and replace. It means bringing every component that solar hardware will interact with up to a standard that supports 25+ years of performance.
Decking and Structural Reinforcement
The most common required upgrade is spot repair: replacing or sistering (adding a new member alongside the damaged one) damaged decking and rafters at bracket locations. Every bracket penetration transfers wind uplift force directly into the framing beneath it. Rot or undersized timber at those exact points is a structural problem that worsens under load, not a cosmetic one.
Full reinforcement versus spot repairs depends entirely on what an on-roof inspection reveals. Spot repairs are appropriate when damage is isolated. Full reinforcement becomes necessary when:
- Rot or moisture damage is widespread across multiple rafter bays
- Framing doesn't meet the 4 psf simplified dead-load threshold
- The planned array is large and bracket points are distributed across questionable sections
Flashing and Waterproofing Preparation
Flashing at every bracket penetration is the single most important waterproofing detail in the entire project. The correct method:
- Remove shingles at the bracket location
- Fix a flashed bracket directly to the rafter
- Replace the shingle course so water flows over — not under — the metal
The shortcut of sealant alone fails within a few seasons: UV exposure and thermal cycling degrade the bead, and no major mounting hardware manufacturer supports it in their installation requirements.
Different roof types require different hardware, and the right choice matters for long-term waterproofing:
| Roof Material | Required Flashing Approach |
|---|---|
| Asphalt shingle | Integrated flash foot product (e.g., IronRidge FlashFoot) |
| Concrete/clay tile | Tile replacement flashing — tile removed, rafter located, replacement flashing installed |
| Standing-seam metal | Non-penetrating clamp system (no roof penetration required) |
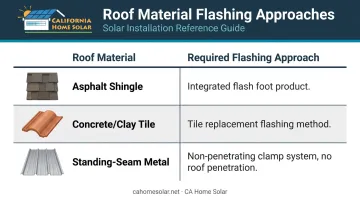
A contractor using one universal kit across all roof types is applying the wrong hardware to the wrong roof. The flashing kit for a Huntington Beach stucco-and-tile home is not the same as for a Sherman Oaks asphalt ranch house — CA Home Solar's experience across both material types means that distinction gets made before installation, not discovered after.
Material Upgrades and Ventilation
Two situations call for a material upgrade alongside solar:
- Aging asphalt shingles: If you're already replacing the roof, architectural or impact-rated shingles last longer than standard 3-tab and better align with panel lifespan
- Standing-seam metal: The most solar-compatible roofing material — long service life, and non-penetrating clamp hardware means no holes in the roof at all
Material choice connects directly to the next detail most solar quotes ignore: ventilation. Rack-mounted panels sit roughly 1.5 inches above the shingle surface, trapping heat in that gap. Research has found solar panels can reduce heat reaching the roof deck by approximately 38% — a useful thermal effect — but adequate ridge and soffit ventilation still needs to be confirmed before installation. Poor attic ventilation raises shingle temperatures and reduces panel efficiency over time.
Because CA Home Solar handles roofing and solar as integrated services, ventilation gets assessed during array layout — while there's still time to adjust ridge vent coverage or soffit intake before panels go up.
Choosing the Right Solar Mounting Approach
The mounting system determines how complex the roof upgrade needs to be, what flashing is required, and what the finished installation looks like. Your choice typically comes down to three factors: your roof's current condition, the scope of the project, and how much the aesthetics matter.
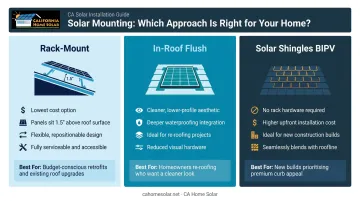
Rack-Mount, In-Roof, and Integrated Solar Shingles
Rack-mount (most common): Panels sit on rails approximately 1.5 inches above the shingles. Works on nearly any well-conditioned roof. Lowest cost, most flexible for existing homes, and straightforward to service. The ventilation gap between panel and shingle is an asset in most conditions.
In-roof (flush) systems: Panels replace a section of the existing roof covering and sit flush with the roof plane. Cleaner appearance, but requires more detailed waterproofing integration. Best suited for roof replacement projects where the covering is already being removed — retrofitting onto an intact roof is significantly more disruptive.
Integrated solar shingles (BIPV): The roofing material itself generates electricity, with no rack hardware required. The CEC classifies BIPV panels as exempt from cool roof requirements. Upfront costs are higher and output per square foot is lower than standard panels, but they're the right fit for new builds or full re-roofing projects where architectural continuity matters. Cost and efficiency figures vary by product — ask for specifics during your consultation.
When to Replace Your Roof Before Going Solar
If your roof has fewer than 10 years of useful life remaining, replace it before installing solar. Combining both projects saves money in ways that compound quickly:
- Panel removal and reinstallation runs $1,500–$6,000 if the roof needs replacing mid-system life — a cost you avoid entirely by doing both at once
- Shared labor and scaffolding cuts mobilization to a single visit instead of two
- Aligned warranty timelines: Roof and panel warranties start simultaneously
- Single permit process in many Southern California jurisdictions
- Tax credit opportunity: The federal Residential Clean Energy Credit covers 30% of qualified solar installation costs — including labor for onsite preparation and original installation — through 2032. Ordinary roof replacement isn't automatically eligible, but the solar-specific labor and prep costs on a combined project typically are
CA Home Solar is a HERO Registered Contractor. HERO is a PACE (Property Assessed Clean Energy) financing program that covers eligible energy-efficiency and solar upgrades, repaid through property tax assessments rather than upfront.
Note: The original Renovate America HERO program filed for bankruptcy in December 2020. Confirm current program availability with CA Home Solar directly — they can clarify which PACE financing options are actively enrolling in your area.
Skipping the right sequence creates a gap that neither contractor will own. Here's what typically goes wrong:
- Roofing warranties explicitly exclude third-party penetrations made after installation
- Solar warranties don't cover roof leaks originating at bracket points
- Insurance claims stall when neither team accepts responsibility for waterproofing at the penetrations
Common Roof-Solar Integration Problems and Fixes
Flashing Failures Leading to Leaks
Problem: Water infiltrating at bracket penetrations, often appearing months or years after installation — well after the install crew has moved on.
Likely cause: Sealant-only installation without proper metal flashing, or a mismatched flashing kit for the roof material.
Fix: Remove affected panels and brackets, then correct the installation from the deck up:
- Install manufacturer-engineered flashing properly integrated with the shingle course
- Seal all penetrations with compatible, UV-rated sealant as a secondary measure
- Re-sealing alone will not correct a fundamentally flawed installation
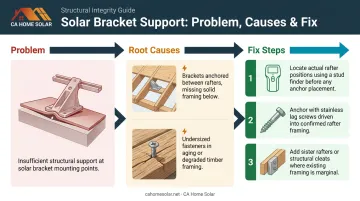
Insufficient Structural Support at Bracket Points
Brackets pulling away from the roof — or visible deck deflection around mount locations — usually trace back to one cause: the brackets were anchored between rafters rather than into framing, or undersized fasteners were used in aging timber.
To fix it, locate the actual rafter positions and anchor into them using stainless or fully galvanized lag screws sized for the timber. Where existing framing is marginal, add sister rafters or cleats before remounting. Treat this as a structural repair — it requires proper framing work, not just better bolts.
Shading Underestimation Reducing System Output
When an installed array produces significantly less than projected, shading is often the culprit — and the root cause is usually a shade analysis that only looked at one time of day, or failed to account for fast-growing vegetation nearby.
Two paths forward, depending on the situation:
- Retrofit with microinverters or DC optimizers to isolate underperforming panels from the rest of the string
- Address the obstruction directly — trim or remove the tree rather than accepting the production loss permanently
Pro Tips for Southern California Homeowners
Three practical tips specific to SoCal conditions and installation realities:
East- and West-Facing Slopes Are More Viable Than You Think
LA's irradiance is strong enough that a well-designed east/west split array can still deliver meaningful production. If your roof layout is complex, ask for a production model using actual LA-area irradiance data — not national averages.
Add Cool Roof Technology While You're at It
California's Title 24 standards already push toward reflective roofing materials, so you're likely upgrading in that direction anyway. A cool roof coating or reflective shingle reduces heat absorbed into the attic, cutting cooling loads — and those savings stack on top of solar production savings.
Some reflective roofing options can keep roof surfaces more than 50°F cooler than standard dark roofing under summer sun, which matters a lot in the Inland Empire and San Fernando Valley during peak months.
Document Everything Before Panels Go On
Photograph the decking condition, every bracket location, and all flashing details during installation. This record is invaluable if an insurance claim, warranty dispute, or roof inspection comes up years later. Once panels are installed, that evidence is permanently covered.
Frequently Asked Questions
Do I need to replace my roof before installing solar panels?
Not always. But any asphalt roof with fewer than 10 years of useful life should be replaced first — removing and reinstalling panels later costs $1,500–$6,000 and disrupts your system mid-life. A professional inspection determines which path makes sense for your specific roof.
What roofing material works best with solar panels in Southern California?
Standing-seam metal is the most compatible option — non-penetrating clamps eliminate roof penetrations entirely, and metal roofs last 40–70 years. Architectural asphalt shingles are practical and cost-effective for most homes, while concrete and clay tile work well with tile-specific flashing hardware.
Will solar panels damage my roof or void my warranty?
Properly installed panels with correct flashing shouldn't damage the roof. However, many roofing warranties exclude damage caused by third-party penetrations. Review your warranty terms before installation, and confirm your contractor's workmanship warranty covers both the roofing and solar components — CA Home Solar handles both under one scope of work.
Can solar panels be installed on a flat or low-pitch roof?
Yes. Flat roofs require tilted racking systems to angle panels toward the sun, which adds some hardware cost but is a standard and workable solution for many Southern California homes and commercial buildings.
How much does a roof upgrade for solar typically cost in California?
Minor prep work (flashing, spot decking repairs) typically runs in the hundreds to low thousands. Full roof replacement in Los Angeles averages around $8.60/sq. ft., with a common range of $4–$12/sq. ft. The federal 30% Residential Clean Energy Credit and PACE financing can both offset combined roof-and-solar project costs.
How long does a combined roof upgrade and solar installation take?
A straightforward upgrade with solar on an average home typically completes in one to two weeks. Full roof replacement followed by solar adds time, but combining the work avoids repeat permitting, scaffolding, and scheduling friction that come with splitting projects months apart.