When done incorrectly, the consequences are expensive: membrane punctures at penetration points, panel warranties voided by improper tilt angles, chronic water pooling, and energy output that falls well short of projections. Correcting those mistakes after the fact often costs more than doing the job right the first time.
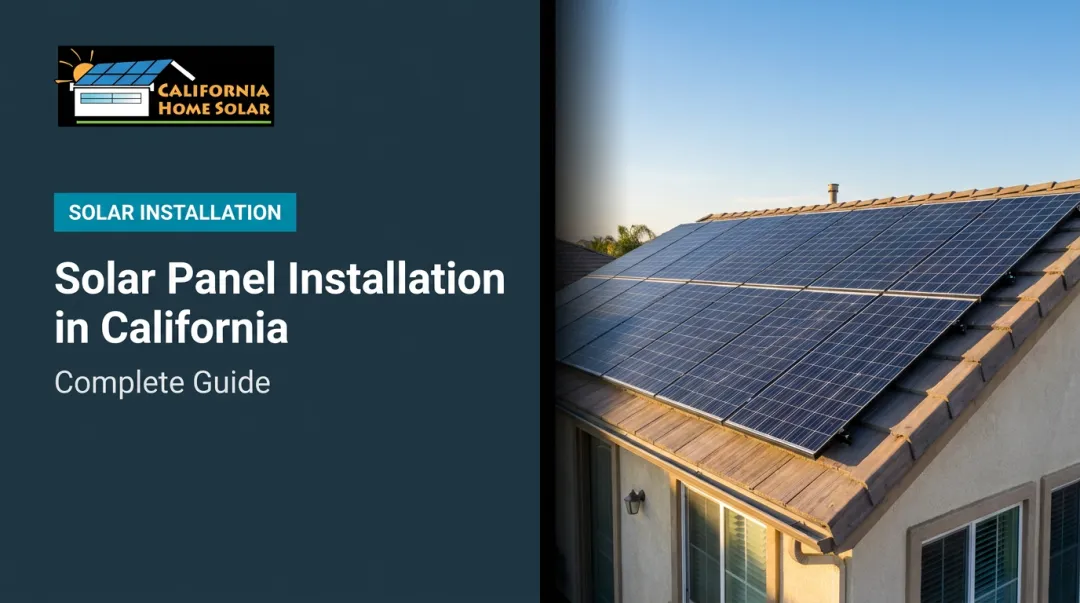
This guide covers everything a Southern California homeowner needs to know before committing to flat roof solar — from prerequisite assessments and mounting system selection to a step-by-step installation breakdown, common failure points, and pro tips specific to the LA market.
Key Takeaways
- Flat roofs support solar panels, but panels must be tilted (minimum 10°, ideally 15–25° for Southern California) — never laid flat
- Two mounting systems exist: ballasted (no roof penetrations) and mechanically attached (fastened through the membrane)
- A structural engineering evaluation and roof condition assessment are required before installation — skipping either risks membrane damage and voided warranties
- Flat roofs offer real advantages: flexible panel orientation, optimal tilt control, easier maintenance access, and low street-level visibility
- Water pooling around mounts is the top cause of energy loss and roof damage on flat-roof solar systems
Benefits of Installing Solar Panels on a Flat Roof
Orientation and Tilt Flexibility
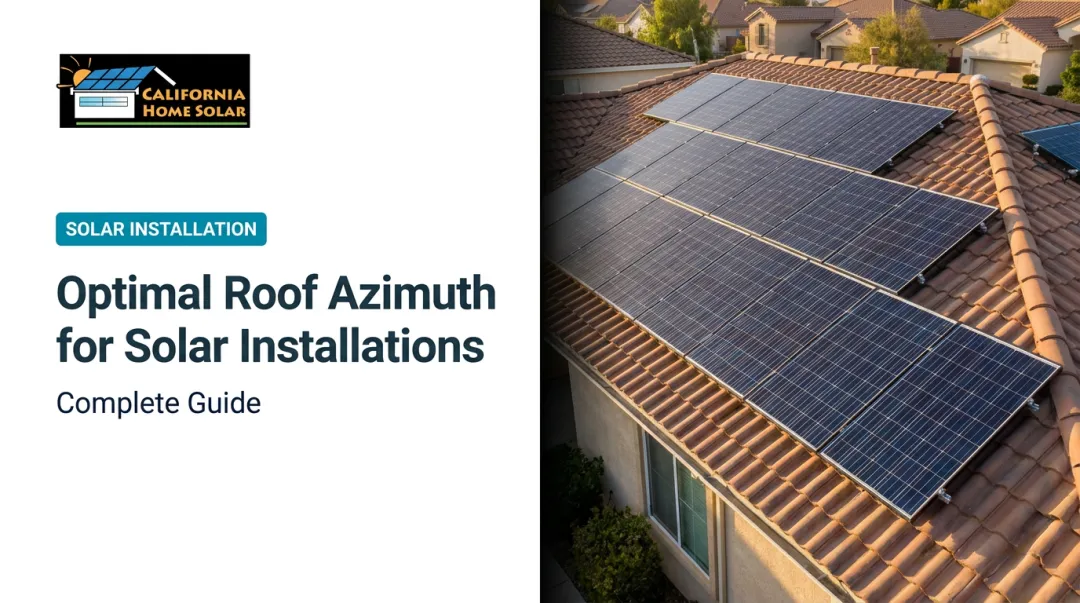
A pitched roof locks your panels into a fixed slope and compass direction. A flat roof does not. You can orient every panel true south and set the tilt angle precisely for your latitude — two variables that directly determine annual energy output.
For the Los Angeles area (approximately 34°N latitude), NREL's PVWatts calculator lets you model a south-facing array at your exact address and compare output across different tilt angles.
A flat roof installation dialed to the right tilt and azimuth can match or outperform a pitched roof constrained by the wrong slope direction, which is common in neighborhoods where homes face east-west rather than north-south.
Safer Maintenance Access and Cleaning
Technicians can walk a flat roof safely without fall-arrest equipment, which makes semi-annual cleaning practical rather than a budget line item that gets skipped.
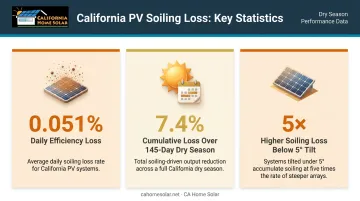
That's especially relevant in Southern California. A UC San Diego study of 186 California PV sites found soiling losses compound quickly across the dry season:
- Average daily efficiency loss from dust and soiling: 0.051%
- Cumulative loss over a typical 145-day dry season: 7.4%
- Sites tilted below 5° suffered soiling losses roughly 5× higher than steeper arrays
Wildfire ash from increasingly active fire seasons adds to the problem, making regular cleaning a genuine production issue rather than a cosmetic one.
CA Home Solar offers professional solar panel cleaning services in the LA and Orange County areas, using soft brushes, biodegradable solutions, and deionized water to restore output without risking panel damage.
Usable Roof Space and Aesthetics
Flat roofs have no dormers, hips, valleys, or skylights interrupting the surface, which typically yields larger contiguous installation areas than pitched roofs of comparable square footage. Panels also sit below the roofline and stay invisible from street level, a practical concern for homeowners in design-conscious neighborhoods across Pasadena, Beverly Hills, or Santa Monica.
Flat Roof Solar Installation: Prerequisites and Roof Assessment
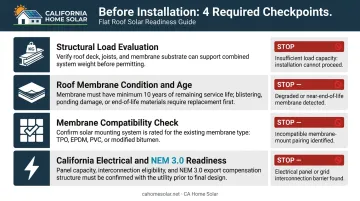
No installation should begin without clearing these four checkpoints.
Structural Load Evaluation
Ballasted racking systems add approximately 3–7 lbs per square foot of roof load (per Unirac EcoFoot 2+ technical specifications). Under LA County's Solar PV Plan Review criteria, structural calculations are required unless system weight stays at or below 4 lbs/ft², maximum concentrated load is 40 lbs or less, and panels are no more than 18 inches above the roof. Most flat roof solar systems don't meet all three thresholds simultaneously — treat structural review as standard, not optional.
If the structure cannot support ballast weight, options include switching to a lighter mechanically attached system or reinforcing specific load-bearing areas.
Roof Membrane Condition and Age
Installing a 25–30 year solar system on a membrane with 5–7 years of remaining life is a costly mistake. The Roofing Contractors Association of Canada puts it plainly: it makes no sense to mount a long-life PV system on a roof near end-of-life.
Removing and reinstalling solar panels for a later roof replacement typically runs $1,500–$6,000, with complex projects exceeding $7,000, or roughly $200–$300 per panel (EnergySage). If the membrane has fewer than 10 years of remaining life, replace it before solar installation.
That's why CA Home Solar offers combined roofing and solar installation — solar-ready roofing designed to handle mounting loads from day one, eliminating the risk of a costly mid-system re-roof.
Membrane Compatibility by Type
| Membrane Type | Ballasted System | Mechanically Attached |
|---|---|---|
| TPO | ✅ Excellent | ✅ Heat-weldable flashing |
| PVC | ✅ Excellent | ✅ Heat-weldable flashing |
| EPDM | ✅ Preferred choice | ⚠️ Requires compatible adhesive sealants |
| Modified Bitumen | ✅ Suitable | ⚠️ Age-dependent; replace if aging |
| BUR (Built-Up) | ✅ Suitable | ⚠️ Age-dependent; replace if aging |
Holcim Elevate recommends a minimum 1.5mm membrane thickness for solar-ready roofs.
California Electrical and NEM 3.0 Prerequisites
Before sizing your system, confirm electrical readiness and understand California's billing framework:
- Panel capacity: Verify main service panel capacity and available breaker space
- NEM 3.0 applies: All interconnection applications submitted on or after April 15, 2023 fall under the Net Billing Tariff — exported energy earns Energy Export Credits based on grid value, not full retail rate
- SCE Solar Billing Plan: Post-April 2023 residential customers get a nine-year lock-in when enrolling before January 1, 2028
- Self-consumption priority: Size your system around self-consumption first, not maximum export
- Battery storage: Evaluate battery storage economics seriously under this framework
Installation Non-Negotiables
Do not proceed if:
- The roof is actively leaking or structurally compromised
- The membrane is within 2–3 years of end-of-life
- The property is in a California high-fire-hazard zone without confirming solar fire safety setbacks
- LA County ballasted system criteria aren't met (roof slope under 7°, 4-ft minimum edge setback per SEAOC PV2-2017, mean roof height under 60 ft)
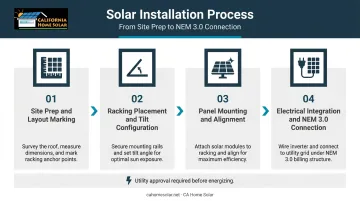
How to Install Solar Panels on a Flat Roof: Step-by-Step
Flat roof solar follows a strict sequence — and each stage builds on the last.
Selecting and Configuring the Mounting System
Three racking configurations apply to flat roofs, each suited to different structural and site conditions:
- Ballasted racking rests weighted concrete or steel trays on protective roof pads with no membrane penetrations. Ballast weight must account for local wind uplift — requirements are higher in coastal areas like Malibu, Hermosa Beach, and Long Beach.
- Mechanically attached racking uses standoffs fastened through the membrane into the structural deck. Each penetration requires flashing boots and sealant. Preferred in seismic zones or where ballast weight exceeds structural capacity.
- Hybrid systems combine both approaches, reducing penetration count while maintaining seismic resistance.
All mounting components should be UL 2703-listed.
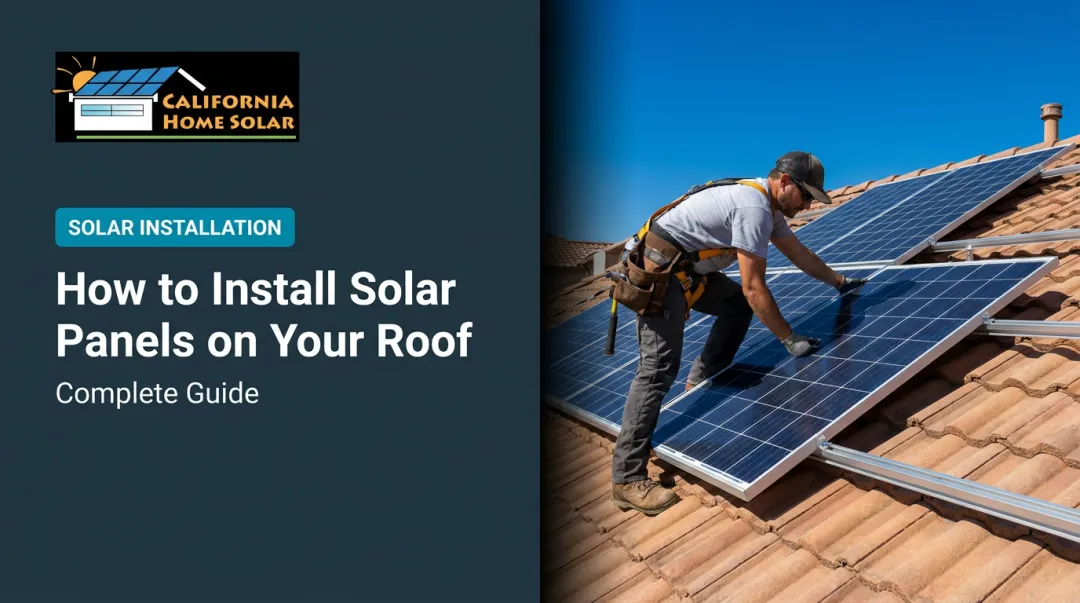
Installing the Racking and Panels
Step 1 — Site prep: Mark the panel layout on the roof surface. Verify all drainage pathways remain unobstructed. Install protective separation pads where racking contacts the membrane to prevent abrasion over time.
Step 2 — Racking placement and tilt: Position rows at the correct tilt for Southern California's latitude. For LA (34°N), a south-facing array at 20–30° tilt captures near-optimal annual irradiance. Space rows at 1.5–2× the tilted panel height to prevent inter-row shading during low winter sun angles.
Step 3 — Panel mounting: Attach panels using manufacturer-specified clamps. Verify alignment and confirm no row shadows the row behind during peak hours. Keep panel frame drainage holes clear (blocked holes can void manufacturer warranty coverage).
Step 4 — Electrical integration: Run conduit and wiring from panels to the inverter, connect to the main electrical panel, and configure for NEM 3.0 interconnection. Utility approval is required before the system can be energized.
Post-Installation Waterproofing and Validation
After installation, verify:
- All penetration points have correct flashing application
- Roof drainage is unobstructed (run water and check for pooling)
- Inverter output and panel-level monitoring pass commissioning checks
Skipping waterproofing validation is one of the most common mistakes on flat roof installations — and failures typically don't appear until the first heavy rain. A final sign-off from a licensed roofing contractor is strongly advisable. When the same contractor handles both roofing and solar, as CA Home Solar does, that sign-off is built into the project from the start.
Common Flat Roof Solar Installation Problems and Fixes
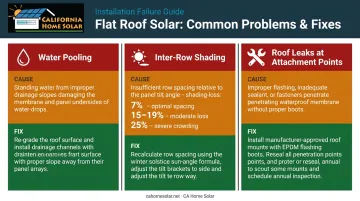
Water Pooling Around or Beneath Panels
Problem: Standing water accumulates around panel bases or beneath ballast trays after rain, increasing membrane stress and leak risk.
Likely cause: Panels placed too close to roof drains or low points, or tilt angle below 10° creating inadequate runoff.
Fix: Redesign the layout to keep drainage pathways unobstructed. Verify all panels are set at a minimum 10° tilt, and confirm with a roofing contractor that drainage capacity is unaffected by the new layout.
Inter-Row Shading Causing Energy Underperformance
Problem: Panel rows shade each other during mornings, late afternoons, or winter months, reducing output below projections.
Likely cause: Row spacing calculated for summer sun angles without accounting for Southern California's lower winter sun position — or layout compressed to fit more panels.
Fix: Use solar design software to model shading at winter solstice angles before finalizing layout. Increase inter-row spacing or reduce row count to eliminate shading losses. Annual irradiance loss from shading falls into three ranges: roughly 7% (light), 15–19% (moderate), and 25% (heavy) — and even the lightest shading compounds into meaningful lost production over a full year.
Microinverters or DC optimizers limit shading impact on overall system output if spacing cannot be increased.
Roof Leaks at Mechanical Attachment Points
Problem: Water intrusion develops where racking standoffs were drilled through the membrane.
Likely cause: Incompatible flashing materials, inadequate sealant, or pads shifting over time and stressing penetration seals.
Fix: Use only membrane-manufacturer-approved flashing systems and sealants, and inspect all penetration points annually — re-sealing any cracked or delaminating flashing right away. Before the project closes, require written warranty coverage on all penetration waterproofing from your installer or roofing contractor.
Pro Tips for Installing Solar Panels on a Flat Roof Effectively
Coordinate roofing and solar if your membrane is within 5–7 years of end-of-life. Doing both at once avoids paying removal and reinstallation fees later ($1,500–$7,000+). A contractor with both roofing and solar credentials can design the new membrane specifically to accommodate mounting loads and attachment points from day one.
Pull permits early. Cities within LA County vary on flat roof solar setback requirements, fire access pathway rules, and structural documentation. LADBS ties roof access requirements to LAFD Requirement No. 96, and LA County mandates specific ballasted criteria including a 4-foot edge setback. Starting permit procurement in parallel with equipment ordering prevents weeks of delay.
Document everything in one file. Retain the structural engineer's load report, permit approvals, roof membrane warranty, and solar system warranty together. Insurers and future buyers increasingly ask for this paperwork on solar-equipped homes — and it protects you if a warranty claim ever requires proof of proper installation.
Work with a contractor experienced in flat roof solar. CA Home Solar has served Southern California homeowners for 36 years and has been recognized six times as a Top 500 Solar Contractor by Solar Power World. That combined solar and roofing expertise means your project gets assessed by a single team that understands structural load, membrane compatibility, tilt optimization, and utility interconnection — no juggling separate firms.
Frequently Asked Questions
Can you install solar panels on a residential flat roof?
Yes. Residential flat roofs are suitable for solar provided a structural assessment confirms load capacity and the membrane is in good condition. Panels must be mounted on tilt racking — never laid flat — and the roof should have at least 10 years of remaining service life before installation proceeds.
What is the best mounting system for flat roof solar panels?
Ballasted systems (no membrane penetrations) are the most common choice and typically preserve roof warranties. Mechanically attached systems are preferred in high-wind or seismic zones, or where ballast weight exceeds structural capacity — the right choice depends on your structural report, membrane type, and local building code.
Will solar panels on a flat roof cause leaks?
Properly installed flat roof solar should not cause leaks. Ballasted systems avoid all membrane penetrations; mechanically attached systems use engineered flashing at each fastening point. Most post-installation leaks trace back to inexperienced installation, incompatible flashing materials, or skipped waterproofing validation.
What tilt angle should flat roof solar panels be set to?
Panels need a minimum 10° tilt to maintain manufacturer warranties and prevent water pooling. For Southern California's latitude, 15–25° is the recommended range to maximize annual energy production while balancing row spacing requirements and structural load.
Do flat roof solar panels produce less energy than pitched roof systems?
Flat roof systems often match or outperform pitched roof installations because panels can be oriented true south at an optimal tilt — unconstrained by the existing roof slope. Production depends primarily on correct system design, tilt angle, and consistent cleaning to offset Southern California's dry-season soiling rates.
How much does flat roof solar installation cost compared to a pitched roof?
According to LBNL's Tracking the Sun 2024 report, 2023 residential installed prices ranged from $3.20 to $5.50 per watt with a median system size of 7.4 kW. Flat roof installations typically run higher upfront due to additional racking equipment and the structural assessment, but optimized panel orientation and lower maintenance costs can improve long-term ROI compared to a poorly oriented pitched roof.