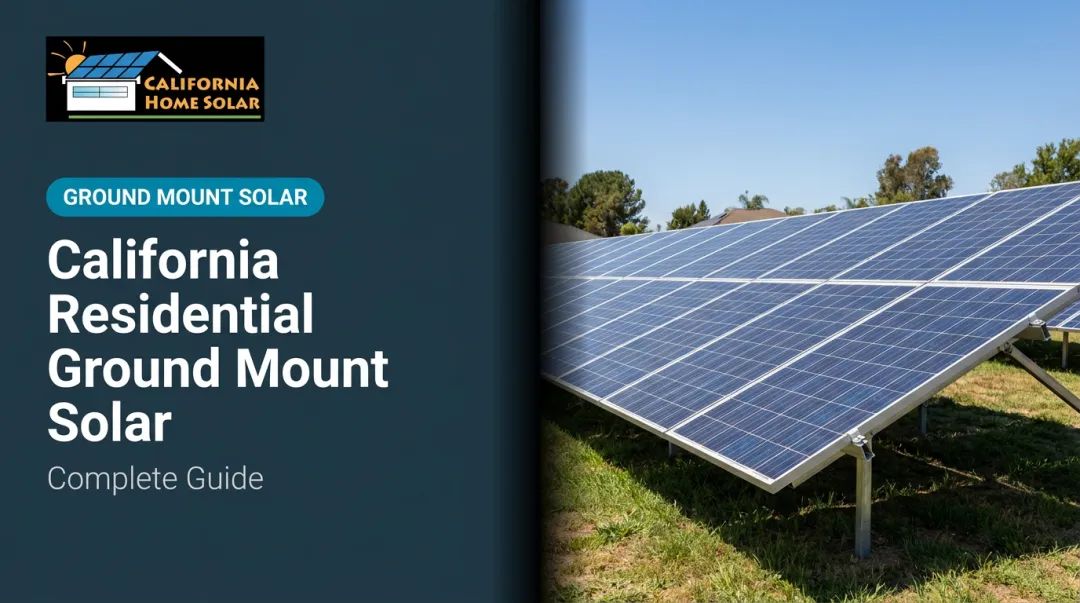
That complexity isn't a reason to avoid it. For Southern California homeowners with open land, a poorly oriented roof, or structural constraints, a ground-mount system can actually outperform rooftop solar by optimizing tilt and orientation independently of the building.
This guide covers whether your property is a genuine candidate, what the installation process involves step by step, the most common problems installers encounter, and how to verify the system is correctly commissioned before you consider it operational.
Key Takeaways
- Ground-mount solar suits properties with open, unshaded land where the roof is north-facing, aged, shaded, or geometrically complex
- Installation follows a fixed sequence: permits, foundation, racking, panels, then electrical integration — each stage requires professional execution
- For SoCal properties at ~34° latitude, a 33–34° tilt angle is the NREL PVWatts modeling baseline
- An 8–12 kW residential system needs roughly 800–1,200 sq ft of clear, unshaded land for planning purposes
- Ground-mount systems cost roughly 51% more than equivalent rooftop installations — the trade-off is better performance and fewer roof constraints
Is Ground-Mounted Solar Right for Your Property?
Land and Solar Access Requirements
The first question is simple: do you have enough open, unshaded space?
Industry planning benchmarks use approximately 100 sq ft of clear, unshaded land per kW of system capacity. For typical residential systems, that maps to:
| System Size | Panels (400W modules) | Panel Surface Only | Planning Land Area |
|---|---|---|---|
| 8 kW | 20 panels | ~413 sq ft | ~800 sq ft |
| 10 kW | 25 panels | ~516 sq ft | ~1,000 sq ft |
| 12 kW | 30 panels | ~619 sq ft | ~1,200 sq ft |
The panel surface figures are physical minimums. The planning figures account for row spacing, maintenance access, and setbacks — treat those as your real screening threshold.
For Southern California properties at roughly 33–34° N latitude, NREL PVWatts defaults array tilt to the site latitude with a 180° (true south) azimuth. A 33–34° tilt angle is the correct modeling baseline for the LA area. Some racking systems offer fixed 20° or 30° options, so run production modeling at your available geometry before finalizing the design.
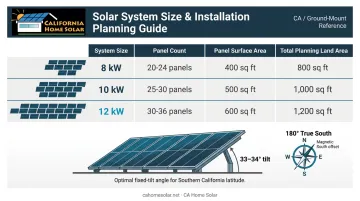
One practical note on orientation: a standard compass in Los Angeles reads approximately 11.4° east of true north due to magnetic declination. Using an uncorrected compass to set panel orientation can leave your array pointing slightly off true south — reducing production across the system's 25–30 year life.
When Ground-Mount Beats Rooftop Solar
Roof-related constraints are the most common reason Southern California homeowners choose ground-mount. The specific situations:
- North-facing or shaded roof — a roof that doesn't face south, or one shaded by trees or neighboring structures, significantly limits rooftop output
- **Aging or complex roof geometry** — installing panels on a roof that needs replacement in 5–7 years means a costly removal-and-reinstall later; skylights, vents, and hip roofs reduce usable surface
- Insufficient structural load capacity — older homes may require expensive reinforcement before a rooftop array is feasible
- Space constraints — ground-mount systems can be sized to match your actual consumption without the footprint limitations of your roof
Ground-mount systems eliminate these constraints entirely because placement is chosen for solar performance, not dictated by building geometry.
Land Use and Zoning Considerations
Committing land to a ground-mount system is a long-term decision. A 25–30 year system lifespan means that 800–1,200 sq ft (plus maintenance clearance) is dedicated for decades. Factor in whether you need a security fence around the array, which adds to the total footprint.
On the regulatory side, California homeowners should verify:
- Local zoning setbacks — LA County requires minimum setbacks that vary by zone (agricultural zones carry a 30 ft minimum setback; other zones follow base zone rules)
- HOA restrictions (Section 714) — California Civil Code Section 714 voids HOA restrictions that effectively prohibit solar or add more than $1,000 in cost or reduce efficiency by more than 10%
- Ground-mount protections (Section 801.5) — Civil Code Section 801.5 explicitly extends these protections to racking, support structures, and foundation elements; HOAs can impose aesthetic conditions, but a blanket ground-mount prohibition is unenforceable under state law
A professional site assessment is the most reliable way to confirm your specific parcel clears these hurdles. California Home Solar has assessed Southern California properties for ground-mount suitability for 36 years — evaluating available space, sun exposure, and site-specific factors before any commitment is made.
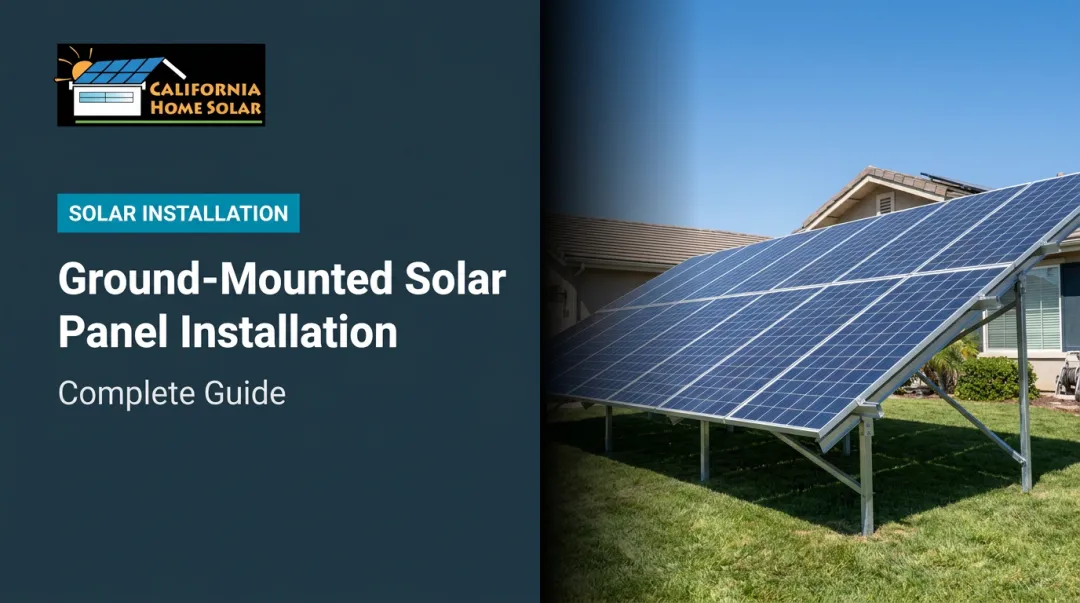
Ground-Mounted Solar Panel Installation Guide
Installation follows a defined sequence: site assessment → permitting → groundwork and foundations → racking assembly → panel mounting → electrical integration → inspection and commissioning.
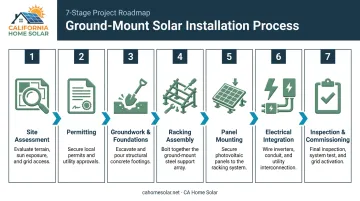
The most important thing to understand before diving into the steps: permitting and utility interconnection happen before physical work begins, and skipping or shortcutting either stage creates serious downstream problems.
Prerequisites and Safety Considerations
Confirm all of the following before breaking ground:
- Soil type and bearing capacity — determines whether concrete piers, ground screws, helical piles, or driven piles are appropriate. Expansive clay soils common in parts of the San Fernando Valley and San Gabriel Valley require deeper or reinforced foundations; a soil test removes the guesswork.
- Underground utility clearance — California law (Government Code 4216) requires contacting DigAlert (811) at least 2 working days before any digging. This is not optional.
- Clear sun path — confirm no seasonal shading from trees, structures, or topography using a solar pathfinder or shading analysis tool
- Electrical pathway — plan the conduit route from the array to the main service panel before the site is disturbed
Permitting in California: Both a building permit (for the structural support) and an electrical permit (for the PV installation) are required. LA County also requires structural plans and calculations showing foundation dimensions and imposed loads for ground-mounted arrays. Utility interconnection approval — from LADWP or SCE depending on your location — must be secured before the system can operate.
Key interconnection timelines to plan around:
- SCE Fast Track Initial Review: 15 business days
- SCE Supplemental Review: 20 business days
- PTO issuance: typically within 5 business days once engineering review is complete
In LA County, pulling permits after the fact means reinspection, potential rework, and delays that can stretch weeks — budget the permitting timeline into your project schedule from day one.
Tools and Materials Required
Equipment checklist:
- Post-hole digger or excavator (for concrete piers)
- Concrete mix, forms, and reinforcement
- Steel ground-mount racking/frame kit with cross-members
- Mounting hardware, fasteners, and torque wrench
- Solar panels
- String inverter or microinverters
- Conduit and wiring rated for outdoor/direct burial use (per NEC/CEC Table 300.5)
- Junction boxes, disconnects, and GFCI/AFCI protection per NEC Article 690
- Multimeter and clamp meter for commissioning
Electrical work connecting the array to the main panel must comply with NEC Article 690 and California Title 24 (California Electrical Code). This requires a licensed electrician or licensed solar contractor — not a general handyman.
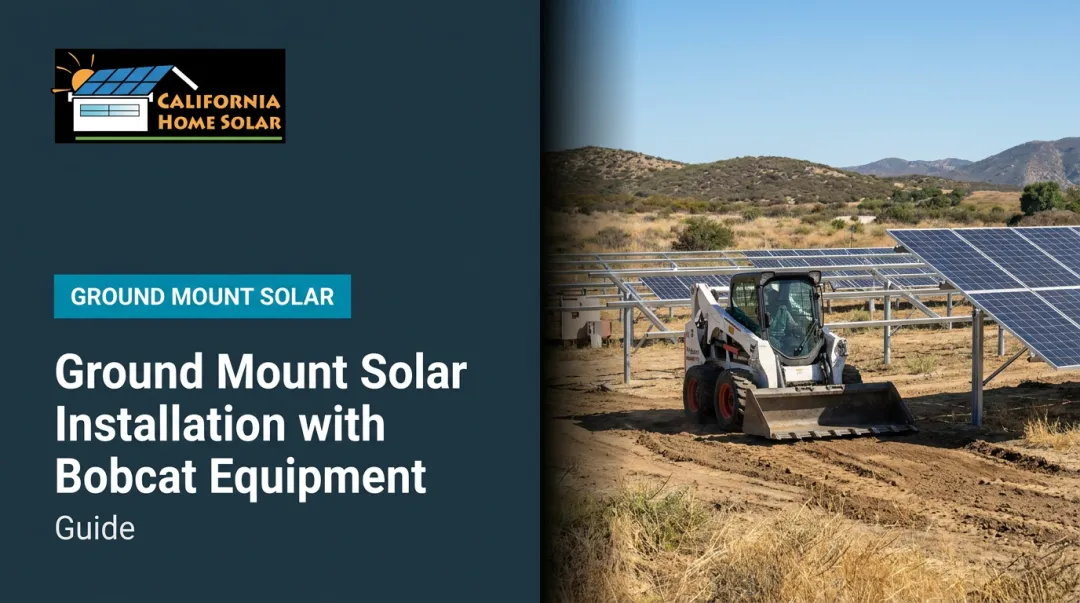
How to Install Ground-Mounted Solar Panels (Step-by-Step)
Compressing or skipping steps — particularly in the foundation and electrical stages — causes the most common long-term failures.
Step 1 — Site preparation and layout Mark the installation footprint per the approved design. Confirm south-facing orientation (accounting for magnetic declination), clear vegetation within the array area, and stake out all pier/anchor locations. Call DigAlert (811) before any digging begins.
Step 2 — Foundation installation Dig or drill holes to the depth specified in the engineering documents. Pour concrete for piers or drive helical piles per the selected foundation method.
Do not load the racking structure until concrete reaches adequate compressive strength. The industry standard reference is 28-day compressive strength; earlier loading requires explicit engineer and AHJ approval based on the mix design and achieved strength. Rushing this step is a leading cause of racking movement and structural failure.
Step 3 — Racking structure assembly Attach steel rails and cross-members to the cured foundation. Set the racking to the pre-calculated tilt angle for Southern California's latitude — 33–34° is the NREL PVWatts baseline, though your design may specify an available fixed angle (commonly 30°) depending on the racking system selected. Torque all connections to manufacturer specifications and verify the structure is level before proceeding.
Step 4 — Panel mounting and wiring Attach panels to the racking using manufacturer-specified clamps. Wire panels in the designed series/parallel configuration. Run conduit from the array to the inverter location and then to the main service panel, following NEC/CEC Table 300.5 burial depth requirements — minimum cover varies by wiring method, voltage, and location (commonly 18–24 inches for most residential conditions, but verify with your AHJ).
Step 5 — Inverter installation and grid connection Mount the inverter in a shaded, ventilated location — direct sun exposure shortens inverter lifespan. Connect DC input from the array and AC output to the main panel. Install all required disconnects. The system cannot be activated until utility sign-off (PTO) is received. Coordinate the utility inspection through your LADWP or SCE interconnection application.
Post-Installation Checks and Validation
Run through both structural and electrical verification before the system goes live:
Structural checks:
- All racking bolts torqued to spec
- Panels seated flush, no cracks in glass or frames
- Conduit runs fully secured with no exposed wiring
- No wiring chafing against metal edges or conduit fittings
Electrical checks:
- Use a multimeter to verify open-circuit voltage (Voc) and short-circuit current (Isc) match panel spec sheets before connecting to the inverter
- After grid connection, verify the inverter commissions correctly — a healthy startup shows DC input voltage rising as the inverter scans, then AC output activating with expected wattage displayed. Fault codes at startup (ground fault, arc fault, isolation error) indicate a wiring problem that must be resolved before the system runs.
Latent wiring errors or loose connectors may not trip a fault immediately — they degrade silently, causing production losses and arc hazards that are expensive to diagnose after conduit is buried and landscaping is restored.
Common Ground-Mount Installation Problems and Fixes
Inadequate Foundation Depth or Improper Cure Time
Problem: Racking structure shifts or tilts after installation, stressing panel frames and wiring connections.
Likely cause: Piers not excavated to the depth required for local soil conditions, or concrete loaded before it reached adequate strength.
Fix:
- Excavate and reset piers to the correct depth per engineering specs
- Commission a geotechnical assessment if soil conditions are uncertain — foundation design should reflect actual site conditions
- Do not load the racking until the concrete has reached the strength specified by the project engineer
Incorrect Tilt Angle or Orientation
Problem: System produces noticeably less power than the design estimate, particularly early and late in the day.
Likely cause: Racking tilt set to a default rather than the site-specific optimum, or panels oriented off true south because magnetic declination wasn't applied. In Los Angeles, magnetic declination is approximately 11.4° east — an uncorrected compass reads about 168.6° when pointing at true south (180°).
Fix: Recalculate optimal tilt for the installation's latitude using PVWatts or equivalent modeling. Verify orientation against true south, not magnetic south. Many racking systems allow manual angle adjustment without full disassembly.
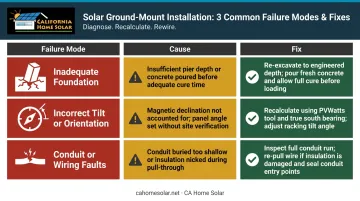
Conduit or Wiring Faults Causing Inverter Errors
Problem: Inverter displays ground fault or arc fault errors shortly after commissioning; system repeatedly trips offline.
Likely cause:
- Conduit buried too shallow
- Wire insulation nicked during the conduit pull
- Incorrect wire sizing for the run length
NREL's connector reliability research identifies connector overheating, arc-fault initiation, and ground-fault risk as real-world failure modes in PV systems.
Fix:
- Inspect all conduit entry points and junction boxes for insulation damage
- Verify burial depth before backfilling; probe the trench if access allows
- Re-pull wiring if any insulation damage is found
- Never bypass GFCI or AFCI protection required under NEC Article 690
Pro Tips for Installing Ground-Mounted Solar Panels Effectively
Sequence permits before any site work. In Los Angeles County, building permit approval and utility interconnection (LADWP or SCE) can take several weeks. Order equipment and complete site prep drawings in parallel with the permit process — but do not break ground until all approvals are in hand.
Get a soil test in clay-prone areas. Expansive clay soils are common in parts of the San Fernando Valley and San Gabriel Valley. These soils shift seasonally with moisture changes, which can compromise standard pier depth assumptions. A soil test before foundation design eliminates the leading cause of structural problems in these sub-regions.
Document everything during installation. California inspection requirements and equipment warranty claims frequently require photographic proof of key installation steps. Capture at minimum:
- Pier depths before backfilling
- Conduit runs before burial
- Torque wrench readings on racking connections
- Wire run labels at junction boxes
A contractor who manages permitting and inspection coordination as part of their standard scope — rather than leaving documentation to the homeowner — reduces your liability exposure if questions arise later.
Factor in total project timeline when planning. Physical installation of a residential ground-mount system can move quickly once permits are approved, but the permit-to-activation timeline is driven by AHJ review and utility interconnection — not installation speed. Plan for several weeks from permit submission to PTO, particularly with LADWP or SCE.
Conclusion
A ground-mounted solar system's long-term performance depends almost entirely on decisions made before a single panel is installed: the foundation engineering, the tilt and orientation design, the permitting and interconnection sequence, and the electrical integration quality.
The physical installation, done correctly, is the easy part.
For Southern California homeowners with suitable land, a well-planned ground-mount system in the region's abundant sunlight is a high-return investment. According to EnergySage's 2026 data, residential ground-mount systems average approximately $46,041 before incentives — roughly 51% more than equivalent rooftop installations. That premium is justified when roof constraints would otherwise limit production, or when proper orientation can noticeably increase annual output.
Getting the site assessment and permitting right from the start keeps your project on schedule and protects your interconnection timeline — both of which directly affect when you start seeing savings. California Home Solar offers free consultations for Southern California homeowners evaluating ground-mount suitability — call 877-903-1012 or email info@cahomesolar.com to schedule one.
Frequently Asked Questions
Can you install solar panels directly on the ground?
Yes, but panels must be mounted on a racking system anchored to concrete piers, ground screws, or driven piles — not simply laid flat. Proper elevation and tilt are required for drainage, airflow, and energy production. Flat-on-ground placement would trap debris, limit airflow, and severely reduce output.
How much land do you need for a ground-mounted solar system?
Plan for roughly 100 sq ft of clear, unshaded land per kW — so an 8–12 kW residential system needs approximately 800–1,200 sq ft. The panel surface itself is smaller, but row spacing, maintenance clearance, and security fencing add considerably to the total footprint.
Do ground-mounted solar panels require a permit in California?
Yes. Both a building permit (for structural support) and an electrical permit (for the PV installation) are required. Utility interconnection approval from LADWP or SCE must also be obtained before the system can operate. LA County additionally requires structural plans and calculations for ground-mounted arrays.
How much more expensive are ground-mounted solar panels compared to rooftop solar?
Ground-mount systems typically cost around 51% more than rooftop installations of equivalent capacity, according to EnergySage's 2026 data — averaging approximately $46,041 before incentives. The premium reflects foundation work, additional racking materials, and conduit trenching costs not present in rooftop installations.
How long does it take to install a ground-mounted solar system?
From permit submission to utility activation, most projects span several weeks — SCE's Fast Track interconnection review alone takes 15–20 business days. Physical installation typically wraps up within a few days once permits are approved, though concrete cure time adds to the overall schedule.
Can ground-mounted solar panels be installed on a slope?
Mild slopes can be handled with adjustable racking designs. Unirac's ground-mount application guide lists a 15% grade (8.5°) as a practical limit for standard systems. Steeper or irregular terrain drives up foundation complexity, cost, and engineering requirements — a site assessment is essential before proceeding.