Who installs these systems matters. In California, ground-mount solar requires a licensed contractor (C-46 Solar or C-10 Electrical) with direct ground-mount experience. Wrong installation leads to structural failures, permit rejections, and production losses that no warranty will cover.
This guide walks Southern California homeowners through the complete picture: when a ground mount makes sense, how installation actually works, what permits are required, what it costs, and how to avoid the mistakes that turn a good investment into an expensive repair.
Key Takeaways
- Ground-mounted solar works best for homes with shading issues, aging roofs, poor roof orientation, or open yard space
- Installation costs more than rooftop — expect site engineering, foundation work, and underground conduit runs to your panel
- A building permit is always required in California; HOAs can restrict but cannot ban solar under the Solar Rights Act
- The 30% federal ITC applies through 2032; under NEM 3.0, pairing with battery storage is the financially smart move
- Hire a licensed, locally experienced installer who knows your city or county's specific permitting and setback rules
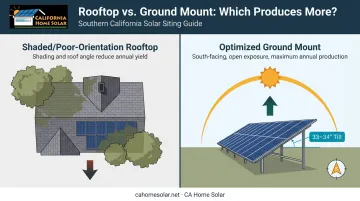
When Ground-Mounted Solar Makes More Sense Than a Rooftop
Aging or Problematic Roofs
Most installers require re-roofing before mounting panels on a composition shingle roof that's nearing the end of its service life — adding significant cost before a single panel goes up. A ground mount avoids this problem entirely. The roof stays on its own replacement schedule, and the solar system goes where conditions are actually good.
CA Home Solar offers free property assessments that evaluate this exact trade-off. Because California Home Solar also handles roofing remodeling, homeowners get an honest side-by-side: re-roof and go rooftop, or ground-mount now and tackle the roof separately when the time comes.
Shading and Orientation Problems
NREL research found that shading greater than 40% of a single cell can cause total output loss for the affected string. That makes partial shade a design-level failure risk, not just a minor efficiency dip. Trees, chimneys, neighboring structures, and rooftop HVAC units create these conditions on otherwise good rooftops.
A ground mount can be placed wherever shading is absent, regardless of where the house sits on the lot. Placement also determines orientation — and that matters just as much. East-west or north-facing roofs produce measurably less annual energy than a south-facing system. According to PNNL's Building America Solution Center, true south orientation at a tilt close to site latitude maximizes annual production — a standard fixed-tilt ground mount achieves this by design.
Large-Lot and High-Consumption Properties
Southern California homeowners with heavy electrical loads often can't fit a properly sized system on a rooftop. Common high-draw loads include:
- EV chargers
- Pool pumps and heaters
- Central HVAC systems
- Well pumps
Ground mounts eliminate that constraint. With usable yard space, you size the system to your actual consumption — not to whatever roof area happens to be available.
HOA-Governed Communities
In communities where street-visible rooftop panels face aesthetic pushback, a backyard ground mount often encounters far less resistance from architectural committees. California law limits what HOAs can do — but keeping the array out of the street sightline makes the conversation easier from the start.
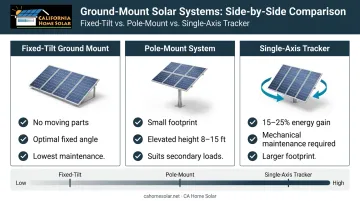
Types of Residential Ground-Mount Systems
Fixed-Tilt Ground Mounts
The most common residential option. Steel racking anchors to driven posts or concrete footings, and panels are set at a fixed angle optimized for local latitude — no moving parts. For Southern California's latitude range of roughly 33–34° N, an optimal fixed tilt falls in the same range. Maintenance is minimal beyond periodic cleaning. For most LA-area homeowners, fixed-tilt delivers the best balance of output and long-term simplicity.
Pole-Mount Systems
A smaller array — typically 2 to 16 modules per pole depending on configuration — mounted atop a single steel pole with a concrete footing, elevated 8–15 feet. Suited for secondary loads, off-grid well pumps, or properties where ground footprint is limited. Some include manual or motorized seasonal tilt adjustment for additional output.
Single-Axis Trackers
The array rotates on a north-south axis throughout the day, following the sun east to west. NREL research documents 15% to 25% energy gain for single-axis tracking over fixed-tilt systems, with bifacial modules adding a further 4% to 15% depending on module type and ground reflectivity.
That output gain comes with trade-offs worth weighing:
- Higher upfront equipment and installation cost
- Ongoing mechanical maintenance fixed-tilt systems avoid
- Larger ground footprint for the tracker drive mechanism
Dual-axis trackers exist but are rarely cost-justified at residential scale. Your site conditions, shading profile, and budget will ultimately determine which system type fits best.
How Ground-Mounted Solar Is Installed: The Complete Step-by-Step Process
Ground-mount installation follows a defined sequence. Skipping or rushing any phase creates structural, electrical, or compliance problems that are costly — sometimes impossible — to fix once the system is in the ground.
Prerequisites and Site Readiness
Before any work begins, confirm:
- Unobstructed ground area with adequate clearance from structures and property lines
- Soil assessment to determine the correct foundation method (driven posts, concrete footings, or helical piles)
- Electrical panel capacity sufficient for the planned system
- Array location clears local setback requirements for your specific parcel
Three items must be in place before breaking ground:
- Confirmed building permit in hand
- Licensed structural engineer's stamp on foundation drawings (required for larger systems)
- Utility interconnection application filed
Skipping any of these steps can require complete teardown and restart.
The Installation Sequence
Step 1 — Site preparation: Grade the pad if required, mark post locations per the engineered site plan, and clear vegetation to meet California Building Code Section 3111.3's 10-foot brush-free clearance requirement around ground-mounted PV arrays.
Step 2 — Foundation installation: Drive steel posts to engineered depth or pour concrete footings based on soil type. Southern California's soil conditions vary widely: soft alluvial soil in valley floors behaves very differently from caliche or decomposed granite in hillside areas. A structural engineer must specify foundation method and depth from actual site conditions, not regional assumptions.
Step 3 — Racking and panel mounting: Assemble the racking structure to the engineered tilt angle, mount panels, and bond the racking to the grounding system. For Southern California's latitude, a fixed tilt near 33–34° optimizes annual production.
Step 4 — Electrical and trenching: Run conduit underground from the array to the main service panel. Burial depth varies by wiring method under NEC Table 300.5; your installer and AHJ (authority having jurisdiction) will specify the correct depth for the conduit type used.
Wire gauge must also be sized to the actual trench length. Longer runs require heavier gauge wire to keep voltage drop within acceptable limits, which adds to material cost.
Post-Installation Validation
Before energizing the system:
- The county or city building inspector physically inspects structural and electrical work
- Walk through a visual check of racking alignment, grounding, conduit integrity, and inverter startup
- Confirm the utility has received and approved the interconnection application
Systems energized without final inspection can be shut down by the utility, void manufacturer warranties, and create liability if a structural or electrical failure occurs later.
California Permits, Setbacks, and HOA Considerations
Building Permit Requirements
Every ground-mounted solar installation in California requires a building permit. The submittal package must include:
- Structural engineering-stamped foundation and racking plan
- Electrical single-line diagram
- Site plan showing setback compliance
This is more document-intensive than rooftop solar, which often qualifies for streamlined or expedited permit pathways. The California Solar Permitting Guidebook recommends over-the-counter issuance or a maximum of 1–3 business days for small systems — but ground-mount complexity often means longer review windows.
For one- or two-family homes with systems up to 10 kW, LADBS processes solar permits at the Electrical Plan Check Counter.
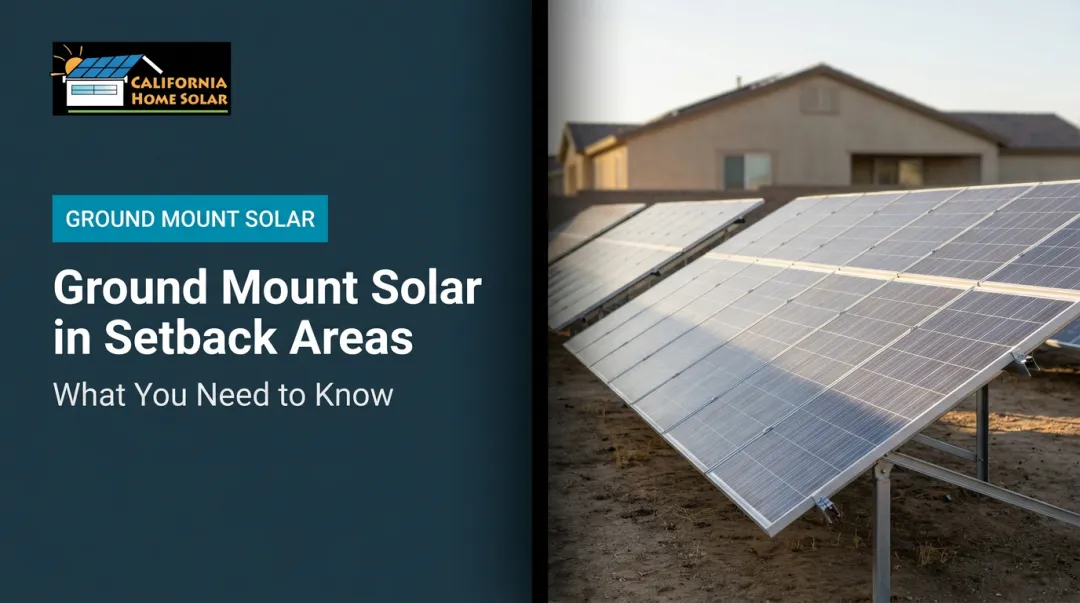
Zoning, Setbacks, and LA County Specifics
LA County's ground-mounted solar framework handles small-scale systems through Site Plan Review when energy is used primarily on-site and the property isn't in an O-S or W zone. Key limits:
- Maximum height: 15 feet
- Maximum lot coverage: 25% of lot or 2.5 acres, whichever is less
- O-S/W zoning or requests to modify development standards require a Minor CUP
Specific setback requirements are determined at the parcel level. Confirm your city or unincorporated county jurisdiction before submitting — the City of Los Angeles (LADBS) and LA County Building and Safety are separate offices with different processes.
Grading Permits
If installation requires leveling a pad, cutting into a slope, or moving significant soil volume, a grading permit is required. Under LA County Appendix J, excavations not exceeding 50 cubic yards may qualify for exemption if they meet specific depth and slope conditions. For flat sites limited to post-driving and trenching, a grading permit is often not needed — but verify with LA County Building and Safety or your city's planning department before any excavation begins.
HOA Rules Under the Solar Rights Act
Once you've cleared the public permit requirements, private HOA rules are the next hurdle — though California law limits how much they can restrict you. California Civil Code Section 714 voids any HOA restriction that effectively prohibits solar. For PV systems, a restriction is considered unreasonable if it:
- Increases system cost by more than $1,000
- Decreases system efficiency by more than 10%
If an HOA application is not denied in writing within 45 days, the HOA must treat it as approved. Backyard ground mounts not visible from the street generally draw the least scrutiny. Get written architectural committee approval with conditions documented before permitting begins — not after.
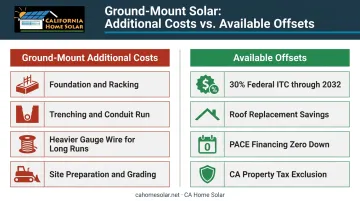
Costs, Incentives, and the NEM 3.0 Reality
What Drives Ground-Mount Cost
Ground-mount systems cost more per watt than rooftop installations. The premium comes from components that rooftop systems don't need:
- Foundation and racking: Driven posts or concrete footings, engineered to soil conditions
- Trenching: Underground conduit run from array to main panel — cost scales with distance and soil difficulty
- Additional wire and conduit: Longer runs require heavier gauge conductors
- Site preparation: Grading, vegetation clearing, and access work
If a roof replacement would otherwise be needed before a rooftop install, the cost comparison often shifts in favor of ground mount. CA Home Solar can model both scenarios as part of a free property assessment.
Available Incentives
- Federal ITC: The Residential Clean Energy Credit provides 30% of qualified solar electric property expenditures for systems placed in service from 2022 through 2032, with no dollar cap
- California property tax exclusion: Active solar energy systems receive a new-construction exclusion (not a full exemption) through January 1, 2027, per the California BOE
- PACE financing: CA Home Solar is a registered HERO contractor and also works with California First and YGrene Energy Fund — all PACE programs offering zero down, zero upfront costs, with repayment through property taxes and flexible terms of 5–25 years
NEM 3.0 Changes the Math
California solar customers who applied after April 14, 2023 fall under the Solar Billing Plan (NEM 3.0). Under this structure, SCE customers transition to TOU-D-PRIME for imports and receive hourly Energy Export Credits based on the CPUC Avoided Cost Calculator — export values that are well below peak retail rates.
The practical result: exporting solar energy to the grid under NEM 3.0 is a poor trade. Pairing a ground-mount system with battery storage changes that equation. Daytime production charges the battery; stored energy offsets expensive evening import costs instead of being exported at low credit value.
For most Southern California homeowners on NEM 3.0, battery storage is what makes the financial case work — sizing the battery alongside the ground-mount array is the key design decision.
Common Ground-Mount Installation Problems and How to Fix Them
Foundation Failure or Post Movement
Posts that shift, tilt, or heave after installation are almost always traced back to inadequate post depth or the wrong foundation method for actual soil conditions. LA County Building Code Manual 1808.6 requires foundations on expansive soils to be designed to minimize uplift and movement — and Southern California has both expansive clay soils and compacted caliche that behave very differently.
A licensed structural engineer should assess the site before installation and specify post depth and type based on actual conditions. Re-driving or re-pouring foundations after the fact costs significantly more than the engineering review upfront.
Excessive Voltage Drop Over Long Trench Runs
A system that underperforms despite excellent sun exposure is often a wire sizing problem. NEC guidance on voltage drop isn't a hard mandate, but longer trench runs demand heavier conductors to keep losses within acceptable limits — and undersized wire is easy to overlook at the design stage.
Conductors must be sized to the actual trench length before installation begins, not after. The inverter architecture choice also matters here:
- String inverters run DC over the trench distance, requiring heavier gauge for long runs
- Microinverters convert to AC at the panel, which changes conductor sizing requirements entirely
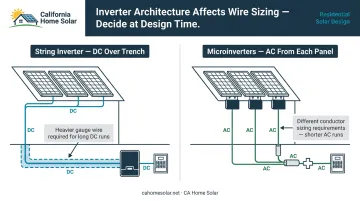
Locking in the right architecture and wire gauge at design time avoids a costly retrofit.
Permit Rejection or Inspector Failure
Inspector rejections typically come down to one of three causes: structural drawings missing a licensed engineer's stamp, setback dimensions miscalculated on the site plan, or electrical work that deviated from the approved plans.
The fix is straightforward but requires discipline upfront — work with an installer who pulls permits regularly in your specific jurisdiction, submit complete documentation on the first attempt, and do not break ground before approval. Failed inspections add weeks to the timeline and rework costs that far exceed what thorough plan preparation would have required.
Pro Tips for a Successful Ground-Mount Installation in Southern California
Sequence Your Preparation Correctly
Complete the soil assessment and get the engineer's stamp before submitting for permit. In LA-area jurisdictions, plan review takes time, and an incomplete submittal restarts the clock. Use the review window to finalize the trench route and order materials — so physical installation can begin the day the permit issues.
Design Your Clear Zone to Satisfy Both Rules at Once
Two separate fire codes apply to most LA County ground-mount installations:
- CBC Section 3111.3: requires a 10-foot brush-free zone around the array itself
- CAL FIRE defensible space: extends 100 feet from structures across Zones 0, 1, and 2 in High Fire Hazard Severity Zones
These requirements overlap. Design one clear zone that satisfies both — not two separate efforts done in sequence.
Document everything during installation:
- Photograph foundation depth before backfilling — you'll have evidence on hand if a structural question comes up later
- Keep copies of all permit approvals and inspection sign-offs in one place
- Activate inverter monitoring from day one — Enphase, SolarEdge, and other platforms CA Home Solar works with provide real-time production data that can surface wiring or grounding issues before they become costly
Following these steps keeps your project on schedule and gives you a clean paper trail from groundbreaking through final inspection.
Conclusion
A properly sited, permitted, and installed ground-mount system can outperform a compromised rooftop install for the entire life of the equipment. But every phase — foundation, trenching, electrical, permitting — contributes to that outcome. Cut corners at any point and you're setting up problems — structural, performance, or compliance — that cost far more to fix after the fact than to prevent upfront.
Start with a professional property assessment. CA Home Solar has been installing solar across Southern California for 36 years, with Top 500 Solar Contractor recognition and the in-house capability to handle roofing, HVAC, and battery storage alongside the solar system itself.
Whether a ground mount or rooftop system fits your property better, that assessment will give you a clear answer based on your specific site, budget, and energy goals. Reach out at 877-903-1012 or info@cahomesolar.com to get started.
Frequently Asked Questions
How much does a residential ground-mounted solar system cost in California?
Ground-mount systems cost more per watt than rooftop solar due to foundation work, trenching, and additional conduit runs. The 30% federal ITC applies through 2032. If your roof would need replacement before a rooftop install, that cost gap often narrows or disappears entirely.
Do I need a permit to install ground-mounted solar panels in California?
Yes — a building permit is always required. The submittal package must include engineer-stamped structural drawings, an electrical single-line diagram, and a site plan showing setback compliance. If the installation involves significant earthwork, a grading permit may also be required from the relevant county agency.
Can my HOA block or restrict my ground-mounted solar installation?
Under California Civil Code Section 714, HOAs cannot prohibit solar installations. They can impose restrictions that don't increase system cost by more than $1,000 or reduce efficiency by more than 10%. HOA applications not denied in writing within 45 days are deemed approved. Backyard ground mounts not visible from the street typically encounter the least resistance.
Is ground-mounted solar more efficient than rooftop solar in Southern California?
Ground mounts can be positioned at the optimal tilt and azimuth, eliminating shading losses and benefiting from natural air circulation that keeps panels cooler. For properties with shading issues or poor roof orientation, the production advantage is often substantial. Single-axis trackers add a further 15–25% gain over fixed-tilt systems.
How much yard space do I need for a residential ground-mounted solar system?
A DOE consumer guide estimates roughly 100 square feet of unshaded space per 1 kW for crystalline silicon panels. An 8–10 kW system therefore needs approximately 800–1,000 square feet before accounting for row spacing and access. The array must also maintain the 10-foot brush-free clearance required under California Building Code Section 3111.3.
Can I pair a ground-mounted solar system with battery storage under NEM 3.0?
Ground mounts pair well with battery storage, and under NEM 3.0 it's the financially optimal strategy. Daytime production charges the battery. Stored energy then offsets expensive peak-hour import rates rather than being exported at the low credit values the Solar Billing Plan provides. California Home Solar handles combined ground-mount and battery storage installations across Southern California.