In California, this isn't a project you can permit yourself or hand to an unlicensed crew. Building permits, engineer-stamped plans (in most cases), and utility interconnection approval are mandatory before the system can legally operate. The CPUC's California Solar Consumer Protection Guide confirms that valid contractor licenses for solar installation are C-46 Solar, C-10 Electrical, or B General Building — and contractors must provide a Solar Energy System Disclosure Document on every residential contract.
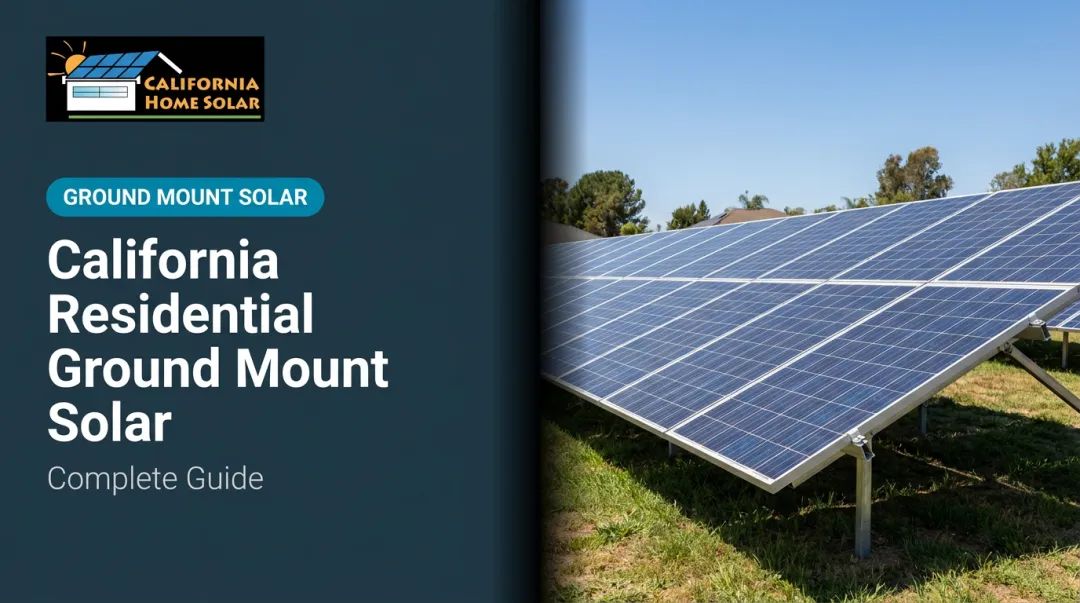
This guide walks through the complete ground-mount installation process — from site assessment and permitting through post-installation validation — so Southern California homeowners know exactly what to expect before the first shovel hits the ground.
Key Takeaways
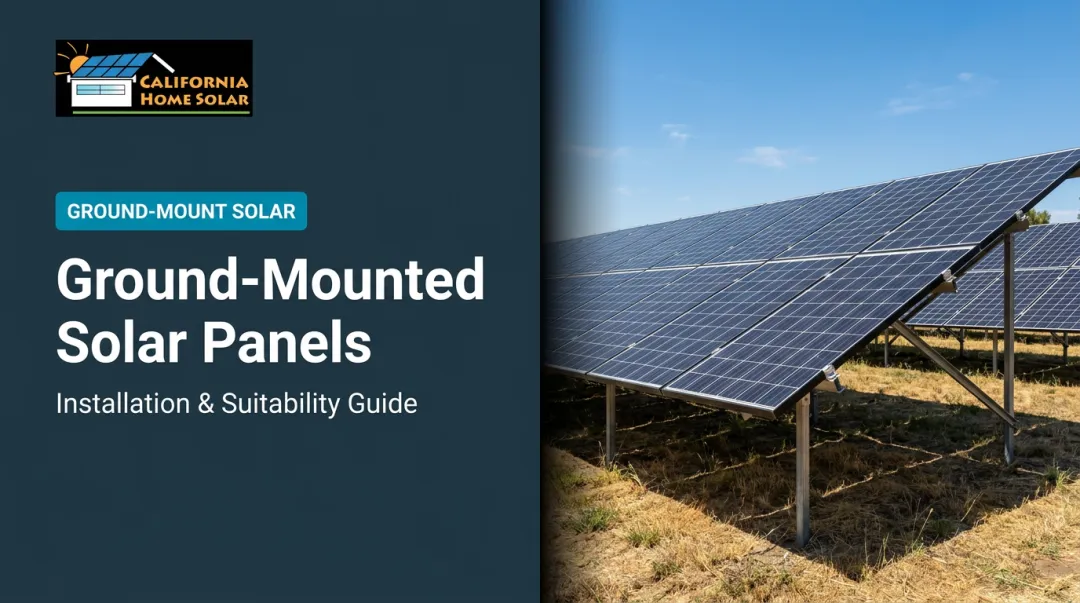
- Ground-mounted solar works best when a roof is shaded, structurally unsuitable, or the wrong orientation — but requires available land and permits
- Installation follows a fixed sequence: site assessment → permitting → excavation → post-setting → racking → panels → electrical → commissioning
- In Southern California, HOA approvals, setback compliance, and SCE or LADWP interconnection applications must be resolved before physical work begins
- Skipping concrete curing or grounding steps creates structural and safety failures that are expensive to correct after the fact
- Ground-mount systems run cooler: NREL's PVWatts models open-rack arrays at 45°C versus 49°C for rooftop installs, translating to measurable efficiency gains
What to Know Before You Start
System Types: Fixed-Tilt vs. Tracking
Most residential and small commercial ground-mount systems fall into one of two configurations:
- Fixed-tilt — posts anchored in concrete, rails set at a static angle. Lower cost, minimal maintenance, and practical for most residential properties
- Single-axis tracking — panels rotate to follow the sun, boosting annual yield by 15–25% but adding mechanical complexity, higher upfront cost, and ongoing maintenance
For most Los Angeles County homeowners, fixed-tilt is the practical choice. Tracking systems make more sense at larger commercial scale where the yield premium justifies the added complexity.
Land Area Requirements
A common starting point: approximately 100 square feet per 1 kW of solar capacity. LBNL's 2024 Tracking the Sun report shows the median new residential PV system was 7.4 kW in 2023, with most falling in the 5–11 kW range. That translates to roughly 500–1,100 square feet of usable ground area — before accounting for setbacks and access clearance.
Your actual footprint depends on panel count, row spacing for maintenance access, and local setback requirements from property lines and structures.
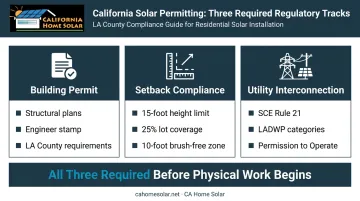
Southern California Regulatory Requirements
Before any physical work begins, three regulatory tracks must be initiated:
- Building permit — required in all California jurisdictions for ground-mount solar; LA County requires structural plans and calculations signed by a licensed architect or civil engineer for most ground-mount systems
- Setback compliance — LA County limits ground-mount system height to 15 feet maximum and lot coverage to 25%; the City of LA requires a 10-foot brush-free area around ground-mounted arrays
- Utility interconnection — SCE operates under Rule 21; LADWP has its own interconnection program with Type 1–4 categories. Neither utility will authorize operation without written Permission to Operate (PTO)
Prerequisites and Safety
With permits and regulatory tracks mapped out, confirm these site-readiness items before any contractor mobilizes:
- Land ownership confirmed and HOA approval in hand (if applicable)
- Soil conditions assessed — expansive clay soils, common across LA County, require engineered foundation design per LA County Building Code
- Shading analysis completed across the full daily arc, not just midday
- Underground utility locations marked (call 811)
- Flood zone status checked via FEMA's Flood Map Service Center
Do not proceed without a valid building permit. All electrical work requires a C-10 licensed contractor. In high-wind zones, engineering review of your foundation design is required before installation can begin.
How to Install Ground-Mounted Solar Panels: Step-by-Step
The sequence below is not flexible. Steps that seem like they could be reordered — particularly anything involving concrete — cannot be. Loading structural weight on uncured footings is one of the most common causes of post shifting.
Step 1 — Site Mapping and Layout
Survey the installation area and confirm:
- All post locations comply with setback requirements from property lines, structures, and utility easements
- The array footprint matches the engineered plan — not a rough approximation of it
- Measurements are transferred precisely; errors here propagate through every subsequent step
Step 2 — Excavation and Post Setting
- Dig footings to the depth specified in the engineered structural plan (depth varies based on soil type, system height, and local wind load requirements; manufacturer specs like IronRidge and Unirac require project-specific footing dimensions, not a universal standard)
- Set galvanized steel posts at the spacing specified in the drawings
- Verify plumb and alignment on every post before the concrete pour — bracing is required to hold position during pour
Step 3 — Concrete Curing
Pour concrete into footings and allow adequate cure time before loading any structural weight. Standard concrete needs far more than 24 hours to reach structural strength: ACI guidelines cited by FHWA require at least 7 days for standard mixes, or 3 days minimum for high-early-strength mixes, maintained above 50°F.
This step cannot be rushed. Post shifting from premature loading is one of the most common field failures in ground-mount installations.
Step 4 — Racking Assembly
Once posts are confirmed set:
- Attach top caps and cross pipes to build the structural framework
- Install rails at the designed tilt angle — for Southern California's latitude (~34°N), PVWatts uses site latitude as the default tilt, making angles near 30–34° a reasonable starting point, though actual design angle should come from project-specific modeling
- Verify rail alignment before panel mounting begins
Step 5 — Electrical Components and Panel Mounting
- Install microinverters or power optimizers on the racking before panels are placed — access is much harder to reach after panels are mounted
- Mount solar panels using manufacturer-specified clamps; torque values must match the engineered drawings
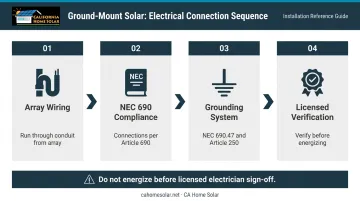
- Run all wiring through conduit from the array back toward the electrical interconnection point
Step 6 — Electrical Connection and Interconnection
- Pull wiring from the array to the main service panel or inverter location
- All connections must comply with NEC Article 690 and the utility's interconnection agreement
- Grounding is mandatory: per NEC 690.47, buildings and structures supporting PV systems must use a grounding electrode system per Article 250; a ground-mounted array support structure may itself serve as the grounding electrode if it meets the requirements of NEC 250.52
- No system should be energized before a licensed electrician verifies all connections against the electrical plan
Post-Installation Checks and Validation
Structural Validation
Before calling for inspection:
- Visually inspect all post bases for shifting or cracking in the concrete
- Check every bolted racking connection for proper torque per the manufacturer spec
- Hand-pressure test panels to confirm no movement
- Verify tilt angle matches the engineered specification using an inclinometer
Electrical Validation
- Confirm all conduit runs are secured and weatherproofed
- Verify grounding continuity across the array frame
- Check inverter startup sequence and confirm expected voltage output before grid connection
Final Sign-Off and PTO
A city or county inspector must sign off on both structural and electrical work before the utility will issue Permission to Operate. PTO timelines vary by utility. SCE customers, for example, typically receive PTO within 2–3 business days of submitting a complete application with a signed final inspection — though high application volume can push that to 30 business days. Other Southern California utilities follow similar processes but may have different review windows.
Don't wait for the final inspection to find problems. Issues caught during pre-inspection checks are far cheaper to fix than those flagged after a failed inspector visit.
Common Installation Problems and Fixes
Ground-mount installations fail in predictable ways. Most problems trace back to rushing the structural phase or underestimating electrical complexity.
Post Shifting or Racking Misalignment
One or more posts shift before or after concrete sets, throwing rails and panels out of alignment. Common causes include:
- Posts not braced during the pour
- Concrete loaded before adequate cure time
- Expansive clay soils (prevalent in LA County) causing movement after initial set
If caught before concrete fully cures, re-plumb and brace immediately. If discovered after curing, the footing must be broken out and re-poured. Shimming is not an engineered solution and will not pass inspection. LA County's Building Code explicitly requires foundation systems on expansive soils to be designed for soil movement — improvising around that requirement will fail inspection.
Electrical Wiring Errors at the Interconnection Point
The system fails to produce power or trips breakers after commissioning, with the inverter showing fault codes. This typically traces to incorrect wire sizing for run length, reversed DC polarity, improper breaker sizing, or missing ground fault protection.
All wiring must be inspected against the electrical plan before energizing, and a licensed electrician must verify connections. Avoid troubleshooting live DC wiring without proper training. DC faults behave differently from AC faults and carry serious arc flash risk.
System Underperformance After Turn-On
Output falls short of the design estimate in the first weeks of operation. Likely culprits include:
- Tilt angle deviation caused by rail installation errors
- Shading from trees or structures missed during site assessment
- Microinverter or optimizer not properly paired to the monitoring system
Use the solar monitoring app to check per-panel output against expected values. Verify actual tilt with an inclinometer against the design drawings. If shading is the issue, trimming or removing obstructions at the site may be the only effective fix.
Pro Tips for Installing Ground-Mounted Solar Effectively
A few decisions made early in the process can prevent costly delays down the line. These are the ones that matter most:
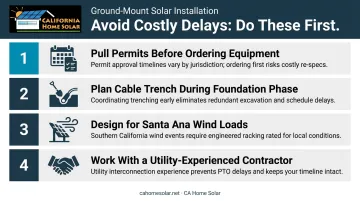
Pull permits before ordering equipment. Approval timelines vary across LA County jurisdictions. Ordering materials before permit sign-off risks having to modify the design and return or re-specify components — an avoidable delay and added cost.
Plan the cable trench route during the foundation phase. Underground conduit from the array to the electrical panel should be trenched as part of the foundation work. Retrofitting through finished landscaping is disruptive and expensive.
Design for Santa Ana wind loads specifically. Elevated arrays experience significant uplift forces during Santa Ana events. Confirm that your structural drawings reflect site-specific wind load calculations — post depth and concrete volume included — not a generic template from a lower wind zone.
Work with a contractor who knows your utility's interconnection process. SCE and LADWP have different application requirements, documentation standards, and processing timelines. California Home Solar has handled ground-mount installations across Southern California for 36 years, managing the full process from permit application through PTO — which translates directly to fewer interconnection delays for homeowners.
Conclusion
Ground-mounted solar delivers real performance and financial advantages for properties where the roof isn't suitable. Optimal tilt and unobstructed sun exposure can meaningfully improve output compared to a constrained rooftop installation.
Those advantages only materialize when the installation follows the correct sequence: engineered structural plans, building inspection, and utility interconnection review — all completed in order.
Every shortcut in the process (premature concrete loading, unlicensed electrical work, skipped permits) creates a problem that costs more to fix than it would have cost to do correctly the first time.
Southern California homeowners considering a ground-mount system should work with a licensed local installer who can carry the project from permit submission through inspection and interconnection to PTO. California Home Solar handles ground-mount installations across Los Angeles County and Orange County, covering each phase so nothing gets skipped and the system produces from day one.
Frequently Asked Questions
How much land do I need for a ground-mounted solar system?
A general starting point is approximately 100 square feet per 1 kW of capacity. For a typical residential system in the 7–10 kW range, that's roughly 700–1,000 square feet before accounting for setback buffers and maintenance access. Your contractor's site assessment will give you the accurate figure based on panel count and local requirements.
Do I need a permit to install ground-mounted solar panels in California?
Yes — a building permit is required in all California jurisdictions. LA County also requires engineer-stamped structural plans for most ground-mount systems. Utility interconnection approval (from SCE, LADWP, or your local utility) must also be obtained separately before the system can legally operate.
How deep do ground-mount solar panel footings need to be?
Footing depth is determined by the engineered structural plan for your specific site, not a universal standard. Depth varies based on soil type, system height, and local wind load requirements — your engineer's calculations will specify the correct dimensions.
Is ground-mounted solar more expensive than rooftop solar?
Ground-mount systems carry higher upfront costs due to foundation labor and materials. LBNL's 2024 Tracking the Sun data shows ground-mounting adds roughly $0.40/W to installed prices. That cost can pay off: ground-mount systems often outperform rooftop arrays thanks to optimal tilt and better airflow, improving long-term ROI.
Can I install ground-mounted solar panels myself in California?
No. California requires a licensed C-10 electrical contractor (or C-46/B equivalent) for all solar electrical work, and a building permit is required for the structure. Unlicensed installation risks failed inspections, voided equipment warranties, and utility interconnection denial.
How long does a ground-mounted solar installation take from start to finish?
The physical installation typically takes a few days to a week. The full timeline (permit approval, installation, inspection, and utility PTO) commonly runs 6 weeks to several months depending on the jurisdiction and utility, with SCE PTO approvals ranging from 2–3 business days up to 30 business days during high-volume periods.