In Southern California specifically, the complexity runs deeper. Soil conditions vary from sandy loam in the valleys to caliche-laced decomposed granite on hillside lots. Permitting requirements differ by jurisdiction. Utilities like LADWP and SCE each have their own interconnection sequences that cannot be rushed or bypassed.
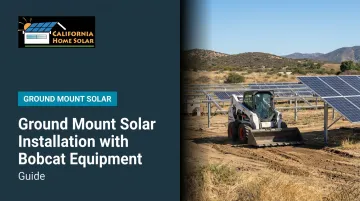
Bobcat equipment — skid steers, compact track loaders, and the right attachments — transforms the most labor-intensive phase of this work. But equipment alone doesn't build a compliant, durable system. This guide walks through the full process: prerequisites, equipment selection, the step-by-step installation sequence, common problems, and what separates a 25-year system from one that fails its first inspection.
Key Takeaways
- Ground-mount solar involves site grading, foundation installation, trenching, racking assembly, and electrical integration — Bobcat equipment handles the civil phase
- Core civil work calls for a skid steer or compact track loader fitted with a grader blade, auger, post driver, and trencher attachment
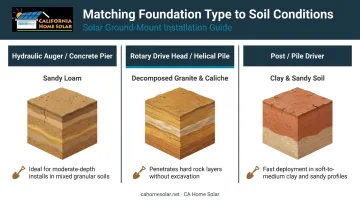
- Foundation type must match your soil — decomposed granite and caliche require different approaches than the sandy loam common in valley areas
- California requires building permits, electrical permits, and utility interconnection approval (PTO) before any system is energized — start this process weeks before installation
- Contact DigAlert at least 2 working days before any digging; this is California law
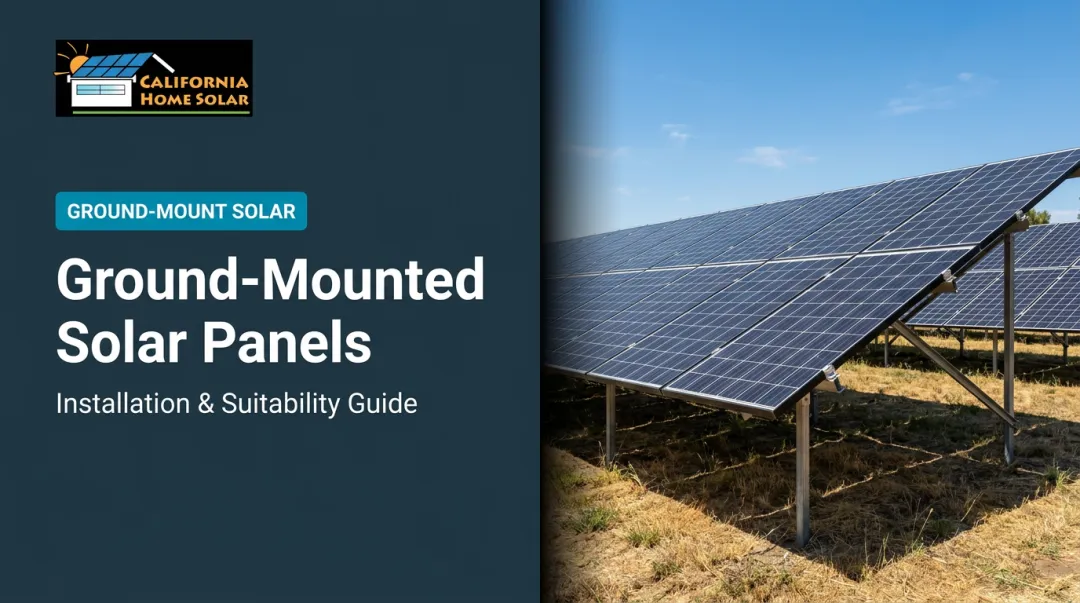
Ground-Mount Solar Installation with Bobcat Equipment
According to Solar Power World, ground-mount systems involve steel supports, heavy equipment, pile driving, and underground assessment to avoid rock, electrical lines, and plumbing — a different scope of work entirely from rooftop installations.
The installation sequence moves in one direction:
Site assessment → permits → grading → foundation installation → trenching → racking assembly → panel mounting → electrical integration → inspection → PTO
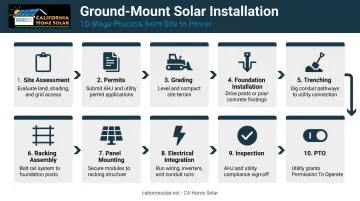
Bobcat equipment is deployed primarily during the grading, foundation, and trenching phases. That's roughly the first third of the project timeline, yet it sets the precision and structural integrity for everything that follows.
Prerequisites and Site Conditions
Before any equipment is scheduled, confirm the following:
- Sun exposure: The array footprint should be south-facing with minimal shading from trees, structures, or topographic features
- Setback requirements: Per LADBS Information Bulletin IB-P-GI-2020-027, setback requirements do not apply to free-standing ground-mount PV arrays, but a 10-foot clear, brush-free area is required around the array
- Lot coverage: In LA County unincorporated areas, small-scale ground-mount solar is capped at 25% lot coverage or 2.5 acres, whichever is less, with a maximum height of 15 feet
- Soil assessment: This determines your foundation type — and your foundation type determines which Bobcat attachment you need. Medium-density soils suit driven piles; rocky or decomposed granite terrain requires ground screws or helical piles. The USDA Web Soil Survey is the authoritative starting point for site-specific data
- Underground utilities: California law requires contacting DigAlert 2 working days (not including the notification date) before any excavation. This applies to auger drilling, pile driving, and trenching equally
Do not proceed on unstable ground (expansive clay, waterlogged soil, or grades beyond your racking system's tolerance) without engineering review. California Building Code Chapter 18 requires geotechnical investigations for deep foundations unless sufficient existing data supports the design.
Permits and Interconnection Approval
Secure all permits before equipment arrives on-site. For California ground-mount installations, this typically means:
- Building permit (structural support)
- Electrical permit (system wiring and interconnection)
- Grading permit if excavation exceeds 50 cubic yards in LA County
Utility interconnection runs on a separate timeline from local building permits. Key steps vary by utility:
- LADWP: Requires final permit release, solar inspection, net meter installation, and system unlock before operation
- SCE: Can issue PTO within 10 business days for complete applications — incomplete submissions restart that clock
Start permitting well before your scheduled installation date. Equipment scheduling depends on it, and utility timelines rarely compress.
Bobcat Equipment and Attachments for Ground-Mount Solar
Most residential ground-mount projects work well with a mid-size skid steer or compact track loader. Tracked models are the better choice for Southern California's softer and uneven terrain — they distribute weight more evenly and cause less ground disturbance than wheeled skid steers. The table below shows which Bobcat models are most relevant to this work and where their hydraulic limits fall.
Verified Bobcat specs relevant to ground-mount work:
| Model | Rated Operating Capacity | Standard Hydraulic Flow | High-Flow Option |
|---|---|---|---|
| S450 Skid Steer | 1,300–1,370 lb | 16.7 gpm / 3,300 psi | None |
| T450 Compact Track Loader | 1,490 lb | 16.7 gpm / 3,300 psi | None |
| T550 Compact Track Loader | 1,995 lb | 17.1 gpm | 26.7 gpm available |
Attachment selection by task:
- Level the site and clear vegetation with a grader blade or standard bucket
- Drill foundation holes in medium-to-firm soils using a hydraulic auger (10"–14" bit)
- Drive helical piles or ground screws in rocky or decomposed granite with a rotary drive head — the SoCal hillside standard
- Install driven steel foundations in clay or sandy soils using a hydraulic post/pile driver
- Run conduit from array to electrical panel with a chain trencher (4–6 ft depth capacity)
- Move racking materials and panel pallets across the site with pallet forks
Critical hydraulic compatibility note: Ground screw and helical pile drive heads typically require 12–30 gpm and pressures up to 3,500 psi. The T550 with its high-flow system handles this; the T450 and S450 at standard flow (16.7 gpm) won't meet the upper flow demands of high-torque rotary drive heads. Verify hydraulic specs before renting an attachment.
Step-by-Step Installation Process
Follow this sequence without skipping steps — skipping ahead, such as installing panels before racking is fully torqued, creates compounding alignment errors that cost far more to fix than to prevent.
Step 1 — Site Grading and Clearing
Attach the grader blade or bucket and level the array footprint. Clear vegetation, establish a stable working surface, and stockpile or remove displaced soil so it doesn't interfere with foundation work.
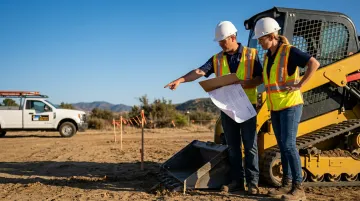
Step 2 — Layout and Marking
Stake post locations using string lines and measuring tape referenced against your engineer-stamped site plan. This step demands precision. Per Unirac GFT installation standards, pile position tolerance is ±1 inch in both north-south and east-west directions, with a rotation tolerance of ±2 degrees. Errors here propagate across the entire rail system.
Step 3 — Foundation Installation
Bobcat equipment drives this phase, and the right attachment depends on soil conditions:
- Hydraulic auger: Drill each hole to engineer-specified depth. IronRidge's Design Assistant notes that larger hole diameters can reduce depth to as little as 36 inches, but actual parameters depend on soil class, pipe size, and load criteria
- Rotary drive head: Spin helical piles or ground screws to specified torque and depth; required in rocky or decomposed granite soils common to LA County hillside communities
- Post/pile driver: Used in clay or sandy soils for driven steel foundations
After each installation, verify plumb and height before moving to the next post. Catching drift early — every 3–4 posts — is far easier than correcting it at the end of a row.
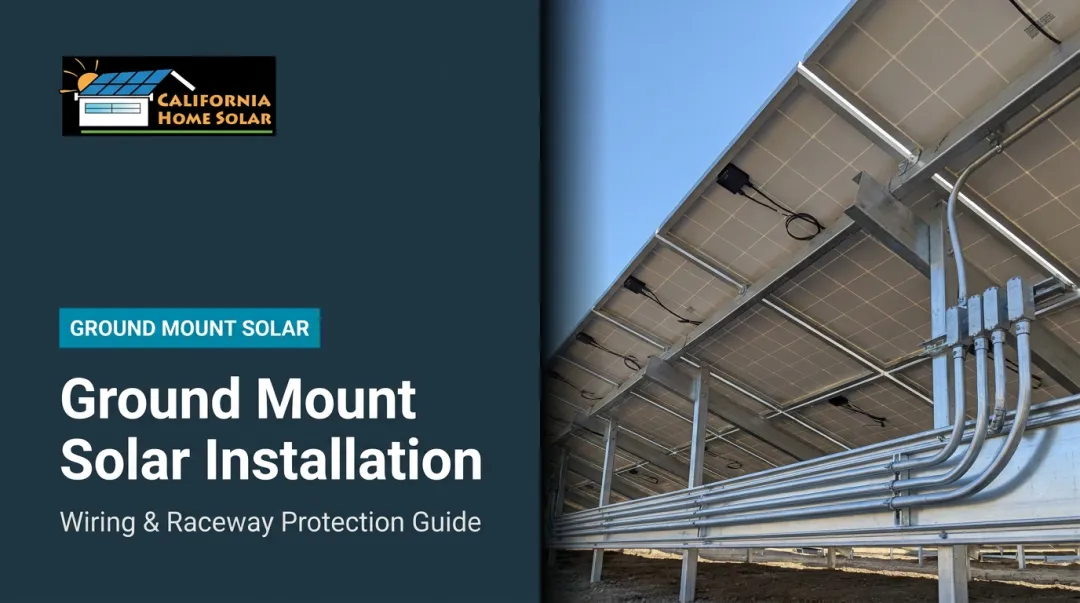
Step 4 — Trenching for Electrical Conduit
Attach the chain trencher and cut the conduit run from the array to the point of interconnection. Minimum burial depths per NEC/CEC Table 300.5:
- 18 inches for nonmetallic raceway in standard locations
- 24 inches in areas subject to vehicle traffic
After conduit is laid, bed it in 3–4 inches of clean sand before backfilling — this protects the conduit from backfill damage and satisfies LADWP Spec 104 requirements for rocky trench conditions. Keep backfill operations slow and controlled near the trench.
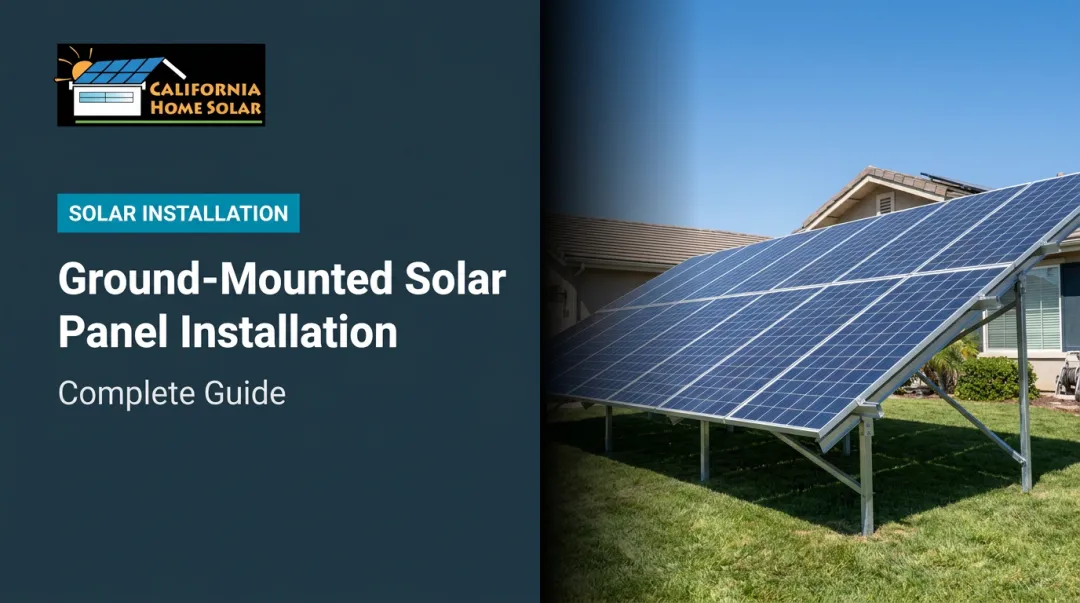
Step 5 — Racking Assembly and Panel Mounting
Use pallet forks to stage racking materials at the array. Assemble the rail system onto installed posts per the manufacturer's instructions, torquing all hardware to spec. As reference points: IronRidge top-cap set screws require 240 in-lb for Schedule 40 pipe; Unirac standard mid-clamps require 10 ft-lb.
Once racking is positioned and staged, crews install panels by hand — Bobcat equipment doesn't have a role beyond material delivery at this stage.
Step 6 — Electrical Integration
Install inverter(s), disconnects, conduit runs, and wiring per the approved electrical plans. In California, a CSLB C-46 Solar Contractor classification covers the solar system installation, but all electrical work must fall within the scope of applicable licensing — a licensed electrician handles this phase.
Do not energize any circuit before all inspections pass and the utility grants Permission to Operate (PTO).
Common Installation Problems and Fixes
Post Misalignment or Out-of-Plumb Foundations
Problem: Posts installed at incorrect depth or angle, causing rails to sit crooked and panels to be unsecured.
Cause: Rushing the staking process, inconsistent auger depth, or skipping plumb checks between installations.
Fix: Use a post level after every 3–4 posts. Minor deviations may be corrected with adjustable racking components. Severe misalignment means pulling and reinstalling — no remediation patch will hold up under load.
Refusal During Pile or Ground Screw Installation
Problem: The auger or rotary drive head hits bedrock, boulders, or caliche (the calcium carbonate hardpan common in Southern California soils) before reaching required depth.
Cause: Inadequate soil investigation before installation. Decomposed granite and caliche layers appear at relatively shallow depths across LA County hillside communities, Antelope Valley, and parts of the San Gabriel Valley.
Fix: Switch to a rock-rated auger bit or chisel-tip ground screw. In extreme cases, pre-drill a pilot hole with a hammer drill. If refusal recurs across multiple post locations, consult your racking manufacturer. They can advise on alternative foundation solutions specific to that section of the array.
Trench Collapse or Conduit Damage During Backfill
Problem: Sandy trench walls collapse during digging, or conduit is damaged by Bobcat bucket pressure during backfill.
Cause: Trenching through loose soils without conduit protection, or aggressive bucket movement too close to the trench line.
Fix:
- Bed conduit in clean sand before backfilling
- Work Bobcat bucket movement from the sides of the trench, not directly over it
- Mark all conduit runs clearly for future locating
Pro Tips for Efficient Ground-Mount Solar Installation
Four practices separate efficient ground-mount installs from costly, avoidable setbacks:
Plan machine traffic first. Work foundation installation from the farthest point of the array back toward the access point. Driving the Bobcat over already-installed posts damages them and compacts soil where drainage and structural stability matter most.
Schedule heavy civil work during dry weather. Southern California's clay soils become adhesive and unstable after rain. A tracked loader handles wet conditions better than a wheeled skid steer, but dry conditions are always preferable for foundation work.
Document every foundation installation. Photograph each post at final depth with a measuring reference visible in the frame and record torque values for helical pile and ground screw installations. This protects you during permit inspections, satisfies racking warranty requirements, and covers you if structural questions surface later.
Verify hydraulic compatibility before renting attachments. A mismatch between the drive head's flow demand and the machine's hydraulic output is one of the most common equipment problems on ground-mount jobs. Confirm specifications before anything arrives on-site.
If this process sounds involved, that's because it is — which is why most Southern California homeowners work with a licensed contractor rather than coordinating equipment, permits, and soil assessments independently.
California Home Solar has 36 years of local installation experience and has been recognized as a Top 500 Solar Contractor. They handle everything from site assessment to final permission to operate, so you don't have to.
Conclusion
The civil preparation phase determines the quality of a ground-mount solar installation. Precise grading, correctly installed foundations, and clean trenching create the conditions for a system that generates reliable energy for 25–30 years. Bobcat equipment makes this phase faster and more consistent — but only when operated by experienced crews following an engineered plan.
Soil assessment, attachment selection, permit compliance, and post-installation validation each carry real consequences. Get them right, and the system performs as designed for decades. Skip steps or cut corners, and structural or code failures surface quickly — often at significant cost.
California Home Solar has handled ground-mount installations across Southern California for 36 years, navigating the soil conditions, permitting requirements, and site variables that define this region. If you're planning a ground-mount system, contact our team to discuss your site and get an accurate project assessment.
Frequently Asked Questions
How much does a ground-mount solar installation with Bobcat equipment cost?
Total cost depends on system size, soil conditions, foundation type, and local labor rates. According to Solar Power World, some ground-mount systems cost less than rooftop alternatives when expensive roof work is avoided — though Bobcat civil work adds upfront cost, it reduces overall labor hours.
What Bobcat attachments are needed for ground-mount solar installation?
Core attachments include a grader blade or bucket for site prep, a hydraulic auger or rotary drive head for foundations, a chain trencher for conduit runs, and pallet forks for materials. Soil conditions drive the choice — decomposed granite needs a rotary drive head, while sandy loam typically handles a standard auger.
Can I install ground-mount solar panels myself using a Bobcat?
A competent equipment operator can handle the civil groundwork, but California requires a licensed contractor to pull permits and a licensed electrician for all electrical work. Foundation errors carry structural consequences, and electrical errors carry serious safety and liability risks — making professional involvement essential on both fronts.
How long does a ground-mount solar installation take with Bobcat equipment?
Civil work on a residential-scale system typically takes 1–2 days with a Bobcat. Total installation — including racking, panels, and electrical — spans roughly 3–5 days for an experienced crew under normal conditions. Difficult terrain, rocky soil, or complex permitting requirements extend the timeline.
What soil types in Southern California work best for Bobcat-driven ground-mount foundations?
Sandy loam and moderately dense clay suit driven piles, while rocky soils and decomposed granite — common on LA County hillsides and in the Antelope Valley — require ground screws or helical piles with a rotary drive head. A soil assessment before installation determines the right approach.
Do I need permits for a ground-mount solar installation in California?
Yes. California requires both a building permit and an electrical permit for any grid-tied ground-mount system. Utility interconnection approval (permission to operate) from your serving utility — LADWP, SCE, or other — must also be obtained before the system is turned on. Start the permitting process well before your installation date.