Introduction
A failed commercial window installation doesn't just look bad — it can trigger failed inspections, voided warranties, and weeks of costly remediation during business hours. Larger opening sizes, structural integration requirements, multi-trade coordination, and California's Title 24 energy code compliance make this a job for licensed specialists, not a general handyman or unlicensed crew.
The risks go beyond inconvenience. Water infiltration, chronic air leakage, and code violations are common outcomes when commercial windows are installed without proper expertise — and unlike a residential repair, fixing a botched commercial job typically means disrupting tenants, coordinating multiple trades, and absorbing significant unplanned costs.
This guide walks business owners and property managers through the complete process: from selecting the right window system and meeting California code prerequisites, to the step-by-step installation sequence and post-installation validation that closes out a project properly.
Key Takeaways
- Commercial window installation in California requires licensed contractors, building permits, and Title 24 compliance — skipping any of these creates permit and liability exposure
- Choose your window system before anything else; switching mid-project causes structural rework and cost overruns
- Flashing, back dam installation, and rough opening preparation determine long-term water performance more than any other factor
- Validate air and water tightness before sign-off — problems caught immediately cost far less than problems found weeks later
- Low-E coated, double or triple-pane windows meeting Title 24 thresholds can reduce heating and cooling loads by up to 30%
Types of Commercial Windows to Know Before Installation
Choosing the wrong window system before installation begins is one of the most expensive mistakes on commercial projects. Switching from a storefront system to individual operable units mid-job — or vice versa — typically means re-engineering the rough opening, adjusting structural headers, and reordering materials. Getting the selection right upfront saves time, budget, and significant rework.
Storefront and Curtain Wall Systems
These are the two dominant systems for commercial facades, and they serve different structural roles.
Storefront systems are ground-level aluminum-framed glass assemblies. They're structurally supported by the floor slab below and the overhead framing above, making them well-suited for retail entries, office lobbies, and low-rise commercial facades. Under California's 2025 Title 24 Part 6, curtain wall and storefront systems are classified as envelope compliance items — meaning their U-factor and RSHGC values must meet the prescriptive thresholds for the project's climate zone.
Curtain wall systems are non-structural glazing assemblies that hang from the building structure itself and can span multiple floors. They're common on mid-rise and high-rise buildings where a continuous glass envelope is the design intent. Both systems require specialist installation and structural engineering review — they're not interchangeable with standard window replacement work.
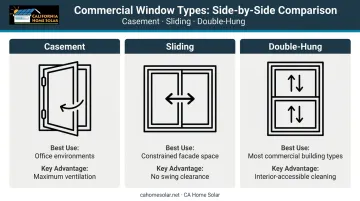
Operable Window Types for Commercial Spaces
For lower-rise projects — offices, hospitality properties, mixed-use buildings — individual operable windows are often the practical choice. Unlike storefront and curtain wall systems, these units can be replaced or installed independently without structural re-engineering. The three most common types:
| Window Type | Best Use Case | Key Advantage |
|---|---|---|
| Casement | Office environments | Maximum ventilation; opens fully outward |
| Sliding | Constrained facade space | No swing clearance required |
| Double-hung | Most commercial building types | Interior-accessible cleaning; both sashes move |
Note that California's CBC Chapter 24 governs glass and glazing in all buildings and structures. Safety glazing (tempered or laminated glass) is required in hazardous locations including near doors, stairwells, and high-traffic zones — and each pane of tempered glass must be permanently identified under CBC Section 2406.3.
Specialty and Custom Commercial Windows
Specialty windows come into play for historic building restorations, fixed-glass picture windows for unobstructed views, or custom geometric shapes driven by architectural or branding requirements. They carry real schedule implications worth planning around. Custom units typically have longer lead times than standard commercial products. Rough openings must also be prepared to tighter tolerances — a gap that's off by a fraction of an inch can force costly field modifications.
Prerequisites and Planning for Commercial Window Installation
Commercial window installation follows a clear sequence: preparation → procurement → installation → inspection. Skipping steps in the preparation phase creates expensive problems — the kind that surface during inspection or after the first rainy season, when fixing them costs far more than getting it right upfront.
Site and Structural Readiness
Before a single window unit is ordered, the rough openings need a thorough assessment:
- Dimensions and condition — openings must be plumb, square, and structurally sound; any framing that's out of square will transfer stress to the window frame
- Substrate compatibility — wood, steel, and masonry each require different anchoring methods and flashing approaches; confirm the substrate before specifying fasteners
- Existing moisture damage — water damage or rot in the framing must be fully remediated before installation proceeds
Three conditions should stop a project outright until resolved:
- Rough openings showing active moisture damage or rot
- Structural headers undersized for the new opening width
- Substrates that cannot support the frame anchoring loads of the specified window system
Permitting and California Code Compliance
In California, building permits are required for commercial window installation in virtually all cases — particularly when adding new openings, modifying header sizes, or replacing windows as part of a change of use. LADBS confirms that window replacement permits exist specifically to verify Energy Code and safety glazing requirements.
Title 24 mandatory thresholds for nonresidential vertical fenestration under the 2025 code cycle:
| Scope | Max U-Factor |
|---|---|
| New construction | 0.47 |
| Alterations replacing >150 sq ft | 0.58 |
For projects in Southern California, the prescriptive path requires meeting climate-zone-specific performance targets. 2025 prescriptive values by product type are as follows:
| Product Type | Climate Zone | Max U-Factor | Max RSHGC |
|---|---|---|---|
| Fixed window | CZ 6, 7, 8 | 0.36 | 0.25 |
| Fixed window | CZ 9 | 0.34 | 0.22 |
| Fixed window | CZ 10 | 0.36 | 0.25 |
| Operable window | CZ 6–10 | 0.46 | 0.22 |
| Curtain wall/storefront | CZ 6 | 0.41 | 0.26 |
| Curtain wall/storefront | CZ 7 | 0.38 | 0.25 |
| Curtain wall/storefront | CZ 8, 9, 10 | 0.41 | 0.26 |
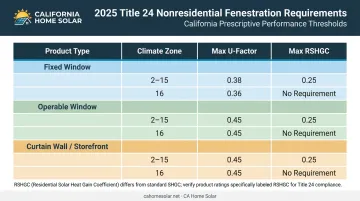
Note that CEC uses RSHGC (Relative Solar Heat Gain Coefficient), not standard SHGC — verify product data sheets use the correct metric. Inspections are required at rough opening and final stages.
Compatibility and Product Specification Checks
With permits in hand and Title 24 targets confirmed, the final pre-order step is verifying product compatibility. Before ordering, confirm:
- Window unit dimensions match rough opening size with correct tolerances for the specified system
- Frame material compatibility with the building envelope — aluminum frames require thermal breaks in climate zones with meaningful temperature swings
- Products are documented against CEC Title 24 requirements (ENERGY STAR certification alone does not automatically satisfy Title 24; compliance must be verified against CEC values)
For businesses using PACE financing programs such as HERO, the selected windows must also meet the program's energy efficiency criteria before financing can be applied. CA Home Solar is a HERO Registered Contractor serving Southern California — only contractors registered and in good standing with the program can install HERO-financed products.
How Commercial Window Installation Works: Step-by-Step
The installation sequence below applies to most commercial window types. Shortcuts in flashing and weatherproofing are the leading cause of long-term water intrusion and warranty claims — skipping steps isn't optional, it's how defects start.
Preparing the Opening
Start by clearing the rough opening of old frames, debris, and any damaged substrate material. Then verify all four sides — sill, head, and both jambs — are plumb, level, and square. On large commercial openings, use a laser level rather than a spirit level, since the margin for error is tighter at scale.
Apply a house wrap or vapor-resistant barrier around the interior edges of the jambs and sill before the window goes in. This protects the wall cavity if any water gets past the exterior flashing.
Install the back dam. This is a tapered wood or clapboard piece set on the sill with the thick edge toward the interior. Its job is to direct any water that enters the sill area back outward rather than into the wall cavity. Inexperienced installers skip this step — and chronic sill leaks follow.
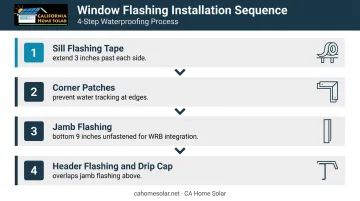
Flashing and Moisture Barrier Installation
The flashing sequence must go in the correct order. Per Building Science Corporation's pan flashing guidance and the AAMA 2400-21 standard, each layer must overlap the one below it so water is directed outward at every step:
- Sill flashing tape first — extend 3 inches past each side of the opening
- Corner patches — cut and install at each sill corner to prevent water tracking around the edges
- Jamb flashing — applied after sill; per AAMA 2400-21, do not fasten the bottom 9 inches of jamb flashing so the WRB can be slipped underneath in weatherboard fashion
- Header flashing and drip cap last — installed so it overlaps the jamb flashing above
Apply caulk along the rough opening's exterior sides and top using a compatible sealant. Do not caulk the sill bottom — the sill bottom must remain open to allow any infiltrated water to drain out. This is a critical and frequently misunderstood detail.
Positioning, Leveling, and Securing the Window
Set the window unit in the opening from the exterior. Center it and align the nail fin centerlines to pre-marked horizontal reference lines. Insert shims under the sill and behind the jambs to bring the unit to plumb and level.
Check squareness by measuring diagonally corner-to-corner — both measurements must match. If they don't, the unit is racked. No fasteners go in permanently until plumb, level, and square are confirmed. Tightening fasteners into a racked frame makes the problem irreversible.
Integrating with the Building Envelope
After the unit is fastened:
- Fold the header vapor barrier back down over the top flashing
- Fit the drip cap over the header so water sheds outward
- For curtain wall systems, tie exterior glazing panels back to the window frame per the manufacturer's sequence
These steps are straightforward on single-story installs. Multi-story and curtain wall projects add a coordination layer that's easy to underestimate. Structural and waterproofing trades must stay in sync throughout this phase. When one trade closes up the wall before another finishes, defect claims follow — and they're among the most common disputes on commercial glazing projects.
Post-Installation Checks and Common Problems to Watch For
Problems discovered weeks after installation — after the wall has been closed up and interior finishes applied — cost dramatically more to fix than those caught during the installation walk-through. Schedule a formal validation check before interior finishes go on, while access is still easy.
Post-Installation Validation
Visual and structural checks:
- Inspect all flashing laps and sealant joints for gaps or voids
- Verify operable windows open, close, and latch correctly
- Confirm the unit is still plumb and square after final fasteners are set
- Check for visible air gaps between frame and rough opening from the interior
Functional testing:
- Water test per AAMA 501.2-25 — controlled spray at the frame perimeter to check for leakage at storefronts, curtain walls, and sloped glazing
- Blower door or smoke pencil test to detect air infiltration around the frame
California commercial projects may require third-party inspection sign-off before the permit can be closed. Confirm this requirement with your local building department at the permitting stage, not after installation is complete.
Common Problem 1: Water Infiltration at the Sill
Symptom: Water pooling on the interior sill or staining below the window after rain.
Likely cause: Missing or improperly lapped sill flashing, no back dam installed, or caulk applied across the sill bottom (which traps water rather than letting it drain).
Fix: Remove interior trim, inspect sill flashing condition, and re-flash per the correct sequence. Confirm the sill bottom is left open to drain.
Common Problem 2: Window Not Opening, Closing, or Sealing Properly
Symptom: Operable sash binds, won't latch, or leaves visible gaps when closed.
Likely cause: The unit was fastened before being fully squared and leveled, causing frame racking — or shimming was inadequate and the frame shifted under its own weight.
Fix: Loosen fasteners, re-shim, re-square, and re-fasten. Severe racking may require full removal and reinstallation.
Common Problem 3: Condensation Between Panes or at Frame Edges
Symptom: Fogging or condensation between the glass panes, or condensation forming at interior frame edges.
Likely cause: Failed insulated glazing unit (IGU) seal — often from point-loading the glass during installation, improper handling, or incompatible sealants that degrade the spacer seal. Frame-edge condensation typically indicates a missing thermal break.
Fix: A failed IGU seal requires glass unit replacement under warranty. Frame condensation points to a thermal break issue — check whether the window was stored and handled per manufacturer guidelines before concluding the spec is at fault.
Pro Tips for a Smoother Commercial Window Installation
Small decisions made before and during installation have an outsized effect on the final result. These four practices consistently separate problem-free commercial window projects from ones that drag on or generate callbacks:
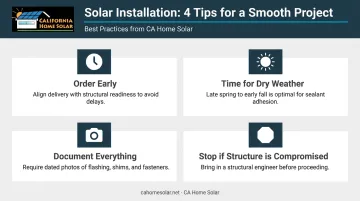
- Order windows before framing is complete. Commercial-grade and custom units carry long lead times — often several weeks. Late orders are one of the most consistent causes of schedule overruns. Align delivery with structural readiness so units don't sit on-site and risk damage.
- Time installation for dry weather. In Southern California, late spring through early fall offers the best conditions for flashing tape and sealant adhesion. If wet-month work is unavoidable, tent all openings between installation phases.
- Build photo documentation into the contract. Require dated photos of flashing details, sill flashing, shim placement, and fastener locations before walls close up. This record supports warranty claims, permit close-out, and future maintenance — and should be a contractual deliverable, not an afterthought.
- Stop work if the structure is compromised. If inspections reveal header issues, wall cavity moisture damage, or substrate incompatibility, bring in a structural engineer before proceeding. Continuing over a compromised structure voids warranties and transfers liability to the property owner.
Frequently Asked Questions
How much does commercial window installation cost?
Commercial window installation costs vary widely based on project scope, building type, window system, and glazing specifications. Storefront systems cost more or less than individual unit replacements or curtain wall assemblies depending on complexity. California permit fees and Title 24 compliance documentation add to the total — confirm both are included in any contractor quote.
What types of windows do commercial buildings use?
The main systems are storefront assemblies, curtain wall systems, casement, sliding, fixed/picture, and double-hung windows. The best choice depends on building height, occupancy type, local climate zone, and energy code requirements.
Do I need a permit for commercial window installation in California?
Yes. Permits are required in virtually all cases — especially when adding new openings, changing opening sizes, or replacing windows during a change of use. Title 24 energy compliance documentation is also mandatory; LADBS issues window replacement permits specifically to verify Energy Code and safety glazing standards.
How long does commercial window installation take?
Individual window replacements may take one to two days per unit depending on size and access conditions. Full storefront or curtain wall installations on larger commercial buildings can take weeks to months, depending on project scope, permit approval timelines, and material lead times.
What is the difference between a storefront system and a curtain wall system?
Storefront systems are ground-level assemblies structurally supported by the floor and overhead framing — common for retail entries and low-rise facades. Curtain wall systems hang from the building structure and span multiple floors, providing a continuous glass envelope. Curtain walls require more complex engineering, specialist installation, and carry stricter Title 24 compliance documentation requirements.
Can new commercial windows improve energy efficiency?
Yes. Low-E coated, double or triple-pane windows reduce heating and cooling loads by limiting solar heat gain and improving insulation value. The 2025 Title 24 prescriptive requirements set the performance floor (U-factor ≤ 0.34, RSHGC ≤ 0.22 for fixed windows in Climate Zone 9) — windows exceeding those thresholds deliver even greater savings.