The problems aren't just inefficiency. Skipped load calculations produce oversized or undersized units. Improper refrigerant handling causes leaks and compressor failure. Unpermitted work in California can complicate home sales and create disclosure obligations under California Civil Code. These aren't edge cases — they're what happens when installation is rushed or handed to someone cutting corners.
This guide walks through every major phase of a correct HVAC installation: what needs to happen before the first bolt is turned, the sequence technicians follow on installation day, and the post-installation checks that confirm the system will actually perform as promised. If you're a homeowner evaluating contractors or preparing for a replacement, this is what the process should look like.
Key Takeaways
- HVAC installation is technically complex: refrigerant handling requires EPA certification, electrical work must meet code, and DIY attempts void manufacturer warranties
- Run a Manual J load calculation before selecting or ordering any equipment
- Installation follows a defined sequence: site evaluation → permits → old system removal → equipment placement → ductwork and refrigerant → electrical and thermostat → testing
- California requires Title 24 compliance plus mechanical, electrical, and (for gas systems) gas permits — skipping these creates real legal and financial exposure
- Federal tax credits and utility rebates may offset costs, but incentive programs change — verify availability before your installation date
HVAC Installation Guide
A complete HVAC installation moves through four phases: preparation and planning, physical equipment placement, system integration (ductwork, refrigerant, electrical), and validation. For a straightforward replacement of an existing system, a competent team completes the job in 4–8 hours. New installations requiring ductwork modifications or electrical upgrades can stretch across multiple days.
Understanding the sequence helps you ask the right questions when evaluating contractors — and recognize when someone is proposing to skip steps they shouldn't.
Prerequisites and Safety Considerations
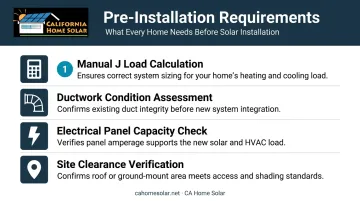
Before any equipment is ordered or scheduled, four things must be confirmed:
- Manual J load calculation — ACCA's Manual J 8th Edition is the national ANSI-recognized standard for residential equipment sizing. The DOE's 2018 literature review found oversizing in 31%–93% of systems — often 33%–48% above what a proper Manual J would specify. Most of those oversized installs happened because technicians skipped the calculation entirely
- Ductwork condition assessment — existing ducts are inspected for leaks, damage, and compatibility with the new system's airflow requirements
- Electrical panel capacity — the panel must support the new unit's circuit requirements; an undersized panel requires an upgrade before installation proceeds
- Site clearance — both indoor and outdoor unit locations must be accessible, level, and code-compliant
California-specific compliance requirements:
California's Title 24 energy standards apply to new HVAC installations, replacements, and alterations in both new construction and existing homes. Requirements include:
- Duct leakage testing (new duct systems must measure ≤5% leakage; alterations with more than 25 feet of new duct must test at ≤10%)
- Refrigerant charge verification (required for all heat pumps and ACs in specific climate zones)
- CF1R, CF2R, and CF3R compliance documentation
- Mechanical and electrical permits pulled before work begins (gas permit required for gas systems)
A licensed contractor handles permit acquisition as part of the job. Permits matter beyond paperwork: California Civil Code requires disclosure of unpermitted alterations on property transfer forms, which can complicate or delay home sales.
CA Home Solar's licensed HVAC team manages full permit compliance for Southern California homeowners, including Los Angeles County jurisdictions where permit requirements vary by city.
Non-negotiables before work begins: Do not proceed if there are active gas leaks, exposed wiring, inadequate panel capacity, or structural problems in the installation area. Power must be shut off at the breaker before any work starts.
Tools and Parts Required
HVAC installation requires specialized equipment that most homeowners don't own — and some they're legally prohibited from using without certification.
Essential tools:
- Refrigerant gauges and manifold gauge set
- Vacuum pump (for system evacuation)
- Duct cutters and benders
- Multimeter and torque wrench
- Precision screwdrivers and screw guns
- Level
Refrigerant handling equipment requires EPA Section 608 certification — any technician who maintains, services, or disposes of equipment that could release refrigerants must be certified. Intentional venting of refrigerants violates the Clean Air Act. This is the single biggest reason HVAC installation is not a DIY task.
Key components typically required:
| Component | Usually Supplied By |
|---|---|
| Indoor air handler or evaporator coil | Contractor |
| Outdoor condenser unit | Contractor |
| Refrigerant line set (copper) | Contractor |
| Electrical disconnect box | Contractor |
| Thermostat and low-voltage wiring | Contractor |
| Line set insulation wrap | Contractor |
| Ductwork materials (if needed) | Quoted separately |
Ductwork materials — sheet metal, flex duct, mastic sealant — are typically a separate line item from base installation costs. Ask your contractor to specify this clearly in writing before work begins.
How to Install an HVAC System: Step-by-Step
HVAC installation follows a strict sequence. Rushing any step creates problems that often don't surface for weeks — by then, the cause is harder to trace.
Step 1 — Site Evaluation and Old System Removal
The technician measures square footage, reviews insulation quality, inspects existing ductwork, and confirms electrical capacity. If replacing an existing system, the old unit is powered down and refrigerant is recovered using certified equipment, as required by EPA regulations before any system can be disconnected or disposed of. Components are then removed.
Step 2 — Positioning Indoor and Outdoor Units
The indoor air handler or furnace coil is placed in the designated space (basement, utility closet, or attic) on a level, secure surface to prevent vibration. The outdoor condenser goes on a concrete pad or mounting brackets in a well-ventilated area, clear of vegetation and debris. Local building codes set minimum distances from gas meters and property lines — your contractor should know the specific requirements for your city.
Step 3 — Ductwork Connection and Refrigerant Line Set
Existing ductwork is inspected and sealed with mastic compound or metal tape. The DOE reports that ducts in typical homes lose 20%–30% of moving air through leaks and poor connections, so sealing is not optional if you want the system to perform.
The refrigerant line set (a pair of insulated copper pipes) runs from the indoor coil to the outdoor condenser. All connections are brazed, insulated, and protected from physical damage.
ACCA's quality installation guidance specifies a nitrogen purge during brazing, a nitrogen pressure test, triple evacuation, and a hold to 500 microns or less before charging. Ask your contractor to confirm they follow this protocol — skipping any step here leads to moisture contamination and premature compressor failure.
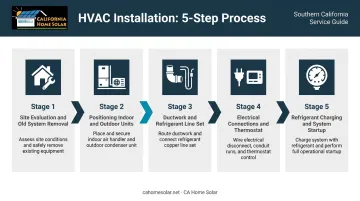
Step 4 — Electrical Connections and Thermostat Installation
A licensed HVAC technician connects the condenser and air handler to the electrical panel with a correctly sized circuit breaker and disconnect box. Low-voltage thermostat wiring is run between the air handler and the thermostat location. Smart thermostat setup and configuration happens at this stage.
Step 5 — Refrigerant Charging and System Startup
The technician evacuates the refrigerant lines using a vacuum pump to remove moisture and air contamination, then pressure-tests for leaks. The system is charged with the manufacturer-specified refrigerant type and quantity. ENERGY STAR notes that an incorrect refrigerant charge can lower efficiency by 5%–20% and cause premature component failure.
For gas systems, combustion analysis and flue vent checks are performed before the system is powered on and monitored through its startup sequence.
Post-Installation Checks and Validation
A completed installation isn't a finished installation until validation is done. These checks confirm the system is safe and performing as designed.
Visual and structural checks:
- All electrical connections tight and correctly labeled
- Refrigerant lines properly insulated, no kinks
- Condensate drain line flowing freely (a blocked drain causes water backup and mold growth)
- Outdoor unit level and securely mounted
Functional testing:
- Measure supply and return air temperatures — the temperature differential under typical conditions should fall in the 16–22°F range from return to supply
- Verify airflow at each register
- Confirm the thermostat accurately reads room temperature and correctly cycles the system
Skipping this phase is a false economy. Problems like an improper refrigerant charge or a blocked condensate drain rarely surface immediately. Left unchecked, they cause compressor failure or structural water damage weeks down the line. California's Title 24 compliance process mandates field verification for refrigerant charge, duct sealing, and system airflow on qualifying installations — proper commissioning is a code requirement, not an optional step.
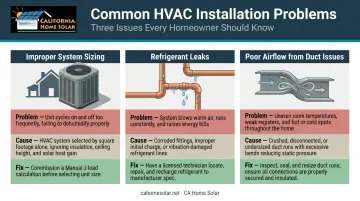
Common Installation Problems and Fixes
Even careful installs can develop issues. The three problems below account for the majority of callbacks — here's what causes each one and how a technician resolves it.
Improper System Sizing
Problem: The unit short-cycles (turns on and off too frequently) or runs continuously without reaching the set temperature.
This almost always traces back to a skipped or inaccurate load calculation. DOE research found oversizing in up to 93% of systems studied — often well above what a proper Manual J assessment would produce.
Fix: A licensed contractor returns to a Manual J load calculation and recommends the correct tonnage. Operating the wrong-sized system for even one season can erase years of potential energy savings.
Refrigerant Leaks
Problem: System blows warm air, ice forms on the evaporator coil, or energy bills spike without a change in usage.
Improperly brazed connections or a line set damaged during installation are the usual culprits. Even small leaks degrade cooling capacity over time.
Fix: A technician uses a leak detector or UV dye to locate the leak, repairs the connection, re-evacuates the system, and recharges to manufacturer specification. Refrigerant handling is EPA-regulated — not a DIY repair.
Poor Airflow Due to Duct Issues
Problem: Uneven temperatures between rooms, weak airflow at supply registers, or increased dust throughout the home.
Unsealed ductwork, loose connections, or kinked flex duct that's undersized for the system's airflow requirements are common causes.
Fix: A duct pressure test pinpoints leaks and restrictions. Sealing with mastic compound and replacing undersized sections restores proper airflow. In Southern California's climate — where systems run hard through long cooling seasons — duct efficiency has a direct impact on monthly energy bills.
Pro Tips for HVAC Installation
Schedule strategically. Book installations in spring or fall — before peak summer demand hits in Southern California. Lead times are shorter, contractor availability is better, and you won't be left without cooling during a heat wave. If you're doing new construction or a major renovation, plan ductwork before drywall goes up.
Get documentation in writing. Confirm your contractor pulls permits before work begins and request copies of inspection sign-off documents. Also ask for the manufacturer's warranty registration — most require professional installation and permit documentation to remain valid. Unpermitted HVAC work creates disclosure obligations under California law and can complicate home sales.
Explore available incentives.
Southern California homeowners may have access to several programs:
- IRS Section 25C Energy Efficient Home Improvement Credit — 30% credit for qualifying heat pump installations, up to $2,000/year cap; verify current eligibility at the IRS credits page since program terms are subject to change
- SoCalGas HEER Program — rebates available for qualifying high-efficiency natural gas furnaces in 2026; amounts vary by AFUE rating
- TECH Clean California — single-family HEEHRA incentives were fully reserved as of early 2026; check current availability before relying on this program
Financing is another option worth exploring alongside rebates. Through the HERO Program, qualifying HVAC installations can be financed with zero down payment, repayment terms of 5–25 years billed through property taxes, and approval based primarily on home equity rather than credit score. California Home Solar is a HERO Registered Contractor and can help homeowners access this option — and HERO financing doesn't affect eligibility for separate rebates or tax credits.
Know when to pause. If a technician finds unexpected structural issues — deteriorated subfloor under the air handler, asbestos in old duct insulation, or an undersized electrical panel — those must be resolved before installation proceeds. Don't pressure a contractor to skip structural remediation to save a day.
Conclusion
The quality of an HVAC installation determines everything that follows: efficiency, comfort, equipment lifespan, and whether the manufacturer warranty holds up. A system that's correctly sized, properly charged, and installed with sealed ductwork will outperform one that skipped key steps.
Southern California homeowners run their systems for most of the year. That difference shows up on every utility bill.
Prioritize contractors who pull permits, perform load calculations, and include post-installation validation as standard practice. For homeowners in the Los Angeles area, CA Home Solar is a licensed home energy contractor with 36 years of experience across solar, roofing, windows, and HVAC upgrades — handling the full process from system selection through permit sign-off.
Frequently Asked Questions
How long does HVAC installation typically take?
A standard replacement of an existing system typically takes 4–8 hours. Installations involving new ductwork, electrical upgrades, or attic air handler placement can extend across multiple days. Permit acquisition may also add lead time before physical work can begin.
Can I install an HVAC system myself?
No — refrigerant handling requires EPA Section 608 certification, electrical connections must meet local code, and self-installation typically voids the manufacturer's warranty. DIY installations also won't pass permit inspection in California.
What permits are required for HVAC installation in California?
California requires mechanical and electrical permits for HVAC installations; gas systems also require a gas permit. The installation must comply with Title 24 energy standards, including duct leakage testing and refrigerant charge verification.
Does HVAC installation include ductwork replacement?
Ductwork is typically a separate cost from the HVAC unit installation. The technician assesses existing ductwork and recommends repairs, sealing, or full replacement based on age, leakage test results, and compatibility with the new system.
What HVAC systems are best for allergies?
Systems paired with high-MERV filtration, UV air purifiers, or whole-home air purification are most effective for allergy sufferers. Proper duct sealing also prevents allergen infiltration from unconditioned spaces — often the biggest overlooked factor.
What are the top AC brands for Southern California homes?
Carrier, Trane, and Lennox are consistently recognized among the top residential AC brands for reliability, efficiency, and warranty support. For Southern California's climate zones, look for units rated SEER2 16 or higher to meet California's energy efficiency requirements.