Introduction
HVAC installation is a sequence of engineering decisions — load calculations, equipment selection, duct design, permits, installation, and testing — where a mistake at any stage costs money and comfort for years.
The consequences of poor design or installation are significant. DOE research estimates that more than 65% of residential HVAC systems are improperly installed and perform suboptimally, and ENERGY STAR states that incorrect sizing or installation can reduce system performance by as much as 30%.
In California — where Title 24 energy codes, HERS verification, and strict permit requirements apply — the stakes are even higher.
This guide walks through the full HVAC design and installation process — from Manual J load calculations and equipment selection through final commissioning. By the end, you'll know what separates a code-compliant, properly sized system from one that underperforms for the next decade.
Key Takeaways
- A Manual J load calculation is the required starting point — sizing by square footage alone produces oversized equipment, humidity problems, and higher energy bills
- Manual S (equipment selection) and Manual D (duct design) must follow that calculation — skip either step and you risk mismatched equipment or leaky ducts
- California requires mechanical permits for HVAC installations — unpermitted work can block utility rebates and draw CSLB penalties
- Post-installation testing — duct leakage, refrigerant charge, airflow, and static pressure — confirms the system performs as designed
- A system not sized or installed correctly can lose up to 30% of its rated performance before it runs a single season
HVAC System Design: Planning Before a Single Part Is Ordered
Every downstream decision — equipment size, duct layout, energy performance — is locked in at the design stage. Mistakes made here are expensive to undo once equipment is ordered and installed.
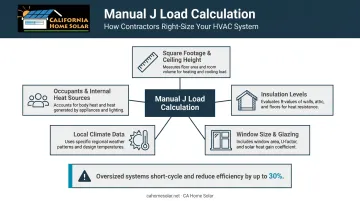
Load Calculation: The Foundation of Correct Sizing
A Manual J load calculation is a room-by-room analysis that determines a building's exact heating and cooling demand. It accounts for:
- Square footage and ceiling height
- Insulation levels (walls, attic, floor)
- Window size, orientation, and glazing type
- Local climate data and building orientation
- Number of occupants and internal heat sources
Skipping this step — or substituting a rule of thumb like "1 ton per 500 sq. ft." — consistently produces oversized equipment. Oversized systems short-cycle: they reach set temperature quickly, shut off, then restart within minutes. The result is comfort problems, component stress, humidity issues, and shorter equipment life, plus measurable energy penalties.
For Southern California homes specifically, local climate inputs matter. Homes in the Antelope Valley or San Gabriel Valley face extreme summer heat loads that coastal properties in Malibu or Redondo Beach never experience. A national average climate assumption produces the wrong answer for both.
Equipment Selection: Manual S
With accurate load numbers in hand, Manual S governs equipment selection. The principle: selected cooling capacity should not exceed total design load by more than 15%. That ceiling exists because an oversized unit won't run long enough to dehumidify properly, even if it can hit the thermostat setpoint.
The main equipment types and their best applications:
| Equipment Type | Best For |
|---|---|
| Central split system (air handler + condenser) | Homes with existing ductwork needing AC replacement |
| Heat pump (split or package) | Homes wanting heating and cooling from one system; minimal gas use |
| Ductless mini-split | Homes without ductwork, room additions, or targeted zone additions |
| Gas furnace + AC combination | Homes with gas service where heating demand justifies a dedicated furnace |
California efficiency minimums (effective January 1, 2023): split-system central ACs under 45,000 Btu/h require 14.3 SEER2; units 45,000 Btu/h or larger require 13.8 SEER2. Split-system heat pumps must meet 14.3 SEER2 and 7.5 HSPF2. Equipment that doesn't meet these thresholds cannot be legally installed in California.
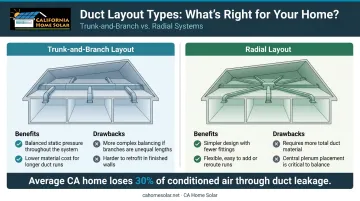
Ductwork and Airflow Design: Manual D
Manual D sizes the duct system to deliver the correct CFM (cubic feet per minute) to each room. Duct diameter, length, number of bends, and register placement all affect static pressure and airflow balance throughout the house.
Key design decisions:
- Trunk-and-branch vs. radial layouts — each has trade-offs for pressure balance and installation cost
- Return air sizing — undersized returns are among the most common causes of pressure imbalances and hot/cold spots
- Duct insulation — ducts running through unconditioned attics in Southern California need adequate insulation; the average California home HVAC system loses 30% of conditioned air into non-living spaces through leakage alone
- Control systems — smart thermostats and zoning dampers must be specified at the design stage so wiring is integrated, not retrofitted
- Zoning — damper-based zone control delivers real comfort and efficiency gains in larger Los Angeles County homes
HVAC Installation: Step-by-Step Process
Installation follows a defined sequence. Shortcuts — unsealed duct connections, skipped permits, improper refrigerant charging — create failures that take months to surface and are costly to diagnose.
Prerequisites and Site Readiness
Before any equipment is touched, confirm:
- Permits pulled (mechanical permit required by LADBS for any HVAC installation or modification)
- Electrical panel capacity verified for new equipment loads
- Site accessible for equipment delivery and technician vehicles
- Existing system safely shut down
- Structural clearances confirmed for indoor and outdoor unit placement
Non-negotiables before installation begins:
- No work starts without approved permits in California
- Outdoor unit placement must meet manufacturer clearance minimums and local zoning setbacks
- For replacement jobs, old equipment refrigerant must be recovered — EPA Section 608 prohibits intentional venting of refrigerants during service or disposal
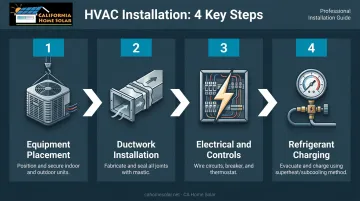
The Installation Sequence
Step 1: Equipment Placement Indoor air handler and outdoor condenser (or heat pump) are positioned, secured, and verified against manufacturer clearance specs. Refrigerant line sets are run between units.
Step 2: Ductwork Installation New duct systems are fabricated per the Manual D layout. All joints are sealed with mastic or UL-181 listed tape — cloth-backed duct tape is not an approved primary sealant under California code. Flexible duct runs are kept short and fully extended to prevent kinking. Return plenums are sealed to prevent drawing unconditioned air from attics or garages.
Step 3: Electrical and Controls A licensed technician connects line-voltage wiring, installs the dedicated circuit breaker, and wires the thermostat or smart controls. All connections must be code-compliant and properly grounded.
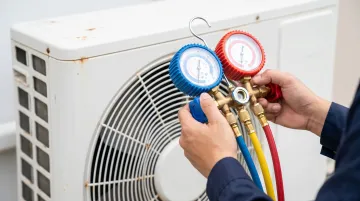
Step 4: Refrigerant Charging The system is evacuated of all non-condensables. Refrigerant is then charged using the superheat or subcooling method — not by volume estimate. ENERGY STAR data shows more than half of central AC and heat pump systems have been installed with incorrect refrigerant charge and/or airflow. Incorrect charge reduces efficiency, strains the compressor, and voids most manufacturer warranties.
Post-Installation Checks and Validation
California's HERS program makes post-installation verification mandatory, not optional — and the documentation produced here is what unlocks utility rebates and protects warranty claims.
Required verification:
- Duct leakage test — California HERS thresholds: 5% total leakage for new systems; 10% total or 7% leakage to outside for alterations/replacements. Testing uses 25 Pa pressure differential
- Airflow verification — confirm each supply register is delivering close to its Manual D design CFM
- Static pressure check — blower static pressure verified against design specs
- Refrigerant check — superheat or subcooling readings confirm correct charge
- Combustion check (gas systems) — burner flame inspection and flue draft verification
Hold onto every test result and permit closure document. SoCalGas won't pay furnace rebates without proof of permit closure, and LADWP heat pump rebates (up to $2,500 per ton) require compliant installation records. Those same documents support manufacturer warranty claims if equipment fails in the first few years.
Common HVAC Installation Problems and How to Fix Them
Common HVAC Installation Problems and How to Fix Them
Most HVAC installation failures trace back to three recurring mistakes. Recognizing them early saves money — and avoids replacing a system that just needs a proper diagnosis.
Oversized Equipment and Short-Cycling
Symptoms: The system reaches set temperature quickly, shuts off, then restarts within minutes. Rooms feel humid and uncomfortable despite constant cycling.
Root cause: Contractors often select equipment using square footage rules of thumb instead of a Manual J load calculation. The unit ends up with far more capacity than the home's actual heat gain or loss requires.
Fix: A licensed contractor should perform a proper load calculation. If the equipment is significantly oversized, replacement is the correct solution. Zoning systems can mask symptoms but don't correct the underlying inefficiency.
Duct Leakage and Uneven Room Temperatures
Problem: Some rooms are consistently too hot or cold. Energy bills are higher than expected. The system runs long cycles without satisfying the thermostat.
Likely cause: Duct joints were not sealed with mastic or approved tape; flexible duct runs are kinked or compressed; duct sizes were not calculated to deliver correct CFM per room.
Fix:
- Commission a duct leakage test
- Seal all leaks with mastic or UL-181 tape
- Replace kinked or compressed flex duct sections
- Verify register flows with a calibrated flow hood
Incorrect Refrigerant Charge
Problem: System blows air but struggles to reach set temperature. Ice forms on refrigerant lines or the indoor coil. Energy use is elevated.
Root cause: Someone added refrigerant by volume estimate rather than superheat/subcooling measurement. A leak may have gone unidentified before charging.
Fix: A licensed technician must recover existing refrigerant, inspect for and repair leaks, evacuate the system, then recharge to manufacturer specifications using the correct measurement method. Refrigerant handling requires EPA 608 certification; only a licensed technician may legally perform this work.
Pro Tips for HVAC Design and Installation Success
Start with the load calculation. Get it done before selecting any equipment. Many contractors — including CA Home Solar, serving Southern California for 36 years — include load calculations as part of their design-build service.
Know California's requirements upfront. Title 24 compliance, HERS verification, and permit requirements all depend on correct equipment selection and documented installation. LADWP offers heat pump rebates up to $2,500 per ton; SoCalGas pays furnace rebates for AFUE ≥ 92% systems — but only with proof of permit closure.
Use available financing. CA Home Solar is a HERO Program registered contractor. HERO financing covers HVAC upgrades with zero down payment, no application fees, and repayment through property taxes over 5–25 years — without affecting eligibility for separate utility rebates or tax credits.
Keep thorough records. Hold onto load calculations, permit approvals, equipment spec sheets, test results, and refrigerant charge records. You'll need this documentation for warranty claims, utility rebates, and federal tax credit applications.
Know when other trades are needed. Electrical panel upgrades, gas line work, and asbestos or mold remediation in older duct systems require separate licensed contractors. A reputable HVAC contractor coordinates these — not works around them.
Conclusion
The quality of HVAC design and installation determines system performance, energy efficiency, and equipment lifespan from day one. A properly designed and installed system should deliver reliable comfort for 15–20 years. A poorly installed one starts losing efficiency within the first season.
Prioritize licensed contractors who perform proper load calculations, pull permits, and provide post-installation test documentation. That documentation protects your warranty, keeps you eligible for utility rebates, and gives you recourse if problems arise. The lowest bid rarely covers all of that.
For homeowners across Southern California, California Home Solar's licensed HVAC team handles assessments and upgrades with the same attention to efficiency and compliance they bring to solar and whole-home energy projects. Contact them at 877-903-1012 or info@cahomesolar.com.
Frequently Asked Questions
What are the $5,000 rule and the 20% rule in HVAC?
The $5,000 rule suggests that if anticipated repair costs over the remaining unit life exceed $5,000, replacement is typically more cost-effective. The 20% rule says to consider replacement when a single repair exceeds 20% of a new system's price. Both are screening guidelines, not engineering standards.
How much does HVAC system design and installation cost?
ENERGY STAR estimates heat pump installation averages $10,000–$25,000, varying by system type, home size, duct condition, and efficiency tier. Central AC replacements typically run lower; ductless mini-split single-zone installs range from roughly $3,000–$8,000. Permit fees and electrical upgrades add to the final total.
Do I need permits for HVAC installation in California?
Yes. LADBS requires mechanical permits for any HVAC installation or modification. Unpermitted work can result in CSLB penalties up to $5,000–$8,000, failed inspections during home resale, and denial of utility rebates — SoCalGas explicitly requires proof of permit closure before paying furnace rebates.
What is the difference between Manual J, Manual D, and Manual S?
Manual J calculates the building's actual heating and cooling loads. Manual S uses those loads to select correctly sized equipment. Manual D sizes the duct system to deliver the right airflow to each room. All three are required steps for a properly engineered installation — skipping any one creates downstream problems.
How long does HVAC installation typically take?
A standard replacement installation takes one to three days. New construction or projects requiring significant ductwork fabrication, electrical panel upgrades, or structural modifications take longer. In California, permit inspection scheduling may add additional days to the overall timeline.
What are the signs my HVAC system needs replacement rather than repair?
Watch for system age over 10–15 years (per ENERGY STAR guidance), frequent or escalating repair costs, rising energy bills, inconsistent temperatures, and R-22 refrigerant — phased out for production and import, making those systems increasingly costly to service. Any combination of these signals replacement over repair.