When installation is done poorly, the consequences are real. According to DOE-cited NIST research, improper HVAC installation practices can increase energy use by up to 30% — meaning a 96% AFUE furnace installed incorrectly can easily perform like an 80% model. Add condensate leaks, pressure switch failures, voided warranties, and Title 24 code violations, and a rushed installation becomes an expensive one.
This guide walks through the complete best-practice process — from pre-installation requirements through commissioning — so Southern California homeowners know exactly what a quality installation looks like and what to demand from their contractor.
Key Takeaways
- 90%+ AFUE furnaces require PVC venting and condensate drainage — not a like-for-like swap with older 80% systems
- DIY installation is illegal in California: a licensed contractor, mechanical permit, and passed inspection are all required
- Manual J load calculation is non-negotiable before sizing; never let a contractor size the unit based on the old furnace's capacity
- Commissioning checks (temperature rise, static pressure, CO readings) are required steps, not optional extras
- Federal tax credits and SoCalGas rebates are available: confirm eligibility thresholds before installation begins
High-Efficiency Furnace Installation: The Four-Phase Process
Installation follows four phases: pre-installation assessment → equipment and site preparation → physical installation and system integration → commissioning and validation.
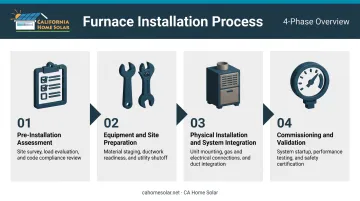
Most installations are completed in one day (roughly 6–10 hours). Projects involving significant ductwork modifications, new venting runs, or gas line upgrades may extend to two days. Skipping any phase doesn't save time — it creates compounding problems that surface weeks into the heating season.
Prerequisites and Safety Considerations
Before any equipment is ordered, several site conditions must be confirmed:
- Gas line capacity — the existing supply line must support the new unit's input rating
- Electrical supply — typically 120V dedicated circuit; verify compatibility
- Installation clearances — manufacturer-specified clearances on all sides must be maintained
- Condensate drain path — Southern California slab-foundation homes often lack floor drains nearby, making a condensate pump necessary rather than gravity drainage
California compliance requirements add another layer. Under the 2025 Building Energy Efficiency Standards (effective January 1, 2026), furnace installation requires a building permit with specific inspection documentation: CF1R submitted with the permit, CF2R-MCH posted at final inspection, and (where HERS verification is triggered) CF3R forms transmitted to an approved registry before occupancy is cleared.
The Los Angeles Department of Building and Safety confirms that mechanical HVAC permits are required for all heating system installations or modifications.
One more non-negotiable: a Manual J load calculation must be performed before sizing. California's energy code requires load calculations for new space heating systems, using ACCA Manual J methodology, with equipment selection following ACCA Manual S-2023. DOE guidance specifies that furnace capacity must meet the Manual J heating load without exceeding it by more than 40%.
Sizing based on the old furnace's capacity alone is a code violation. It's also the primary reason oversized units end up short-cycling.
For homeowners managing upfront costs, CA Home Solar is a HERO Registered Contractor and can help with PACE financing for qualifying HVAC upgrades. Payments are billed through the property tax bill with zero down payment required.
Tools and Equipment Required
Installation materials:
- The furnace unit (sized per Manual J/Manual S)
- Schedule 40 PVC pipe for intake and exhaust venting
- Condensate trap, drain line, and pump (if gravity drainage isn't available)
- Gas line fittings and approved thread sealant
- Thermostat wiring compatible with the new control board
- Sheet metal for duct connections and transitions
Commissioning instruments:
- Manometer (total external static pressure measurement)
- Combustion analyzer
- CO detector
- Gas leak detector or soap solution
The commissioning instruments are what separate a complete installation from a rushed one. A furnace that starts and heats doesn't mean it's operating correctly.
How to Install a High-Efficiency Furnace: Step-by-Step
Installation follows a defined sequence. Rushing or skipping any step creates problems that may not surface until weeks after the system is running.
Step 1 — Remove the Old System
Disconnect and cap the existing gas line, electrical connections, and duct connections. Remove the old furnace and assess:
- Whether existing ductwork needs modification to support the new unit
- Whether existing venting (metal flue) needs to be replaced with PVC — it does in most residential retrofits
- Whether the gas piping diameter is adequate for the new unit's input rating
Step 2 — Position and Secure the New Furnace
Place the unit in the correct orientation based on the home's layout and the manufacturer's installation manual:
- Orientation: Choose upflow, horizontal, or downflow to match the existing duct configuration
- Leveling: Level carefully — improper leveling directly affects condensate drainage
- Clearances: Confirm all required clearances on all sides before securing the unit
Step 3 — Install PVC Venting
This is where condensing furnace installations differ most from standard units. Key requirements:
- Route separate intake and exhaust PVC pipes to the exterior
- Maintain a downward slope toward the furnace of at least ¼ inch per foot (per Trane, Lennox, and Rheem installation manuals) so condensate flows back to the drain rather than pooling in the pipe
- Separate outdoor terminations to prevent flue gas recirculation; intake termination must be at least 3 feet above any forced-air inlet within 10 feet
- Confirm total equivalent vent length stays within the limits specified in the exact furnace model's manual. These tables vary by input rating, pipe diameter, and number of elbows.
Per IFGC 503.4.1, plastic vent piping may only be used where the appliance is specifically listed for those materials and installed per the manufacturer's instructions. Model-specific manual requirements govern — not generic rules.
Step 4 — Condensate Drainage, Gas, and Electrical
- Install the condensate trap (manufacturers typically specify minimum trap height ; Trane's manual, for example, requires a minimum 6-inch trap height) and route the drain line to a floor drain or condensate pump
- Connect the gas line using approved fittings; conduct a pressure leak test before proceeding
- Complete electrical wiring and thermostat integration, confirming compatibility with the new control board
Step 5 — Configure Blower and System Settings
Blower configuration determines whether the system performs as designed once commissioned:
- Set blower speed profiles to match the home's duct system and heating stage requirements
- For variable-speed ECM blowers, verify airflow settings align with both heating mode and, where applicable, cooling mode
- Confirm temperature rise falls within the manufacturer's specified range — this is verified during commissioning
Post-Installation Checks and Validation
Passing startup is not the same as passing commissioning. A furnace that heats on day one can still have incorrect static pressure, marginal condensate drainage, or gas pressure slightly out of spec — problems that cause unexpected shutdowns, efficiency loss, or part failures within the first heating season.
Visual inspection checklist before startup:
- All PVC vent connections are secure with no gaps at joints
- Condensate lines slope correctly and flow freely to drain or pump
- Gas connections show no leaks (verified with detector or soap solution)
- All electrical connections are tight and labeled
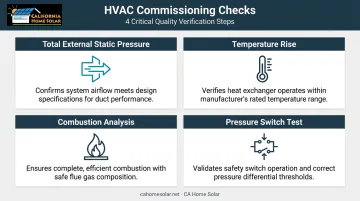
Functional commissioning checks:
| Check | What It Confirms |
|---|---|
| Total External Static Pressure (TESP) | Duct system isn't over-restricting airflow |
| Temperature rise | Within manufacturer-specified range for the unit |
| Combustion analysis | Efficiency and CO output within acceptable limits |
| Pressure switch test | Furnace shuts down correctly under fault conditions |
ACCA's ANSI/ACCA Standard 5 (HVAC Quality Installation Specification) is the industry benchmark for what commissioning should cover. Document all readings. This protects the homeowner's warranty and gives technicians a reliable baseline for future maintenance comparisons.
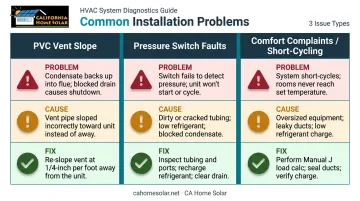
Common Installation Problems and Fixes
Improper PVC Vent Slope Causing Condensate Backup
Problem: Water pools in the vent pipe, blocks airflow, and triggers pressure switch lockouts — or accelerates corrosion if condensate sits in the pipe.
Cause: Vent pipe installed flat or with a slight upward slope instead of sloping back toward the furnace at ¼ inch per foot.
Fix:
- Re-slope the vent run and re-secure all supports to maintain correct pitch
- Inspect elbow placements for low spots where condensate collects
- Confirm supports are spaced closely enough to prevent pipe sag over time
Pressure Switch Faults at Startup
Problem: The furnace attempts to start but locks out, displaying a pressure switch fault code.
Cause: Blocked or improperly routed intake/exhaust vent, missing or incorrect condensate trap, or a combustion air pipe joint leak (failed gasket or unsealed PVC connection).
Fix:
- Verify vent terminations are clear of debris, bird screens, or obstructions
- Confirm the condensate trap is correctly configured and draining freely
- Inspect all combustion air pipe joints for failed gaskets or unsealed PVC connections
A pressure switch fault almost always traces back to venting or condensate — not the switch itself.
Comfort Complaints Despite Correct Operation
Problem: The furnace runs and passes all checks, but rooms are unevenly heated or the system short-cycles.
Cause: Unit was oversized (not sized via Manual J), or existing ductwork has high static pressure due to leaks, undersized runs, or restricted returns. DOE research confirms oversizing leads directly to reduced efficiency and increased equipment wear.
Fix:
- Conduct a full duct leakage test and total external static pressure (TESP) measurement
- Seal duct leaks and address any undersized or restricted return runs
- Evaluate whether a variable-speed blower profile adjustment can correct airflow distribution before pursuing duct modifications
Pro Tips for a Successful High-Efficiency Furnace Installation
Timing matters. Schedule installation in late summer or early fall — before heating season demand peaks — so there's time to address any post-installation adjustments without urgency. Emergency replacements in January create time pressure that leads to shortcuts in commissioning.
Get documentation in writing. Always obtain a copy of the final inspection report showing temperature rise, CO levels, and static pressure readings. This protects the homeowner's warranty, satisfies California building code requirements, and gives a baseline for future service visits.
Know when a broader upgrade is warranted. If existing ductwork is more than 15–20 years old, extensively leaky, or was sized for a different system, a furnace installation alone may not deliver the expected efficiency gains.
CA Home Solar offers free whole-home energy evaluations that assess insulation, air sealing, ductwork, windows, and HVAC together. In many cases, addressing duct losses and insulation before or alongside a furnace upgrade produces noticeably better results — and avoids a second round of work down the line.
Conclusion
Installation quality determines how much of a furnace's rated efficiency actually reaches the home. A 96% AFUE unit with improper venting, an unchecked condensate drain, or no commissioning documentation can perform like an 80% model, wiping out the financial and comfort benefits that justified the upgrade.
Before committing to a project timeline, make sure to:
- Choose a licensed HVAC contractor with verifiable credentials
- Require a Manual J load calculation and full commissioning documentation
- Explore California rebate programs and HERO financing — CA Home Solar is a registered HERO contractor and can guide Southern California homeowners through available options
Getting these details right from the start is what separates a high-efficiency furnace that delivers on its promise from one that simply carries the label.
Frequently Asked Questions
How much does it cost to install a high-efficiency furnace in Southern California?
National data from HomeAdvisor puts gas furnace installation in the $3,800–$10,000 range, with higher-efficiency or larger units reaching $12,000. Southern California costs vary based on unit size, venting complexity, and whether ductwork modifications are needed. Get an itemized quote before committing.
What is the most reliable furnace brand?
Reliability depends as much on installation quality and local service availability as it does on the brand. A well-installed furnace from a manufacturer with strong distributor support in your area will outperform a premium brand that's poorly installed or hard to service locally.
Can I install a high-efficiency furnace myself?
No. California requires a licensed contractor, a mechanical permit, and a passed inspection for furnace installations. DIY installation also voids manufacturer warranties. California code is clear on this — no exceptions.
What AFUE rating qualifies as high-efficiency?
Furnaces rated 90% AFUE or above qualify as high-efficiency condensing units, which meets ENERGY STAR requirements for California. The federal 25C tax credit sets a higher bar at 97% AFUE, so verify which threshold applies to your goals before selecting equipment.
How long does a high-efficiency furnace installation typically take?
Most installations complete in one day (6–10 hours). Projects requiring significant ductwork modifications, new venting runs, or gas line upgrades may extend to two days.
Are there rebates or tax credits available for high-efficiency furnace installation in California?
Yes, though thresholds differ by program. SoCalGas's 2026 rebate requires a 92% AFUE ENERGY STAR-certified unit installed by a C-20 contractor; the federal 25C tax credit requires 97% AFUE. Verify current requirements before selecting equipment, since funding and eligibility can change. CA Home Solar is a HERO Registered Contractor and can connect homeowners with PACE financing for qualifying HVAC upgrades.