The stakes for getting it wrong are real. Common consequences of a poorly executed expansion include inverter overload and power clipping (wasted production you'll never recover), disruption to a grandfathered NEM 1.0 or NEM 2.0 agreement, permit violations that delay Permission to Operate, and voided equipment warranties.
This guide covers the complete process for adding solar panels to an existing system — from pre-expansion assessment through post-installation validation — with specific attention to what Southern California homeowners need to know.
Key Takeaways
- You can expand most existing solar systems, but inverter capacity, roof space, panel compatibility, and permit requirements must all be assessed before purchasing equipment
- Expansions are more complex than new installations — skipping assessment or permitting steps leads to performance loss, activation delays, or NEM agreement disruption
- California homeowners on NEM 1.0 or NEM 2.0 should verify their expansion stays within the threshold that preserves favorable export rates
- The federal Residential Clean Energy Credit covers 30% of qualifying solar costs through 2032 — confirm eligibility with your tax advisor
- A licensed local contractor who handles permits, utility paperwork, and interconnection updates is the most reliable path forward
How Solar System Expansion Works
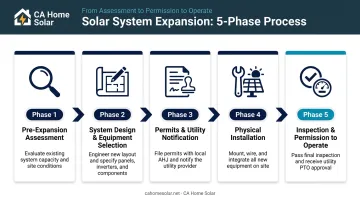
Expanding an existing system follows five defined phases:
- Pre-expansion assessment — A technician evaluates your current inverter capacity, roof space, panel compatibility, and electrical panel headroom.
- System design and equipment selection — New panels, inverters, or a second inverter string are specified to match your existing setup and expanded energy goals.
- Permits and utility notification — Your contractor files revised permits with the local building department and notifies your utility of the system changes.
- Physical installation — New panels are mounted, wiring is updated, and the system is integrated with your existing array. Most installs take 1–2 days on-site.
- Post-installation inspection and Permission to Operate (PTO) — A city inspector signs off on the work, and your utility issues updated interconnection approval before the expanded system goes live.
In the Los Angeles area, the full timeline from initial consultation to PTO typically runs 6–12 weeks. The physical installation itself takes 1–2 days — permitting, utility interconnection updates, and inspections account for most of that window.
Each phase has its own variables that can affect your specific timeline, starting with the pre-expansion assessment.
Prerequisites and Safety Considerations
Skipping the assessment phase is the single most common cause of underperforming expansions. Here's what needs to be evaluated before any equipment is purchased.
Roof Space and Structural Capacity
Each 400W panel requires approximately 20–22 square feet of usable, sun-exposed roof area. A standard 400W module measures roughly 1,754 × 1,096 mm — just over 20 square feet of footprint. South-facing sections deliver the best annual output; west-facing panels are a reasonable second choice for capturing afternoon production.
Beyond square footage, the existing roof structure must support additional panel weight. Roofs showing significant age or wear should be evaluated — and potentially replaced — before expansion. Reworking a freshly installed solar array to fix a deteriorating roof underneath costs far more than sequencing those projects correctly.
Inverter Capacity Check
This is where most expansions run into trouble. String inverters have a fixed DC input limit. When the total wattage of the expanded array exceeds that limit, the inverter caps its output — a condition NREL defines as power clipping, where excess DC energy is simply wasted. In one NREL example using a 1.34 DC-to-AC ratio, 6.9% of total DC energy was clipped.
Microinverter systems work differently. Because each panel operates independently, Enphase confirms homeowners can expand one panel at a time without affecting existing hardware — no clipping risk, no string constraints.
To check a string inverter:
- Locate the nameplate on the unit and find its maximum DC input rating
- Add the wattage of your existing array plus the panels you plan to add
- If the totals are close or over that limit, inverter strategy must be resolved before design is finalized
Panel Compatibility
When adding panels to a string inverter system, new panels must match the existing array's voltage and current specifications. The complication: the exact panel model from the original installation is frequently discontinued. Drop in a visually similar but electrically different panel, and the entire string runs at the output of its weakest link.
This requires a professional compatibility assessment. Don't order equipment until that step is complete.
California Net Metering Policy Check
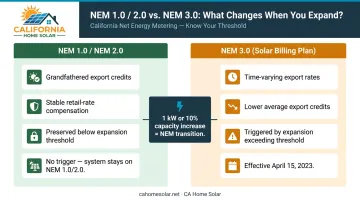
For California homeowners, the net metering implications of an expansion can cost more than the equipment itself. According to PG&E's utility FAQ, customers who increase generation capacity by 1 kW or 10% of current system size transition from their existing NEM agreement to the Solar Billing Plan (NEM 3.0) at annual True-Up.
NEM 3.0 has been in effect for new interconnection applications since April 15, 2023. Under NEM 3.0, export credits are time-varying and can range from a few cents to over two dollars per kWh, which is a meaningful reduction from NEM 1.0 and NEM 2.0 rates for most households. Confirm your current NEM status and expansion threshold with your utility before committing to a system size.
Hard Stops — When Not to Proceed
Some conditions require resolving an underlying issue before expansion can begin:
- Leased solar systems — lessor approval is required and rarely granted; confirm before proceeding
- Deteriorating roofs — address before installation to avoid costly rework
- Electrical panels at capacity — the main panel may need an upgrade before additional circuits can be added
- Utility-imposed system size caps — some interconnection agreements limit total system size; check yours
How to Add Solar Panels: Step-by-Step
Skipping or rushing any phase — particularly assessment and permitting — is the most common cause of underperforming systems and delayed activation.
Step 1 — Energy audit and system assessment
Analyze 12 months of utility bills alongside solar production data to calculate the gap between what the existing system generates and what the home currently consumes.
A licensed professional should inspect existing panels, inverter condition, wiring, and the main electrical panel to confirm the system is expansion-ready and code-compliant.
Step 2 — System design and equipment selection
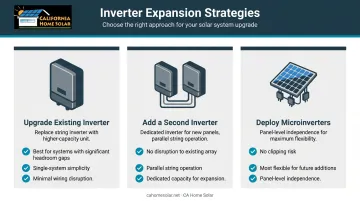
Determine the number of panels needed to close the generation gap. Select panels that are electrically compatible and ideally matched aesthetically to the existing array. Inverter strategy options include:
- Upgrading the existing string inverter to a higher-capacity model
- Adding a second dedicated inverter for the new panels
- Deploying microinverters on new panels for fully independent operation
Step 3 — Permits and utility notification
Submit building and electrical permit applications to the relevant AHJ. LADBS requires an electrical permit for all solar PV installations; building permits are required for structural support unless specific exemptions apply. Los Angeles-area permitting typically takes 2–6 weeks. Simultaneously notify your utility to update the interconnection agreement and confirm net metering status will be preserved.
Step 4 — Physical installation
Installation covers three task areas:
- Mount racking hardware with appropriate flashings and sealants for the roof type
- Secure new panels, complete DC wiring, and integrate with the existing or new inverter
- Complete AC connections to the electrical panel with proper grounding, and confirm rapid shutdown devices meet current NEC requirements
Step 5 — Inspection and Permission to Operate (PTO)
Schedule required structural and electrical inspections promptly after installation. Once inspections are passed, the utility issues PTO and updates net metering enrollment.
Per SCE's NBT/NEM Interconnection Handbook, new panels cannot export energy to the grid until written PTO is granted. Turning them on early risks utility penalties and potential loss of net metering status.
Post-Installation Checks and Validation
Visual and Structural Checks
After installation, confirm:
- All new panels are securely mounted with no exposed wiring
- Flashings are properly sealed at every roof penetration
- New racking integrates cleanly with any existing array structure
- Inverter and junction box enclosures are properly secured
Functional Testing and Performance Monitoring
Once the system is live, verify that production monitoring shows the new panels generating output consistent with the design estimate. Enphase's default Production Threshold is 90% of expected output, configurable in 5% increments between 50–95% across a 30-day or 90-day evaluation period.
If actual production falls more than 10% below the system design estimate within the first 30 days, that warrants investigation — don't assume it's weather-related variance.
Signs in monitoring data that point to clipping or poor string integration:
- Production plateauing at an unexpected ceiling during peak sun hours
- Consistent underperformance on clear days compared to design projections
- Individual string output significantly lower than expected
Why Skipping Validation Causes Delayed Failures
Wiring errors and inverter overload issues often aren't immediately obvious. A system can appear operational while silently losing 5–15% of expected production — and that shortfall often persists for months, only surfacing when the homeowner spots the discrepancy on their utility bill.
The window for cheap fixes is short. Catching problems early, while the installation crew and equipment are still under warranty, is far cheaper than diagnosing them six months later.
Common Problems and Fixes When Expanding a Solar System
Even well-planned expansions run into predictable snags. Knowing what to expect makes resolution faster.
Issue 1: Inverter Overload and Power Clipping
Total DC input from the expanded array exceeds the string inverter's rated capacity, capping energy output and wasting production. This typically happens when the original inverter was sized with little or no headroom and the added panels push total wattage past the maximum DC input rating.
Fix: Add a second inverter dedicated to the new panels, or replace the existing inverter with a higher-capacity model. Either path needs to be confirmed during the design phase, before installation begins.
Issue 2: Performance Drag from Panel Mismatch
New panels can underperform or drag down the existing array when their electrical specifications differ from the originals. Adding mismatched panels to the same string is the usual culprit — in a series-connected string, output is limited by the panel generating the lowest current.
Fix: Configure new panels on a separate MPPT input or string. Install power optimizers on mismatched panels to reduce losses, or deploy microinverters on the new panels for fully independent operation.
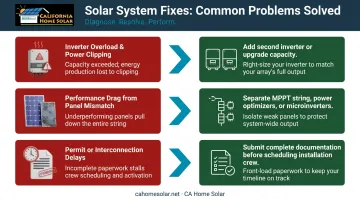
Issue 3: Permit or Interconnection Delays Stalling Activation
A physically complete installation can still sit idle if the utility hasn't issued Permission to Operate (PTO). Incomplete permit applications — missing an electrical single-line diagram or equipment spec sheets — and failure to notify the utility before work began are the most common causes.
Fix: Work with a contractor who knows local permitting authority requirements and utility interconnection processes. All documentation should be submitted and approved before the installation crew is scheduled.
Pro Tips for a Successful Solar System Expansion
NEM Strategy for California Homeowners
If you're currently on NEM 1.0 or NEM 2.0, calculate whether your planned expansion stays under the 1 kW / 10% threshold that preserves those rates.
If the capacity increase would trigger NEM 3.0, consider pairing your existing system with battery storage instead of adding panels. Under NEM 3.0's time-varying export structure, storage that captures midday production for evening use can outperform the value of additional panel capacity. California Home Solar installs battery storage alongside solar and can help model both paths.
Use the Expansion as a Full System Health Check
Have the installer inspect existing panel condition, wiring integrity, and inverter performance during the expansion project. Identifying degradation, code compliance gaps, or underperforming components now costs far less than a separate service call later. California Home Solar's technicians assess the full system as part of every expansion consultation — catching an existing issue early prevents it from undermining the new equipment.
Document Everything Before, During, and After
Retain copies of:
- Updated interconnection agreement
- All permits and inspection sign-offs
- Equipment warranty registrations
- Monitoring system credentials and login information
This documentation protects your warranties, supports future expansion planning, and carries increasing weight when selling a home with solar.
Conclusion
Getting a solar expansion right comes down to what happens before the first panel goes up. Skipping a proper assessment, rushing permits, or mismatching inverter capacity leads to performance loss, compliance issues, and net metering benefits that are hard to restore once lost.
Southern California homeowners should start with a contractor who knows local permitting, utility requirements, and NEM rules inside out. California Home Solar has served the Los Angeles area for 36 years and earned Top 500 Solar Contractor recognition. Every expansion starts with a thorough site assessment — permits, utility coordination, and interconnection updates handled end to end.
Reach the team at 877-903-1012 or info@cahomesolar.com.
Frequently Asked Questions
Can you expand an existing solar system?
Yes, expansion is possible in most cases. Key prerequisites include available inverter capacity, suitable roof space, panel compatibility with the existing array, and compliance with local permit requirements. A professional assessment determines whether your system is ready to expand before any equipment is purchased.
Do solar panels work immediately after installation?
New panels are physically installed within 1–2 days, but they cannot legally generate or export power until the utility issues Permission to Operate (PTO). PTO typically takes 2–6 weeks after inspections are passed. Switching panels on before PTO is received risks utility penalties and potential loss of net metering status.
Will adding solar panels affect my net metering agreement in California?
Expansions exceeding 1 kW or 10% of existing system size can trigger a transfer from a grandfathered NEM 1.0 or NEM 2.0 agreement to NEM 3.0, which carries lower export credits. Confirm your specific threshold with your utility before finalizing system size.
Do I need a new permit to add panels to my existing solar system?
Yes. Most jurisdictions in the Los Angeles area require both building and electrical permits for solar system modifications. Proceeding without permits risks failed inspections, PTO denial, and code violation liability that can set a project back by months.
Will my existing inverter handle the additional solar panels?
String inverters have fixed capacity limits and may require an upgrade or a second dedicated inverter when additional panels push the array past that limit. Microinverter systems allow new panels to be added independently without affecting existing hardware or creating clipping risk.
How many solar panels can I add to my existing system?
The number depends on the gap between current production and consumption, available roof space, inverter headroom, and any utility-imposed size limits under your interconnection agreement. A professional energy audit and system assessment is the most reliable starting point.