Introduction
Installing a cool roof sounds simple — use reflective materials, absorb less heat, save on energy bills. In practice, the details determine whether the system performs or fails.
Proper cool roof installation in Southern California requires accurate material selection, thorough surface preparation, and compliance with California's Title 24 energy code. Skip any of these, and you risk voided warranties, reduced performance, and a roof that fails within a few seasons.
Most cool roof installations here — particularly full replacements or membrane systems — are handled by licensed roofing contractors, not homeowners. Reflective coatings on low-slope roofs are simpler retrofits, but even those benefit from a professional assessment first.
This guide covers the complete installation process: prerequisites, material selection, step-by-step installation, and post-install validation. Each section applies whether you're planning a coating retrofit or a full system replacement.
Key Takeaways
- Coating systems are the simplest retrofit; membrane or shingle replacements require a licensed contractor
- California's Title 24 mandates minimum solar reflectance and thermal emittance values — verify compliance before purchasing materials
- Surface prep is the most-skipped step and the leading cause of cool roof failures
- Post-installation validation of seams, flashing, and coverage is required before signing off
- LADWP offers cool roof rebates of $0.20–$0.60 per sq ft for qualifying Title 24-compliant systems
Cool Roof Installation Guide
The installation sequence follows this order: material selection and compliance verification → surface preparation → material application → sealing and flashing → final inspection.
Timeline expectations:
- Coating application: 1 day per coat, with 2 coats typically required
- Full replacement: 1–3 days depending on roof size and system complexity
Before starting, you'll want to confirm four things about your existing roof. Each one affects which materials you can use and whether a permit will sail through or stall.
Prerequisites and Safety Considerations
1. Structural condition of the roof deck No soft spots, rot, or active leaks. Any of these must be repaired before cool roof work begins. Sealing over hidden moisture leads to blistering and delamination.
2. Roof slope California code defines low-slope as less than 2:12 and steep-slope as 2:12 or greater. Slope determines which products are eligible and which installation methods apply.
3. Title 24 compliance The 2022 California Energy Code applies to permit applications submitted on or after January 1, 2023. Requirements are triggered on replacements when more than 50% of an existing roof is replaced.
| Roof Type | Climate Zones | Min. Aged Solar Reflectance | Min. Thermal Emittance |
|---|---|---|---|
| New low-slope | 13, 15 | 0.63 | 0.75 |
| New steep-slope | 10–15 | 0.20 | 0.75 |
| Replacement low-slope (>50%) | 4, 6–15 | 0.63 | 0.75 |
| Replacement steep-slope (>50%) | 4, 8–15 | 0.20 | 0.75 |
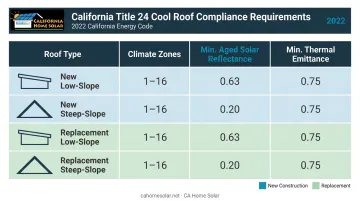
Los Angeles Green Building Code note: LA applies stricter values — low-slope roofs require a 3-year aged SR of 0.65 and TE of 0.85 (or SRI 78); steep-slope roofs require SR 0.25 and TE 0.85 (or SRI 20). Confirm which code governs your permit before ordering materials.
4. Compatibility and layer limits California Residential Code R908.3.1.1 prohibits installing a new roof covering over an existing roof that already has two or more applications. If the substrate is water-soaked or deteriorated, removal to the deck is required.
Also check: HOA restrictions on light-colored roofing, and whether your chosen coating product requires primer for the existing substrate type.
Safety note: Do not proceed on wet surfaces, during extreme heat, or if moisture damage hasn't been addressed. Rooftop work requires fall protection — a key reason most homeowners hire licensed contractors for this scope.
Tools and Materials Required
For coating systems:
- Primer (if required by substrate type or manufacturer)
- Elastomeric or silicone reflective coating (CRRC-rated)
- Seam tape and patching compound
- Roofing brush or roller, caulking gun
- Pressure washer and scrub brush
For full replacement systems:
- Title 24-compliant reflective shingles, tiles, or single-ply membrane (TPO/PVC)
- Underlayment, flashing, and compatible fasteners
- Roofing nailer or adhesive applicator (system-dependent)
- Chalk line, utility knife
For all systems:
- Safety harness and roof brackets
- CRRC-rated product documentation (required for permit sign-off)
- Infrared moisture scan of the existing deck (not required, but catches hidden water damage before it gets sealed in — repairs cost far less before installation than after)
How to Install a Cool Roof (Step-by-Step)
Shortcuts during surface prep or primer application lead to delamination, blistering, and voided warranties. Follow the sequence as written.
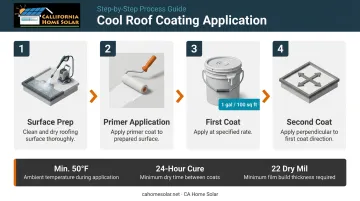
Step 1 — Prepare the Roof Surface
Pressure wash the entire roof to remove dirt, algae, and loose material. Repair cracks, damaged seams, and deteriorated areas with patching compound. Allow the surface to dry completely — minimum 24 hours under typical Southern California conditions, longer after rain.
For full replacements: if the substrate is damaged or a second layer is not permitted, remove existing roofing down to the deck.
For low-slope roofs receiving a coating: apply primer to the cleaned substrate per manufacturer specifications and allow it to cure fully before coating. GAF's liquid-applied coating guidelines require average peel adhesion to exceed 2 PLI before proceeding — primers may be necessary if adhesion tests below this threshold.
Step 2 — Apply or Install the Cool Roof Material
The approach depends on system type:
Elastomeric or silicone coatings:
Apply the first coat at the manufacturer-specified coverage rate. Common benchmarks:
- Silicone (GacoRoof): 1 gallon per 100 sq ft per coat; minimum final film build of 22 dry mils
- Acrylic elastomeric (GAF Diathon QS): total 2 gallons per 100 sq ft across coats; no more than 1.5 gallons per coat
- Minimum air and surface temperature: 50°F and rising; do not apply if rain is expected within 2 hours
Reflective shingles or tiles:
Install per standard roofing sequence — starter strip, first course, overlapping rows — using the nail pattern specified by the manufacturer.
TPO/PVC single-ply membranes:
Roll out and mechanically fasten, fully adhere with adhesive, or heat-weld seams per system requirements. For heat-welded seams, run test welds at the start of each work period and after significant weather changes to confirm a film-tearing bond. Surfaces must be clean and dry — contaminants cause false welds.
Step 3 — Seal Penetrations and Install Flashing
Every penetration — vents, pipes, HVAC curbs, skylights — needs compatible sealant and properly installed flashing. Key requirements by system:
- TPO/PVC systems: Flashing must extend a minimum of 8 inches up vertical surfaces; penetrations mechanically secured at maximum 12-inch intervals
- Coating systems: Apply seam tape over all existing seams and cracks before the second coat — embedded in the base coat, not under or over it
- All systems: Inspect existing flashing for cracks, separation, and corrosion before reuse; replace anything questionable
Step 4 — Apply Final Coat or Complete Final Installation
Coatings: Apply the second coat perpendicular to the first. This cross-directional application ensures even coverage and eliminates pinholes that let moisture in.
Shingle and membrane systems: Before calling the job complete, walk the entire roof. Confirm all fasteners are set, no lifted edges exist, and every flashing transition is secure.
Post-Installation Checks and Validation
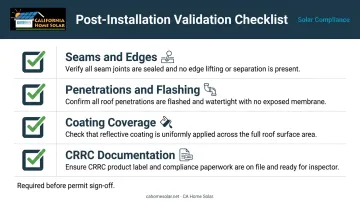
A quick visual pass isn't sufficient. Work through this checklist before signing off:
- Seams and edges: No gaps, lifted sections, or unbonded areas
- Penetrations: All flashing fully sealed and integrated with the roofing layer
- Coating coverage: No thin spots, missed areas, or color variation indicating under-application
- CRRC documentation: Confirm installed products have CRRC-rated labels with initial and aged solar reflectance and thermal emittance values on record — Los Angeles County requires the roofing product to be on site for the inspector to verify compliance
Each item on that list has a real cost if missed. Coating voids that look fine at installation can fail within a single season. Improperly flashed penetrations typically hold until the first serious rain — then the damage starts behind walls and ceilings where it's expensive to reach. For permit-required projects especially, catching these issues during the post-installation walk is far cheaper than addressing them after a failed inspection or a leak claim.
Common Installation Problems and Fixes
The same installation mistakes show up on cool roofs across Southern California — and most are preventable. Knowing what to watch for helps you catch problems early or avoid them entirely.
Coating Delamination or Peeling
Reflective coating that peels, bubbles, or separates within the first year almost always traces back to prep work. The roof surface wasn't cleaned thoroughly enough, was damp at application, or wasn't compatible with the coating — silicone applied over an existing coating without an adhesion promoter is a frequent offender.
Fix: Strip the failed coating down to a stable layer, re-clean, re-prime, and reapply at the correct coverage rate. Verify substrate compatibility first — manufacturers like Henry and Gaco recommend adhesion testing before applying silicone topcoats over existing coatings.
Premature Reflectance Loss
A roof losing reflective performance in 2–3 years instead of 10+ usually comes down to thin application, non-CRRC-rated products, or soiling buildup. According to CRRC research on membrane performance, membranes typically lose about 20% of reflectance in the first year. In Los Angeles County, smog and dust buildup accelerates this further on light-colored surfaces.
Fix: Schedule annual low-pressure cleaning to restore reflectance. If the original coating went on too thin, a maintenance re-coat at proper thickness recovers most of the lost performance. Always specify products with verified aged SRI values from the CRRC directory.
Flashing Failures and Leaks at Penetrations
Water infiltration at HVAC curbs, vents, or parapet walls within the first season points to flashing that wasn't properly integrated with the new roofing layer. Incompatible sealants and degraded existing flashing reused without inspection are the two most common causes.
Fix: Remove and replace compromised flashing. Use manufacturer-specified compatible sealant. For coating systems, confirm seam tape is fully embedded in the base coat at all transitions before the finish coat goes on.
Pro Tips for Installing a Cool Roof Effectively
Timing matters in Southern California. Spring and early fall are the best windows — dry conditions, moderate temperatures, no Santa Ana winds. Avoid scheduling immediately after rain (moisture in the substrate) or during wind events (dust contamination on a freshly cleaned surface). For two-coat coating systems, allow 24–48 hours between coats depending on humidity and temperature.
Documentation protects your warranty and rebates. Keep the CRRC product label, installation photos showing surface prep stages, and permit sign-off from the local building department. You'll need these for warranty claims, resale disclosures, and rebate applications.
Check rebate eligibility before purchasing materials. LADWP's Consumer Rebate Program provides $0.20–$0.60 per sq ft for qualifying cool roofs:
- Low-slope roofs: $0.20/sq ft at SRI 78; $0.60/sq ft at SRI 85
- Steep-slope roofs: $0.20/sq ft at SRI 20; $0.60/sq ft at SRI 35
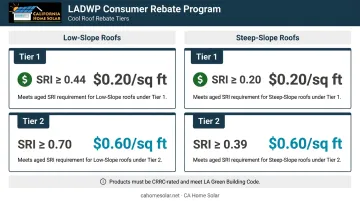
Products must be CRRC-rated and meet LA Green Building Code aged SRI requirements. Confirm your chosen product qualifies before the installation date — not after.
Know when to hire a specialist. A small flat roof coating may be manageable for an experienced DIYer. Full replacements, steep-slope work, membrane heat-welding, and any permit-required installation should go to a licensed roofing contractor. Improper steep-slope work creates fall risk and typically voids the product warranty immediately.
California Home Solar is a HERO-registered contractor with 36 years of experience installing Title 24-compliant cool roofs for residential and commercial properties across Southern California. For homeowners who want to spread out the cost, the company also helps clients find the right financing option through HERO's PACE program — no upfront cost, with repayment tied to property taxes.
Conclusion
Cool roof performance is a direct function of installation quality. A correctly installed, CRRC-rated system on a properly prepared substrate can reduce rooftop temperatures by more than 50°F, lower cooling energy use, and extend roof lifespan. One installed with shortcuts may fail within a few seasons and leave you without warranty coverage.
For Southern California homeowners, four steps matter before signing off on any cool roof project:
- Verify Title 24 compliance before selecting materials
- Choose products with published aged SRI values, not just initial ratings
- Confirm LADWP or other utility rebate eligibility early in the process
- Complete post-installation validation before signing off on the project
Los Angeles County sits under both state and local code requirements, which adds a layer of complexity most homeowners don't anticipate. California Home Solar has handled cool roof and roofing projects across Southern California for 36 years — if you want a contractor who already knows the compliance landscape, they're worth a call.
Frequently Asked Questions
How much does it cost to install a cool roof?
Cool roof coatings for existing roofs start around $0.75 per sq ft according to EPA benchmarks, while single-ply membrane systems (TPO/PVC) typically run $4.50–$16 per sq ft. Total cost varies by roof size, slope, and system type. Title 24-compliant systems in California may qualify for LADWP rebates that partially offset the investment.
Do cool roofs really work?
Yes. According to the EPA, conventional roofs hit 150–185°F in summer sun, while cool roofs stay around 110–115°F under the same conditions. California residential studies show cooling energy reductions ranging from 2% to over 63%, depending on the building and climate.
Is a cool roof required by California building code?
California's Title 24 energy code requires new and replacement roofs to meet minimum solar reflectance and thermal emittance standards when more than 50% of an existing roof is replaced. Requirements vary by climate zone and roof slope. Verify current requirements with your contractor or the local building department before starting work.
What is the best cool roof material for Southern California?
Roof slope drives the choice: reflective tile or cool-colored asphalt shingles suit steep-slope homes, while elastomeric or silicone coatings and TPO/PVC membranes are standard for low-slope and flat roofs. All products should be CRRC-rated with verified aged SRI values and Title 24-compliant for your climate zone.
Can I install a cool roof coating over my existing roof?
Often yes — provided the existing roof is structurally sound, clean, dry, and compatible with the coating system. California code prohibits adding a new layer over two or more existing applications. A professional inspection confirms compatibility and catches hidden substrate issues before work begins.
How long does a cool roof installation take?
Coating applications typically take 1–2 days including cure time; full replacements run 1–3 days depending on roof size and complexity. Southern California humidity, wind, or post-rain moisture can affect scheduling, since surface conditions directly impact coating adhesion.