Introduction
On a typical summer afternoon in Los Angeles, a conventional dark roof can reach 150°F or more — and that heat doesn't stay outside. It radiates into your attic, spikes your AC demand, and drives up utility bills during the months you can least afford it.
Cool roof coatings offer a practical fix. Applied directly over your existing roof surface, they reflect sunlight and release absorbed heat instead of transferring it indoors. The catch? Installation requires real preparation — skipped steps lead to peeling, moisture problems, and voided warranties within months.
Getting those results depends on doing it right. This guide walks through what cool roof coatings are, why they're well-suited for Southern California homes, and how to install them correctly from surface prep to final coat.
Key Takeaways
- Cool roof coatings can reduce peak cooling electricity use by 10–30% in hot climates like SoCal
- Not every roof qualifies — asphalt shingles, active leaks, and structurally compromised roofs are poor candidates
- Installation sequence matters: clean → repair → prime → coat → validate
- Skipping surface prep is the single most common cause of coating failure
- City of LA homeowners (LADWP customers) can access cool roof rebates of $0.20–$0.60 per square foot depending on SRI rating — other SoCal utilities offer similar programs
What Is a Cool Roof Coating and How Does It Work?
A cool roof coating is a liquid-applied reflective layer rolled or sprayed directly onto an existing roof surface. It works through two mechanisms:
- Solar reflectance — bounces incoming sunlight back into the atmosphere instead of absorbing it
- Thermal emittance — releases any heat the surface does absorb rather than transferring it into the building
Both properties together determine actual performance. A coating with high reflectance but low emittance will still heat up — look for products with ratings above 0.65 for reflectance and 0.75 for emittance to see meaningful cooling results. Understanding these two metrics also helps explain why coating type matters.
Primary Coating Types for Residential Use
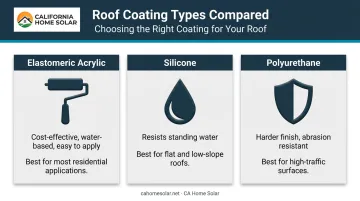
According to the Cool Roof Rating Council (CRRC), field-applied coatings are polymer-based liquids that fall into these main categories:
| Type | Best For | Key Characteristic |
|---|---|---|
| Elastomeric Acrylic | Most residential applications | Cost-effective, water-based, easy to apply |
| Silicone | Flat/low-slope roofs with ponding water | Resists standing water without degrading |
| Polyurethane | High-traffic or impact-prone surfaces | Harder finish, better abrasion resistance |
One important clarification: "modified bitumen" is a roofing membrane or substrate, not a liquid coating type. Coatings can be applied over compatible modified bitumen surfaces — but it's the acrylic or silicone coating doing the reflective work.
Coatings vs. Paint
Cool roof coatings are far thicker than paint and engineered specifically for reflective performance and weathering resistance. Only products rated by the CRRC carry verified solar reflectance and thermal emittance values. In California, the CEC designates the CRRC as the authority for rating these properties — so check the CRRC Rated Products Directory before purchasing.
Benefits of Cool Roof Coatings for Southern California Homeowners
Energy Savings and Lower Utility Bills
Field research backs up the energy-savings claims. A Florida Solar Energy Center study on occupied homes found white elastomeric roof coatings reduced residential AC energy use by an average of 19%, with one case showing 43% savings and a 858W peak demand reduction. The EPA summarizes residential peak cooling demand reductions of 11–27% for cool roofs broadly.
For SoCal homeowners, where air conditioning runs hard from May through October, even a 15–20% reduction in cooling energy has a meaningful impact on monthly bills.
Extended Roof Lifespan
High surface temperatures accelerate UV damage and thermal cycling — the constant expansion and contraction that cracks and ages roofing materials. A reflective coating acts as a protective barrier over the underlying membrane, potentially adding years of service life and reducing how often you need a full re-roof.
Improved Indoor Comfort
The effect isn't limited to air-conditioned spaces. EPA data shows that non-air-conditioned buildings can see maximum indoor temperature reductions of 1.2–3.3°C (2.2–5.9°F) from cool roofs. For garages, covered patios, or rooms directly below the roofline, you'll notice that difference.
Environmental Benefits
Those individual gains add up. Dense urban areas like Los Angeles amplify heat through the urban heat island effect: dark surfaces absorb and re-radiate heat, raising local air temperatures. Cool roofs reduce the amount of heat transferred to surrounding air.
A 2017 PNAS study on Southern California modeled the air-quality implications of widespread cool-roof adoption, finding measurable effects on ozone and particulate matter. The link between lower urban temperatures and reduced ground-level ozone is well established.
Rebates and Financing
LADWP offers verified cool roof rebates:
- $0.20/sq ft for products with a 3-year SRI ≥ 78
- $0.60/sq ft for products with a 3-year SRI ≥ 85
Note: SCE and SoCalGas did not list cool roof coating rebates on their current program pages — confirm directly with your utility before planning around those.
As a HERO-registered contractor, CA Home Solar can help homeowners navigate available financing programs. The HERO Program (administered through current DFPI-licensed PACE providers) allows energy-efficiency upgrades with zero down payment, repaid through property taxes over 5–25 year terms.
Cool Roof Coating Installation Guide
Installation follows a strict sequence. Skipping or rushing any stage — particularly cleaning and prep — is the primary cause of premature coating failure.
Prerequisites and Roof Readiness
Before touching a coating product, confirm:
- No active leaks or ponding water — coat a failing roof and you're sealing in problems
- Dry surface — no rain forecast for at least 24–48 hours (product-specific; some acrylic coatings require no rain within 12 hours)
- Application temperature — typically between 50°F and 90°F; Henry's 587 acrylic specifies 50°F and rising with a surface no hotter than 140°F
- No asphalt shingles — both leading acrylic and silicone coating manufacturers (including Henry 587 and 887) explicitly state their products are not recommended over shingles of any kind; doing so can also void the shingle manufacturer's warranty
Best substrate candidates: flat or low-slope roofs with membranes, metal roofs, concrete tiles, aged asphalt (built-up roofing), and modified bitumen surfaces.
Tools and Materials Required
- CRRC-rated elastomeric acrylic or silicone coating
- Roof primer compatible with your surface type
- Roof patching compound or roofing caulk
- Stiff-bristled broom and pressure washer
- 3/4" nap paint rollers and extension poles
- Paint tray
- Safety equipment: non-slip footwear, safety harness (pitched roofs), gloves, goggles
Airless sprayers speed up application on large flat roofs but require consistent technique to avoid thin spots. For residential DIY work, rollers give better control and more even coverage.
How to Apply Cool Roof Coating: Step-by-Step
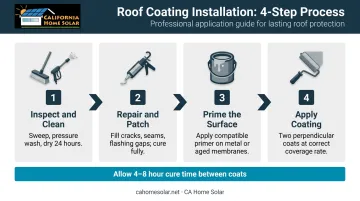
Step 1 — Inspect and Clean Walk the entire roof and mark cracks, blisters, open seams, and drainage issues. Sweep loose debris, then pressure wash to remove dirt, algae, chalk, and oil residue. Allow the surface to dry at least 24 hours before proceeding. Applying over residual moisture is one of the most common causes of adhesion failure.
Step 2 — Repair and Patch Fill all cracks, open seams, and flashing gaps with the appropriate patching compound. Give special attention to roof penetrations — vents, pipes, HVAC curbs — and perimeter edges. These high-movement areas fail first if not properly addressed. Let repairs cure fully per manufacturer specs before moving on.
Step 3 — Prime the Surface Apply a compatible primer when specified by the coating manufacturer. On metal roofs and aged or oxidized membranes especially, adhesion without primer can be significantly weaker — making this step critical rather than optional.
Step 4 — Apply the Coating Apply the first coat in even, overlapping passes working from the farthest point back toward your exit point. Use the manufacturer's recommended coverage rate — for Henry 587 acrylic, that's approximately 1 gallon per 100 sq ft on smooth surfaces per coat, with two coats required. Applying too thin reduces reflectance; applying too thick can cause cracking as the coating cures.
Allow the first coat to cure fully (typically 4–8 hours depending on temperature and humidity), then apply the second coat perpendicular to the first for even, full coverage.
Post-Application Checks and Validation
Once cured, verify:
- Visual uniformity — no streaking, thin patches, bubbling, or bare substrate showing through
- Edge and seam adhesion — lifted edges indicate either contamination or moisture at application
- Cure before foot traffic — most coatings require 24–72 hours before walking on them or exposing them to rain; mark your application date and check product specs
- Post-rain interior check — after the first significant rainfall, inspect ceilings and attic for any new moisture; blistering or peeling points back to the prep stage
If the scope of repair or the condition of your roof goes beyond straightforward coating work, California Home Solar's roofing remodeling services cover the full range — from surface prep through final application — for Southern California homeowners who'd rather not take on the project solo.
Common Installation Problems and Fixes
Most cool roof coating failures trace back to a handful of predictable mistakes. Here's what goes wrong and how to correct it.
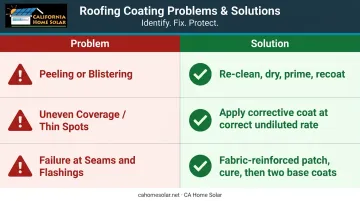
Peeling or Blistering Shortly After Application
Why: Contaminants — algae, oil, chalking, or moisture — prevented proper adhesion.
Fix: Remove failed coating in affected areas, re-clean and dry thoroughly, apply a compatible primer, and recoat to the correct thickness.
Uneven Coverage and Thin Spots
Why: Inconsistent roller pressure, or the coating was over-diluted to make it easier to spread.
Fix: Apply a corrective coat over thin areas at the correct, undiluted coverage rate. Do not thin elastomeric (rubber-based) coatings unless the manufacturer explicitly allows it — dilution directly reduces reflectance performance.
Coating Fails at Seams, Flashings, or Penetrations
Why: High-movement areas weren't adequately patched and reinforced before coating. These points flex with every temperature swing and need reinforcement, not just a fresh coat.
Fix: Cut back the failed area, apply a fabric-reinforced patch with roofing caulk at the seam, cure fully, then recoat with two coats of the base product.
Pro Tips for Effective Cool Roof Coating in SoCal
- Start work in the morning: above 95°F, the surface skins over before the coating bonds fully, causing uneven cure. Avoid application within 72 hours of expected rain. Fall and spring are the most forgiving seasons in Southern California.
- Photograph the roof before starting, record the product batch number, and keep the manufacturer's data sheet. This documentation supports both warranty claims and LADWP rebate applications.
- Seek a professional assessment before coating any roof with multiple layers, complex geometry, unclear substrate compatibility, or active water damage.
CA Home Solar has 36 years of experience evaluating Southern California roofs, recommending CRRC-rated products, and ensuring installation meets local code requirements.
Frequently Asked Questions
How long does a cool roof coating last before it needs reapplication?
Most elastomeric and silicone cool roof coatings are backed by 10–15 year warranties, with some silicone products carrying lifetime limited warranties. SoCal's intense UV exposure means regular inspection matters — plan for periodic maintenance and potential recoating as the coating thins or chalks over time.
Can cool roof coatings be applied over asphalt shingles?
No — leading coating manufacturers including Henry explicitly state their products are not recommended over shingles of any kind. Coating over shingles can trap moisture and voids the shingle manufacturer's warranty. Coatings work best on flat or low-slope roofs with membranes, metal, concrete tiles, or aged built-up roofing.
How much can a cool roof coating reduce my energy bills?
Studies show a range of roughly 10–30% reduction in peak cooling electricity use for hot-climate homes, with a Florida field study averaging 19% AC energy savings across occupied homes. Actual results depend on your roof insulation, home size, and current HVAC efficiency.
Do I need a permit to apply a cool roof coating in Los Angeles?
Permit requirements vary by municipality and project scope. LA city and county generally require permits for full re-roofing, but a coating over an intact existing roof may be treated differently — verify with LADBS or your local building department before starting.
What is the best cool roof coating for a flat roof?
Silicone coatings are the stronger choice for flat or low-slope roofs where ponding water is a risk — silicone resists standing water without degrading. Acrylic coatings (such as Henry 587) are appropriate where the roof drains properly and ponding is limited to 48 hours or less.
Can I apply cool roof coating myself, or should I hire a contractor?
A small, accessible flat roof is manageable as a DIY project if you follow the preparation steps carefully. Multi-story homes, complex geometry, or roofs with existing damage warrant professional assessment — adhesion failure or warranty issues from incorrect product selection can cost more than the savings.