When this goes wrong, the consequences are expensive. An undersized solar array that can't sustain HVAC loads during a July heat wave. Wiring incompatibilities that trip breakers repeatedly. Voided equipment warranties because refrigerant lines weren't pressure-tested before charging. These aren't edge cases — they're predictable outcomes of poor planning.
This guide covers what a solar powered HVAC system actually is, what kind of ROI Southern California homeowners can realistically expect, and how to approach installation correctly from site assessment through final commissioning.
Key Takeaways
- A solar powered HVAC system pairs solar panels with a high-efficiency electric HVAC unit to cut cooling and heating costs dramatically
- Ductless mini splits and inverter-driven heat pumps are the top solar-compatible HVAC options: fully electric, high SEER ratings, and variable-speed operation
- The federal 30% Investment Tax Credit applies to solar; qualifying heat pumps may receive an additional credit under the Inflation Reduction Act
- Southern California's high electricity rates and strong solar irradiance make this one of the best ROI regions in the country
- Poor sizing and wiring errors are the most common causes of underperformance; always use licensed professionals for installation
What Is a Solar Powered HVAC System?
At its simplest, a solar powered HVAC system pairs a photovoltaic (PV) array with your heating and cooling equipment — letting the sun offset what is typically your home's largest electricity draw. There are two ways this works in practice.
Two Main Configurations
Most residential installations use a whole-home solar PV system connected to the electrical panel, which then powers any AC-connected appliances — including the HVAC unit. The solar array feeds the panel through an inverter; the HVAC draws power from that same panel like any other circuit. This is the standard residential approach.
Solar-direct HVAC units take a different approach, using DC-powered equipment with integrated or dedicated panels. These are more common in off-grid cabins and agricultural settings, not typical residential installations in Southern California.
Why Ductless Mini Splits Dominate Solar Pairings
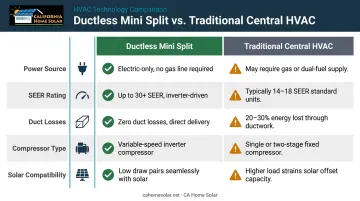
Not all HVAC systems are equally solar-friendly. The comparison breaks down clearly:
| Feature | Ductless Mini Split | Traditional Central HVAC |
|---|---|---|
| Power source | Fully electric | Often gas-dependent |
| SEER rating | 20–33+ | 14–18 typical |
| Duct losses | None | 20–30% energy loss |
| Variable-speed compressor | Yes (inverter-driven) | Usually no |
| Solar compatibility | Excellent | Moderate |
Fujitsu's AIRSTAGE mini split line reaches SEER ratings as high as 33.0; Daikin's single-zone ductless heat pumps hit SEER2 27.4. Higher efficiency means fewer solar panels needed to cover the same cooling load, cutting both upfront system cost and payback period.
The Role of Battery Storage
A solar array only generates power when the sun is shining. For 24/7 HVAC coverage, battery storage closes that gap — and in Southern California, the financial case is hard to ignore.
SCE's TOU-D 5-8 PM rate hits 74 cents/kWh during summer weekday on-peak hours. That's where battery storage pays off most:
- Without storage, evening cooling draws expensive grid power at peak rates
- With storage, excess solar from daytime hours covers those peak windows
- Under California's Net Billing Tariff (NEM 3.0), self-consumption beats grid export — making batteries a smart addition, not just a backup option
CA Home Solar installs battery storage systems, including Enphase IQ8 series solutions, as part of bundled solar and HVAC projects.
Solar Powered HVAC System ROI: Costs, Savings, and Payback
What You'll Pay Upfront
Cost estimates vary by system size and configuration, but here are realistic ranges based on current data:
- Solar PV system (6–10 kW): Using NREL's 2023 benchmark of $2.68/Wdc, a 6 kW system runs approximately $16,000 before incentives; a 10 kW system approximately $26,800. Market pricing from Lawrence Berkeley National Laboratory puts the 20th–80th percentile range at $3.20–$5.50/W, so real-world costs often land higher.
- Ductless mini split installation: HomeAdvisor puts the average at $6,500, with a typical range of $3,000–$8,000 for single-zone systems. Multi-zone systems reach $14,700+.
- Bundled solar + HVAC: Combining both installations with a single contractor like CA Home Solar reduces total project cost by eliminating duplicate mobilization, permitting fees, and design overlap.
Annual Savings: The Southern California Advantage
Heating and cooling account for roughly 43% of a home's utility bill. In California, the average residential electricity rate is 31.97 cents/kWh, with an average monthly bill of $160.86 , adding up to over $1,900 per year in electricity costs alone.
For a mid-size Southern California home where HVAC represents $800–$900 of that annual bill, a properly sized solar system can deliver $1,200–$1,800 in annual savings once the full home load is factored in. Homes on SCE's TOU plans face on-peak rates up to 74 cents/kWh during summer evenings. Pairing solar with battery storage shifts consumption away from those windows, pushing savings even higher.
Available Financial Incentives
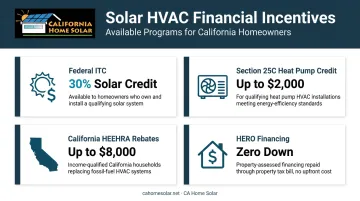
These programs can significantly reduce your net cost — factor them in before calculating payback:
- Federal 30% Investment Tax Credit (ITC): Applies to solar panel systems installed through December 31, 2025, per the IRS Residential Clean Energy Credit. Battery storage (3 kWh+ capacity) also qualifies.
- Section 25C Heat Pump Credit: Qualifying heat pumps may receive a 30% credit up to $2,000/year under the Inflation Reduction Act's energy efficiency provisions.
- California HEEHRA Rebates: The CEC's program offered up to $8,000 for income-qualified homeowners installing heat pump HVAC systems. As of early 2026, single-family rebate slots were fully reserved statewide — check TECH Clean California for current availability.
- HERO Financing: CA Home Solar is a HERO Registered Contractor, meaning eligible Southern California homeowners can finance both the solar and HVAC portions with zero down payment, approval based on home equity rather than credit score, and repayment through property taxes over 5–25 year terms. California First and YGrene are additional PACE financing options the company works with.
Simple Payback Framework
(Total system cost after incentives) ÷ (Annual utility savings) = Years to break even
Example — Southern California household:
- Combined solar + mini split installation: $28,000
- Federal ITC (30% on solar portion, ~$18,000): −$5,400
- Section 25C heat pump credit: −$2,000
- Net cost: ~$20,600
- Annual savings (conservative): $1,400/year
- Payback period: ~14.7 years
With higher SCE TOU savings or a battery system shifting peak usage, payback can compress to the 7–12 year range. Beyond that point, a solar panel system (rated at 25–35 years) and a quality mini split (15–20 years) both continue generating net savings for decades.
The financial upside extends to resale value as well. According to Lawrence Berkeley National Laboratory, solar homes command a premium of roughly $4/W, translating to approximately $15,000 added value on a typical 3–4 kW system.
Installation Guide for a Solar Powered HVAC System
Installation follows a defined sequence. Skipping or rushing any stage leads to performance failures or code violations.
Sequence: Site assessment → Equipment selection → Solar array installation → HVAC installation → System integration and commissioning
Prerequisites and Site Readiness
Confirm all of the following before any work begins:
- Roof condition and orientation: South-facing roofs are preferred per CEC solar-zone guidance. Poor roof condition is a hard stop — panels cannot go on a roof that needs replacement within 5 years.
- Available roof area: A 7–10 kW system typically requires 350–550 sq ft of usable panel space.
- Electrical panel capacity: The combined solar inverter output and HVAC dedicated circuit may require a panel upgrade. An electrician must perform a load calculation against current nameplate loads (the rated capacity of existing circuits) before specifying the panel.
- Utility interconnection rules: Under California's Net Billing Tariff (effective for applications after April 15, 2023), SCE customers are placed on TOU-D-PRIME. Factor this into the savings model.
- Permits: Solar permits, electrical permits, and HVAC/mechanical permits are each required. CA Home Solar handles permitting as part of its project scope — unpermitted work voids warranties and blocks utility interconnection.
Step-by-Step Installation
Step 1 — Solar Array Installation Mount racking to the roof with proper flashing and waterproofing. Secure panels, run conduit from roof to electrical panel, and install the solar inverter. CA Home Solar works with string inverters (Fronius, SMA Sunny Boy), microinverters (Enphase IQ8), and power optimizers (SolarEdge) depending on the site.
Step 2 — Electrical Panel Integration Install a sub-panel or upgrade the main panel if the load calculation requires it. Connect inverter output to the panel and install a dedicated circuit breaker for the HVAC unit. All wiring must meet NEC Article 690 (PV systems) and Article 705 (parallel power sources).
Step 3 — HVAC Unit Installation With the electrical panel ready, mount the indoor air handler(s) and outdoor compressor per manufacturer specifications. For mini splits, drill a 3-inch pass-through for the refrigerant line set, condensate drain, and electrical cable. Connect refrigerant lines and pressure-test for leaks before charging — this step is EPA-regulated and cannot be skipped. Refrigerant handling requires Section 608 certification.
Step 4 — System Integration and Commissioning Power on the solar system and verify inverter output. Connect the HVAC unit to its dedicated circuit and run the system through both heating and cooling modes. Monitor amperage draw against solar array output to confirm the array is correctly sized for actual HVAC load under expected summer conditions.

Post-Installation Checks and Validation
Confirm success with three checks:
- Inspect all mounting hardware, refrigerant line insulation, and electrical connections visually
- Compare inverter output against HVAC amperage draw to verify the array is meeting demand
- Run a temperature performance test — confirm the indoor unit reaches setpoint within a normal timeframe
Don't skip commissioning. Refrigerant undercharge, poor airflow from incorrect air handler placement, and undersized arrays only reveal themselves under peak Southern California summer loads, when fixing them is most disruptive and costly.
Once commissioning is confirmed, retain all post-installation documentation: inverter commissioning reports, refrigerant charge records, panel layout diagrams, and warranty registrations. These records matter for maintenance scheduling, insurance claims, and resale disclosure.
Common Installation Problems and Fixes
Even well-managed installations run into the same handful of problems. Here's what causes them and how to fix each one.
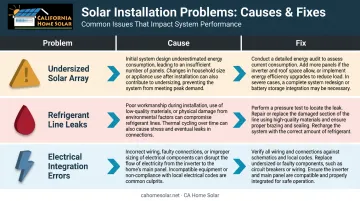
Undersized Solar Array
- Problem: HVAC draws more power than the array produces during peak cooling hours, causing heavy grid reliance
- Cause: Array sized on average home load rather than HVAC-specific peak demand — common when solar and HVAC are designed by separate contractors who don't coordinate
- Fix: Run a Manual J load calculation before sizing the solar system; add panels or a battery backup to cover peak demand gaps
Refrigerant Line Leaks
- Problem: System fails to cool properly or loses efficiency shortly after installation
- Cause: Lines not pressure-tested before charging, or connections improperly flared
- Fix: A licensed HVAC technician must perform a vacuum test and pressure test before charging. Leaks require professional diagnosis — refrigerant handling is EPA-regulated under Section 608
Electrical Integration Errors
- Problem: Breakers trip frequently, or the solar inverter fails to reliably power the HVAC unit
- Cause: Incorrect breaker sizing, shared circuits, or inverter output not matched to the HVAC unit's startup amperage (which significantly exceeds running amperage)
- Fix: Verify circuit sizing against HVAC nameplate data — the HVAC circuit must be dedicated and correctly rated. If breakers continue tripping after initial setup, bring in a licensed electrician
Pro Tips for Installing a Solar Powered HVAC System
Schedule Both Installations Together
Running solar and HVAC as a single project with one contractor reduces labor costs, eliminates duplicate permitting fees, and ensures the system is designed as a whole rather than two separate pieces bolted together. CA Home Solar handles both trades directly — no subcontractor coordination required — for Southern California homeowners.
Always Pull Permits
In California, unpermitted solar or HVAC work voids warranties, prevents utility interconnection under NEM 3.0, and creates disclosure liability at resale. Confirm your contractor handles all permits — solar, electrical, and mechanical — before signing a contract.
Document Everything After Installation
Keep records of the inverter commissioning report, refrigerant charge levels, panel layout diagram, and all warranty registrations. These documents matter for future maintenance, insurance claims, and any resale transaction.
Frequently Asked Questions
How many solar panels does it take to run an AC unit?
The number depends on the unit's wattage and local peak sun hours. A 3-ton central AC typically requires around 7–10 standard 350–400W panels during Southern California's peak sun hours, while a high-efficiency ductless mini split covering the same space may need fewer panels due to its lower power draw.
What type of HVAC system works best with solar panels?
Ductless mini splits and inverter-driven heat pumps are the best match. They run entirely on electricity, carry SEER ratings of 20–33+, and their variable-speed compressors pair naturally with solar's variable output. Traditional gas-dependent central systems require a hybrid approach and can't take full advantage of solar generation.
What is the typical payback period for a solar powered HVAC system?
Payback typically ranges from 7–15 years after applying the federal 30% tax credit and accounting for utility savings. Southern California homeowners often land toward the shorter end of that range due to above-average electricity rates and strong solar irradiance across the region.
Can I add solar panels to power my existing HVAC system?
Yes, an existing electric HVAC system can be connected to a newly installed solar array. The key is sizing the array to the unit's actual load, so a load calculation before system design is essential.
Do solar-powered HVAC systems qualify for federal tax credits?
The solar panel portion qualifies for the 30% federal Investment Tax Credit. Qualifying heat pumps may also receive a separate credit under the Inflation Reduction Act's Section 25C provisions, capped at $2,000 per year — confirm eligibility with a tax professional based on your specific installation.