The good news? Every problem in that complaint pile has an identifiable cause. Old roofs, poor panel placement, electrical shortcuts, skipped permits — each one is avoidable when you know what to look for before signing a contract.
This article walks Southern California homeowners through the most common solar installation mistakes, what happens when they go unchecked, and the concrete steps to prevent them from the start.
Key Takeaways
- Solar installed on aging roofs often requires costly panel removal and reinstallation before the system's 25-year life ends
- Shading from a single tree or chimney can reduce entire string output — NREL research shows median shading losses of 8.3% across real-world systems
- Unpermitted solar in LA County triggers investigation fees starting at $487.88 — plus potential loss of net metering benefits
- Under California's NEM 3.0 (Net Billing Tariff), correct system sizing directly determines how much you save on your bill
- A licensed installer with local California experience catches most of these problems before installation begins
Common Solar Panel Installation Problems
Installation problems rarely happen by accident. They come from predictable mistakes made during planning, assessment, or execution — and Southern California homeowners are particularly exposed given the region's high solar adoption rate and wide variety of roof types, from flat TPO in Long Beach to clay tile in Pasadena.
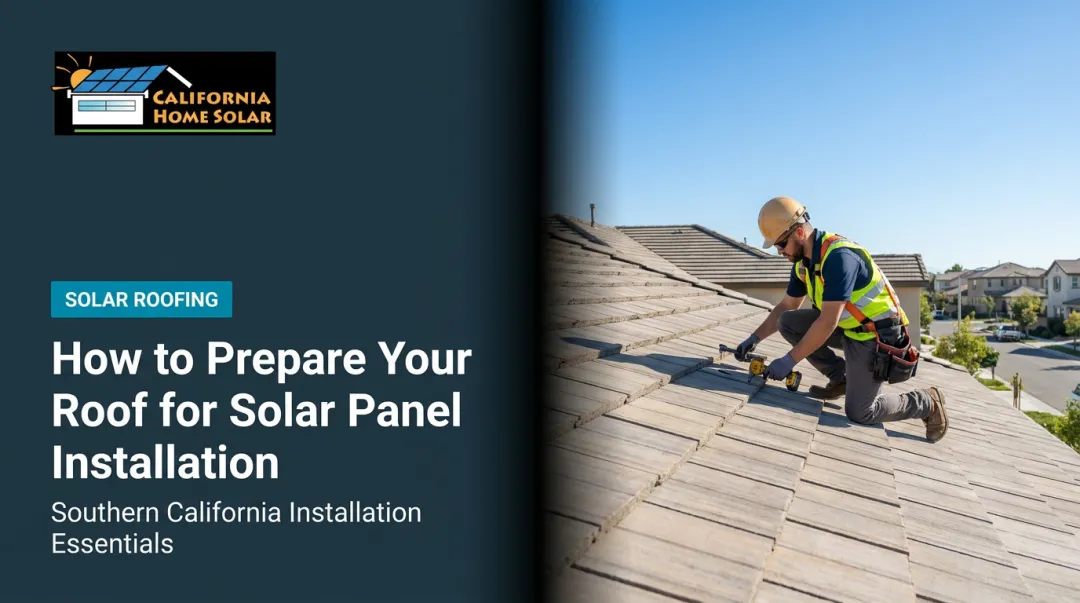
Mistake #1: Installing Solar on an Old or Compromised Roof
Solar panels are designed to last 25+ years. Most asphalt shingle roofs last 20–30 years. If your roof has fewer than 10–15 years of useful life remaining, you'll almost certainly need to remove and reinstall your solar system mid-life to replace it — an expensive inconvenience that's entirely avoidable with upfront planning.
Panel removal and reinstallation typically starts around $5,000 for a residential system, with some contractors pricing work at $275–$300 per panel. On a 20-panel system, that's $5,500–$6,000 on top of whatever the roof replacement costs.
The installation process itself can also damage roofs when done carelessly. Excessive foot traffic, heavy equipment left on shingles, and improper mounting hardware can accelerate wear — a real concern on California roofs that already face intense UV exposure.
California's Solar Permitting Guidebook requires flush-mounted arrays to stay within a load of 4 psf and a module-to-roof gap of 2–10 inches. Installations that ignore these specs put both the roof and the permit approval at risk.
What installers sometimes miss: rushing to close a sale without assessing roof age or condition. Always ask for a written roof assessment before any solar work begins.
Mistake #2: Poor Panel Placement and Shading Oversights
Where panels go matters as much as whether they're installed at all. Incorrect azimuth angle, inadequate tilt, or failure to account for nearby shading sources — trees, chimneys, neighboring structures, even rooftop HVAC equipment — leads to chronic underperformance.
Here's why shading is particularly damaging in series-string systems: shading more than 40% of a single cell can eliminate the output of an entire 18-cell string, according to NREL research. One partially shaded panel drags down every panel connected to it.
Across real-world installations, NREL's partial-shading assessment found:
- 8.3% median energy loss from shading-induced mismatch
- 13% median loss in conventional bypass diode configurations

That's a meaningful chunk of the production your system was designed to deliver.
The root cause is usually a skipped or inadequate site assessment. Visual estimates miss seasonal shading patterns — a neighbor's oak tree that casts no shadow in July may shade your south-facing array every December afternoon.
Professional shade analysis tools like the Solmetric SunEye 360 or NREL's PVWatts modeling account for your home's specific orientation, local tree canopy, and the full annual sun path. That step takes a few hours upfront and saves years of underperformance.
Mistake #3: Electrical Wiring Errors and Inverter Misconfiguration
Electrical mistakes in solar installations are dangerous precisely because they're invisible until something fails.
Using indoor-rated conduit on a rooftop, leaving wires unsecured, or violating NEC Article 690 (which governs PV arrays, inverters, and conductors) creates fire risk, system failures, and guaranteed inspection failures.
California follows the 2025 Title 24, Part 3 California Electrical Code, and all grid-connected systems must comply with CPUC Rule 21 for interconnection. An installer who cuts corners on wiring compliance isn't just risking a failed inspection — they're creating a liability that sits on your roof for 25 years.
Inverter misconfiguration is a separate but equally costly problem. When inverter capacity is mismatched to panel output, you get:
- Clipping — excess DC energy that can't be converted, reducing yield
- Overheating — from inverters running near capacity limits continuously
- Premature inverter failure — replacing a string inverter costs significantly more when it's mounted on your roof versus a wall unit
NREL's 2024 research notes that normal clipping from deliberate DC/AC oversizing is typically less than 2% of annual yield — but misconfigured systems perform far outside that range. The problem is common when installers copy-paste system designs across different homes without customizing for each property's specific layout, roof angle, and shading profile.
Mistake #4: Skipping Permits, Code Compliance, and Proper System Sizing
California law requires a building permit, electrical permit, and utility interconnection approval before any residential solar system can legally operate. In LA County, LADWP systems must pass both an LADBS permit inspection and a LADWP Solar Inspection. Systems 10 kW or larger also require an additional ESR inspection.
What happens if you skip permits:
- LA County investigation fees start at $487.88 (minimum) for work done without a permit
- Utility interconnection approval can be delayed or denied
- Your 30% federal residential clean energy tax credit (IRS Form 5695) depends on a properly permitted, operational system
- You risk failing a home sale inspection if unpermitted work is discovered
Utilities must respond to completed interconnection applications within 30 working days under California's Solar Permitting Guidebook — but only if your application is complete and compliant. Permit skipping turns a 30-day process into an open-ended problem.
System sizing is equally critical under NEM 3.0. Since April 15, 2023, new interconnection applications fall under California's Net Billing Tariff, where exported energy is credited at grid-value rates — typically lower than the retail rate. An oversized system that pushes excess power to the grid recaptures less value than under the old NEM 2.0 structure.
An undersized system, meanwhile, still leaves you paying retail rates for grid power you could have offset. Getting sizing right from the start determines whether the investment actually pays off.
What Happens When Installation Problems Go Unchecked
Small problems compound. A roof penetration with inadequate flashing may seem harmless in year one. After a few Southern California winter rain events, that same penetration can cause mold growth, structural water damage, and a voided roofing warranty.
The financial impact of remediation is substantial:
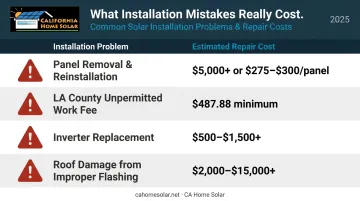
| Problem | Estimated Cost Range |
|---|---|
| Solar panel removal & reinstallation | $5,000+ or $275–$300/panel |
| LA County unpermitted work fee | $487.88 minimum |
| Inverter replacement (roof-mounted) | $500–$1,500+, depending on roof access requirements |
| Roof damage from improper flashing | $2,000–$15,000+, depending on extent of water damage |
Beyond cost, there are real safety concerns. Electrical faults from poor wiring and improperly secured panels in high-wind areas (like the Antelope Valley or San Fernando Valley) can create structural and fire hazards. These aren't hypothetical: CSLB maintains an active solar complaint process specifically because post-installation problems are common.
Warning Signs You May Have an Installation Problem
Monitor your system closely in the first year. Early detection keeps small issues from becoming expensive repairs.
- Energy bills stay high or your monitoring app shows output consistently below your original estimate
- Ceiling or wall stains appear near roof penetrations, pointing to improper flashing around mounting brackets
- Inverter error codes or unexpected shutdowns signal wiring or configuration issues that need professional inspection
How to Prevent Solar Panel Installation Problems
Prevention is a decision made before installation begins. The contractor you choose, the assessments you require, and the proposal you review determine whether problems happen at all.
Prevention Measure #1: Require a Thorough Roof Inspection
Insist that your solar contractor — or an independent licensed roofer — assess your roof's age, material condition, and structural integrity before any solar work begins. Get the assessment in writing.
California Home Solar offers both roofing remodeling and solar installation services, which means they can evaluate roof condition and address inadequacies before panels go up, avoiding the costly mid-life removal scenario entirely. A proper evaluation also confirms that mounting hardware is compatible with your specific roof material, whether that's asphalt shingle, clay tile, or flat TPO.
Prevention Measure #2: Demand a Professional Shade Analysis
Require a site-specific shade analysis that accounts for your home's orientation, local tree canopy, and seasonal sun path — not just a visual estimate taken on a clear July afternoon.
Tools like the Solmetric SunEye 360 and NREL's PVWatts model your specific conditions across the full calendar year. This step protects your energy output projections and your return on investment over the system's 25-year life. Any installer who won't commit to a documented shade analysis during the proposal phase is cutting a corner that will cost you.
Prevention Measure #3: Verify Permits, Licensing, and Code Compliance
Confirm your installer will pull all required permits, handle AHJ coordination, and obtain utility interconnection approval before installation begins. Ask to see proof of their contractor license and liability insurance.
In California, verify the installer holds a valid:
- C-46 Solar Contractor license — covers solar installation, modification, and maintenance
- C-10 Electrical Contractor license — covers electrical work including solar systems that generate electricity
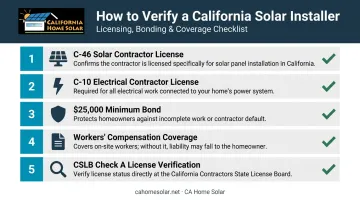
California contractor bonds are required at $25,000 minimum (effective January 1, 2023). Use CSLB's Check A License tool to verify license status, bond, and workers' compensation coverage before signing anything.
California Home Solar handles permitting as a standard part of their installation process, includingCalifornia Home Solar handles permitting as a standard part of every installation. Their process covers site survey, design, permitting, rebate processing, installation, final inspection, and permission to operate, with a dedicated project manager assigned to each job.
Prevention Measure #4: Partner with an Experienced Local Installer
Local experience isn't just a marketing phrase. An installer with a real track record in your specific county understands:
- Your utility's interconnection requirements (LADWP vs. SCE have different processes)
- Regional wind and weather load requirements under California's Design Wind Speed standards
- Your local AHJ's permitting nuances — Los Angeles County operates differently from city jurisdictions within it
California Home Solar has been recognized as a Top 500 Solar Contractor by Solar Power World in 2015, 2016, 2018, 2021, 2023, and 2025 — nearly a decade of consistent third-party recognition. With 36 years of experience in Southern California home improvement, that track record reflects the kind of institutional knowledge that prevents the problems covered in this article.
Tips for Long-Term Solar System Health
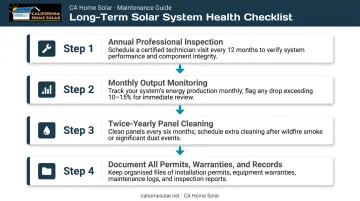
After installation, these practices keep output high and catch problems before repair costs grow:
- Schedule a professional inspection annually — have a licensed technician check wiring connections, mounting hardware torque, flashing seals, and inverter performance data
- Monitor output consistently — compare monthly production to your original estimate; an unexplained dip of more than 10–15% warrants a call to your installer
- Clean panels at least twice a year — Los Angeles area studies report approximately 5% annual energy loss from soiling (dust, wildfire ash, bird droppings); California Home Solar recommends twice-yearly cleaning as a baseline, with additional cleanings after major dust events or wildfire activity nearby
- Document everything — keep copies of permits, your interconnection agreement, warranties, and installation records in one accessible place
These habits matter more than most homeowners realize. NREL's fleet degradation data shows median panel degradation of 0.5% per year under normal conditions and 0.6% per year in hot, dry climates like Southern California. That's a manageable number — but only if your system was installed correctly and maintained consistently from the start.
Conclusion
Every problem covered in this article — old roofs, shading blind spots, wiring shortcuts, skipped permits, unqualified contractors — has a clear cause and a clear prevention. None of them require luck to avoid. They require preparation and a contractor who treats your home like a 25-year commitment — because that's exactly what solar is.
Southern California homeowners who treat solar as a 25-year investment (because it is) make different decisions than those focused only on the upfront quote. They ask harder questions, require written assessments, and choose installers with verifiable local track records.
If you're planning a solar installation anywhere in Southern California — from the Los Angeles area to Orange County — reach out to California Home Solar for a free consultation before signing any agreement. With 36 years in the region and consistent Top 500 Solar Contractor recognition, they have the local track record and experience to back every installation they complete.
Frequently Asked Questions
What are the most common signs of a bad solar panel installation?
Look for unexpectedly high electricity bills despite having solar, frequent inverter error codes or unexpected shutdowns, and new water stains on interior ceilings or walls near where roof mounting brackets were installed. Any one of these warrants a professional inspection.
Can a poorly installed solar system damage my roof?
Yes. Improper flashing around mounting brackets, excessive foot traffic during installation, or drilling into deteriorated roofing material can cause leaks and structural water damage. This is one of the most common complaints filed with California's Contractors State License Board against solar installers.
How do I know if my solar installer is qualified in California?
Verify the installer holds a California C-10 Electrical Contractor or C-46 Solar Contractor license, is bonded for at least $25,000, and carries workers' compensation insurance. Use the CSLB Check A License tool and ask for references from completed installations in your specific city or county.
What permits are required for solar installation in California?
California requires a building permit from the local jurisdiction, an electrical permit, and utility interconnection approval before the system can operate. Your installer should pull all permits directly with the local AHJ — ask for permit numbers before physical work begins.
What happens if I skip the permit process for solar installation in California?
In LA County, work done without a required permit triggers an investigation fee starting at $487.88. Beyond the fine, you risk losing net metering eligibility, complications when selling your home, and a potential requirement to remove and reinstall the entire system at your expense.
How long does a proper residential solar installation take in Southern California?
Physical installation typically takes 1–3 days. The full process — design, permitting, and utility interconnection approval — commonly runs 4–12 weeks; California's Solar Permitting Guidebook requires utilities to respond to completed interconnection applications within 30 working days.