Solar is now a long-term infrastructure investment that demands careful upfront planning. A system thrown together without proper design can leave you drawing expensive grid power despite a full roof of panels, or locked into export credits that barely cover the cost of buying a coffee.
This guide covers the full lifecycle: designing a system that fits your actual energy needs, understanding the components that go into it, navigating the installation and permitting process, connecting to the grid under NEM 3.0, and maintaining performance over 25–30 years.
Key Takeaways
- Start with 12 months of utility bills and a proper site assessment — guessing at system size costs money in both directions
- NEM 3.0 changed the economics: self-consumption beats exporting, which makes battery storage a core design consideration, not an add-on
- Professional installation is mandatory for permits, warranties, and utility interconnection — unpermitted work voids manufacturer warranties and blocks utility approval
- Routine maintenance (cleaning, monitoring, annual inspection) protects a significant financial investment over decades
- California's median residential system was 6.6 kW in 2023; NEM 3.0-era installs now average 5.8 kW, typically paired with a battery
Designing Your Solar PV System: The Foundation That Determines Everything
System design is where financial outcomes are won or lost. An undersized system leaves you dependent on the grid during peak rate hours. An oversized one, under NEM 3.0, generates export credits worth far less than what you paid for the extra capacity.
Start with data, not guesswork.
Calculating Your Energy Needs
Pull 12 months of utility bills and add up your total annual kWh consumption. One month — especially summer or winter — is not representative. You need the full year to account for seasonal swings, whether that's air conditioning load in the San Fernando Valley or electric heating on the coast.
From that annual baseline, calculate your required system size using the NREL PVWatts Calculator, which estimates solar production based on your specific location, tilt, and system configuration. NREL's default system loss factor is 14.08%, accounting for wiring, inverter, and soiling losses. Build that into your calculation — nameplate capacity is not the same as actual production.
If you're planning to electrify further, factor those future loads in now. Common additions to account for:
- EV charger (typically 1,200–2,400 kWh/year depending on mileage)
- Gas-to-electric appliance conversions (range, water heater, dryer)
- Pool pump on a dedicated solar circuit
Undersizing at installation and returning later to add panels costs significantly more than sizing correctly upfront.
Site Assessment: Roof, Shading, and Location
A proper site assessment covers:
- Usable roof area — south-facing planes are optimal; the actual usable square footage determines maximum array size
- Shading obstacles — trees, chimneys, neighboring structures, and HVAC equipment all create shading that reduces output, sometimes dramatically
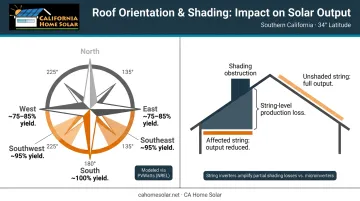
- Local solar resource — coastal communities like Hermosa Beach and Santa Monica deal with marine layer stratocumulus that reduces effective sun hours compared to inland areas like the San Gabriel Valley or Orange County's inland corridor
For shading analysis, PVWatts lets you model output for specific coordinates, tilt angles, and azimuth orientations. A partially shaded string inverter system can lose output across all panels, not just the shaded ones — so shading analysis is non-negotiable before finalizing equipment choices.
Tilt, Orientation, and Optimization
For the Los Angeles and Orange County area (approximately 34° latitude), a south-facing array tilted near your latitude delivers the best annual yield. Southeast and southwest-facing roofs can still perform well. The production difference depends on your specific azimuth and shading profile, which is why PVWatts modeling with actual roof data beats generic rules of thumb.
That shading profile feeds directly into your orientation decision. A roof that looks ideal on paper can underperform if an afternoon shadow clips even one string of panels. Site-specific modeling resolves that before any equipment is committed.
CA Home Solar's design process includes energy modeling tailored to Southern California conditions, accounting for local solar data, shading, and NEM 3.0 export economics before any equipment is ordered.
Key Components Every Homeowner Should Understand
You don't need an engineering degree to evaluate a solar proposal. But understanding what each component does — and what separates a good spec from a cheap one — helps you ask better questions and spot gaps in contractor bids.
Solar Panels (PV Modules)
Panels are rated in watts (W). Higher-wattage panels produce more power per square foot, which matters when roof space is limited — a common constraint in older LA neighborhoods with smaller or complex roof layouts.
Key points to check in any proposal:
- Monocrystalline vs. polycrystalline — mono panels offer higher efficiency and are the current market standard for residential installations
- Thermal derating — panel output drops at high temperatures, a real consideration for inland valleys like the San Gabriel Valley where summer temps regularly exceed 95°F
- Performance warranty — quality panels carry a 25-year linear performance guarantee; verify this is in writing before signing
- Brand tier — tier-1 manufacturers back their products with financial guarantees; avoid unknown brands regardless of price
CA Home Solar works with tier-1 manufacturers including Canadian Solar, Enphase, SolarEdge, Fronius, and SMA — giving homeowners options based on their roof layout, shading conditions, and budget.
Inverters: String vs. Microinverters
| Inverter Type | How It Works | Best For |
|---|---|---|
| String inverter | One central unit for the whole array | Simple, unshaded south-facing roofs |
| Microinverter | One unit per panel | Complex roofs, partial shading |
| Hybrid/smart inverter | String + battery integration | NEM 3.0 self-consumption strategy |
The shading vulnerability of string inverters is the critical factor in LA-area homes. One shaded panel in a string drags down the output of every panel in that string. Microinverters eliminate this problem by allowing each panel to operate independently.
Under NEM 3.0, hybrid inverters capable of integrating battery storage have become the default recommendation for most California residential systems — storing excess generation rather than exporting it at low avoided-cost rates.
Racking and Battery Storage
Racking does two jobs: hold the array in place for 20+ years and protect your roof from water intrusion. CA Home Solar uses Rooftrac Res and Unirac racking systems — both designed for Southern California's wind and seismic load requirements. The most common point of failure in amateur installations is improper flashing at roof penetrations, where leaks can appear years after the job is done.
Battery storage under NEM 3.0:
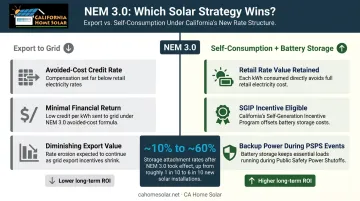
Since April 2023, storage attachment rates in California jumped from roughly 10% under NEM to approximately 60% under the new Net Billing Tariff, according to LBNL research. Storing your solar generation and using it during evening peak hours is worth far more than exporting it at avoided-cost rates. Battery storage also provides backup power during PSPS grid shutoff events — a recurring concern across LA County. California's SGIP (Self-Generation Incentive Program) can offset upfront battery costs for eligible homeowners, making the pairing more accessible.
Solar PV Installation: The Step-by-Step Process
Installation is not a DIY project for the vast majority of California homeowners. It requires:
- Licensed contractors and structural engineering coordination
- Electrical code compliance and local building permits
- A formal utility interconnection application
The realistic timeline from signed contract to Permission to Operate (PTO) is 2–4 months.
Permitting and Pre-Installation
Before any work begins, your installer files for a building permit and electrical permit with the local jurisdiction. Every city in LA County has its own requirements — some require a separate fire department review, others enforce specific panel setback rules from roof ridges and edges.
California's SB 379 created a statewide residential solar permit reporting program and pushed jurisdictions toward online automated permitting, but processing times still vary significantly by city.
Working with a contractor who knows these local nuances — and has filed permits in your specific municipality before — can save weeks of back-and-forth.
CA Home Solar manages the full permitting process — architectural, electrical, and structural drawings included — and has been recognized by Solar Power World as a Top 500 Solar Contractor across multiple years.
Mounting, Wiring, and Commissioning
The physical installation follows this sequence:
- Roof penetrations and flashing — lag bolts are set into structural rafters and sealed with flashing; this step determines long-term roof integrity
- Racking rails — attached to the lag mounts, creating the structural framework for the array
- Panel installation — panels are clamped onto the racking; microinverters or optimizers are attached at this stage
- Electrical wiring — DC wiring from panels runs to the inverter; AC wiring connects the inverter to the main electrical panel with required disconnects
- System commissioning — the installer verifies open-circuit voltage, short-circuit current, and proper inverter startup before calling for utility inspection
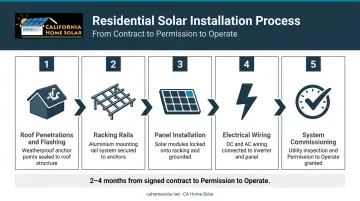
Utility interconnection is governed by CPUC Rule 21. Once the utility completes its review and inspection, it issues a Permission to Operate (PTO) — that's the moment the system legally goes live. SCE confirms that PTO is issued after a complete application review; the process typically takes 1–4 weeks after the final inspection.
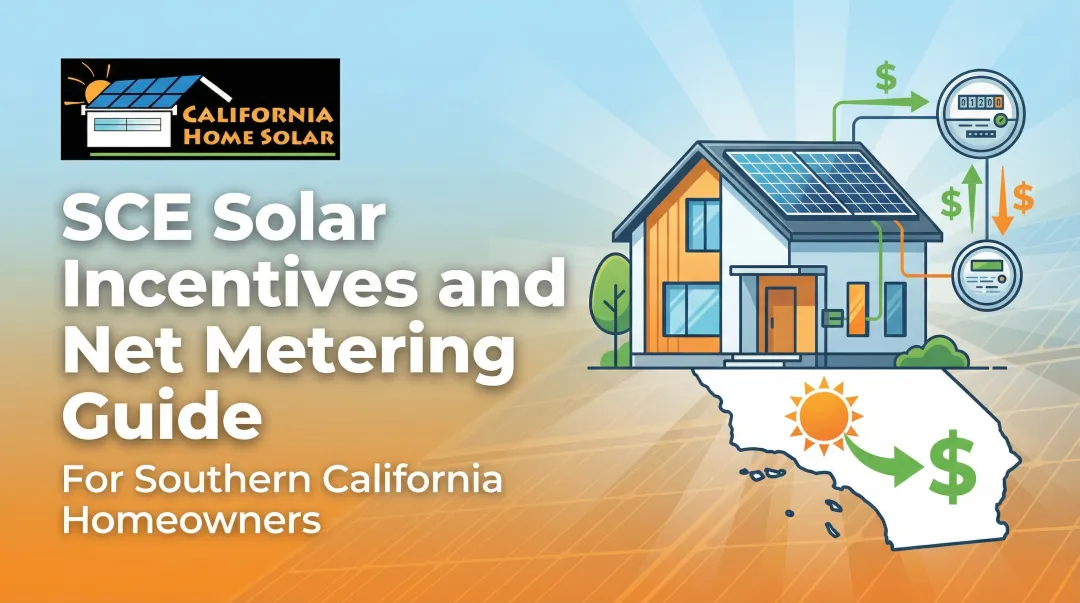
California Net Metering Under NEM 3.0: What Changed and Why It Matters
NEM 3.0 — officially the Net Billing Tariff (NBT) — took effect for new applications on April 15, 2023, for California's investor-owned utilities: PG&E, SCE, and SDG&E. The core change: excess solar exported to the grid now earns an avoided-cost credit rather than the retail rate credit that made oversizing financially attractive under the old policy.
What this means for system design:
- Exporting large amounts of solar generation earns far less than consuming it directly
- Self-consumption — using your solar energy as it's generated, or storing it in a battery for evening use — is now the financially optimal strategy
- LBNL data shows NBT-era residential systems averaged 5.8 kW, 9% smaller than the 6.4 kW median under NEM, sized for self-consumption rather than maximum export
- Monthly solar quote requests dropped to roughly 60% of historical NEM-era levels after the transition, but the buyers who are moving forward are making more deliberate, storage-paired decisions
If you're getting quotes and a contractor is sizing your system the same way they would have in 2022 — maximizing export without accounting for battery storage — ask them directly how they've adjusted for NEM 3.0.
The economics of NEM 3.0 also shift how homeowners approach financing. Because pairing solar with battery storage now delivers the strongest returns, upfront costs are higher — making financing options worth understanding before you commit. California Home Solar is a HERO Registered Contractor, so qualifying Southern California homeowners can finance solar, battery storage, HVAC, and window upgrades through the PACE-based HERO program: zero down payment, no application fees, and 5–25 year terms billed through property taxes.
Maintaining Your Solar PV System for Peak Long-Term Performance
A well-maintained system can deliver reliable power for 25–30 years. A neglected one loses output quietly — often 10–20% below rated capacity before homeowners notice anything is wrong.
Routine Cleaning and Monitoring
California's dry climate means dust accumulation is a real performance factor. UC San Diego research found average soiling losses of 0.051% per day across California PV sites, with 26% of sites losing more than 0.1% per day — enough to measurably affect annual yield. Sites with low tilt angles accumulate soiling faster.
CA Home Solar recommends cleaning panels at least twice per year, with higher frequency for properties in dusty inland areas or locations with heavy bird activity. Their professional cleaning service uses soft brushes, biodegradable solutions, and deionized water — streak-free, and safe for panel surfaces and warranties.
What to monitor between cleanings:
- Use your inverter's app (Enphase, SolarEdge, and most modern inverters include monitoring dashboards) to track daily and monthly production
- A sudden 15–20% production drop often signals a failed panel, loose DC connection, or inverter fault
- Compare production against the same period in prior years to catch gradual degradation — NREL's analytical review found a median panel degradation rate of 0.5% per year
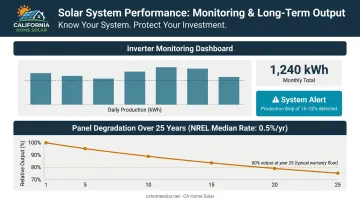
CA Home Solar provides 24/7 system monitoring for installed systems at no additional charge. Consistent monitoring catches most problems early — but some issues require a licensed technician to diagnose and resolve safely.
When to Call a Professional
Some maintenance tasks require a licensed technician:
- Inverter error codes or fault alerts, including arc fault and ground fault conditions — these are electrical safety issues, not DIY troubleshooting
- Significant production drops that weather or shading don't explain
- Physical panel damage from hail, debris, or falling branches
- Any work inside the combiner box or main electrical panel
Inverters are the component most likely to need replacement during a system's lifetime. CA Home Solar services multiple inverter brands — Enphase, SolarEdge, Fronius, and SMA — and handles warranty coordination from diagnosis through replacement.
Frequently Asked Questions
How many solar panels does a typical Southern California home need?
The number depends on your annual kWh consumption, the panel's wattage rating, and your site's solar resource. California's median residential system in 2023 was 6.6 kW — roughly 15–20 panels at 400W each — but your number could be higher or lower. Only a proper energy audit and site-specific PVWatts model gives you a reliable answer.
How long does the solar installation process take in California?
Budget 2–4 months from signed contract to Permission to Operate. The timeline breaks down roughly as follows:
- Design and contract: 1–2 weeks
- Permit approval: 2–8 weeks (varies by city)
- Physical installation: 1–3 days on-site
- Utility review and PTO: 1–4 weeks after final inspection
What is the lifespan of a residential solar PV system?
Quality solar panels are built to produce electricity for 25–30+ years, with performance warranties covering that timeframe. Inverters have shorter service lives and will likely need replacement at least once during that span — factor that into your long-term cost planning.
How often do solar panels need to be cleaned or serviced?
CA Home Solar recommends a minimum of two professional cleanings per year, with higher frequency for properties in dusty inland areas or those with significant bird activity. Continuous monitoring via your inverter app, combined with an annual professional inspection, keeps most systems performing well with minimal hands-on intervention.
Can I install solar panels myself in California?
California law allows licensed owner-builders to install on their own property. In practice, the permitting requirements, NEC electrical code compliance, structural load calculations, and utility interconnection process make professional installation the practical and legally sound choice for most homeowners.
How does battery storage change the economics under NEM 3.0?
NEM 3.0 significantly reduced what you earn for exporting solar electricity to the grid. Battery storage lets you use your own generated power at night instead of selling it at low rates — making self-consumption the financially smarter strategy and improving your system's overall payback period.